MyMusix 42-420 User Manual
Mp3 player, With fm radio and speaker
42-420/GX400
4GB
MP3 Player
with FM Radio and Speaker
What’s Included
MP3 Player
Mini USB 2.0 cable
Earphones
User’s guide
Rhapsody™ Software Installation CD
System Requirements
• Windows
®
2000, Windows XP (SP2) or Windows
Vista
®
• Pentium II 200MHz
• 64MB RAM
• 500MB memory space
• CD-Rom drive
• USB 1.1 or USB 2.0
Features
• 4GB flash memory
• Built-in speaker and rechargable battery
Built-in speaker and rechargable battery
• FM radio
FM radio
• 2 color display
2 color display
• Five preset equalizer settings
• Supports MP3, WMA, ID3 tag, DRM9 and
DRM10
• Can be used as a USB flash drive to transfer and
store any type of files.
Specifications
Built-in flash memory supported .................up to 4GB
Supported file formats ......... MP3 (64kbps~320kbps)
.......................................WMA (64kbps~192kbps)
FM radio frequency ........................ 87.5~108.0MHz
Signal to noise ratio ....................................> 85 dB
Power ....................... Built-in Lithium polymer battery
Playback time .................................. up to 10 hours
Operating temperature ............32 to 104ºF (0 to 40ºC)
Language support ......................English and Spanish
Dimensions (H×W×D) ..................... 1.4 × 2.1 × .4 in
............................................... (36 × 53 × 11mm)
Weight .......................................... .78 oz. (22.2g)
Specifications are subject to change and improvement
without notice. Actual product may vary from the images
found herein.
Thank you for purchasing your Gigaware 4GB MP3 Player with FM
Radio and Speaker from RadioShack. Please read this user’s guide
before installing, setting up, or using your new product.
www.radioshack.com
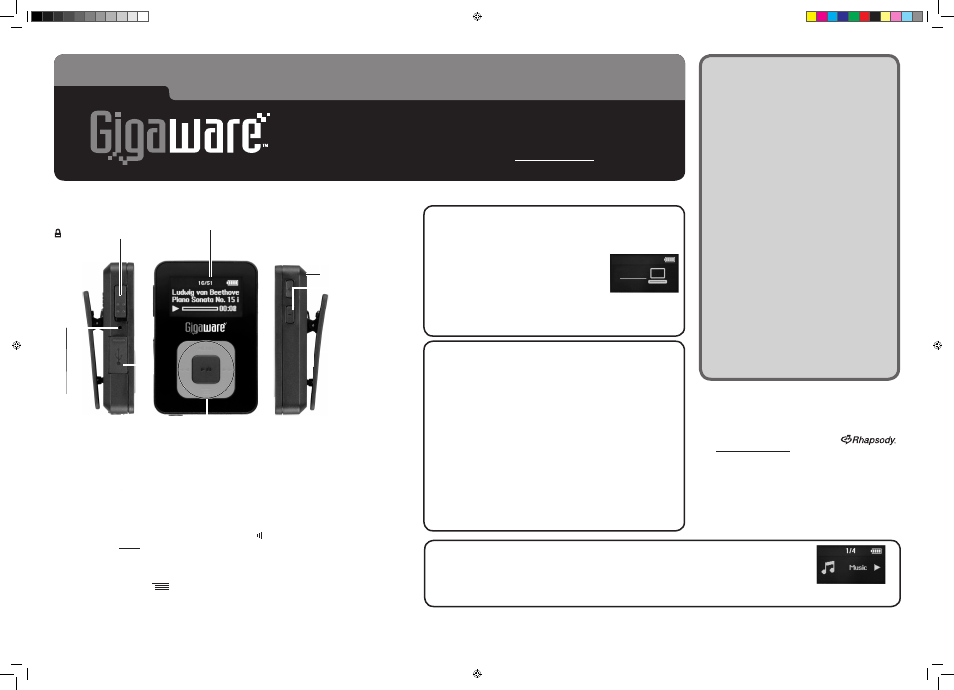
§
Press to turn on; hold down to turn off.
Press during playback to pause a track or mute sound in radio mode.
/
During playback: Skip to another track; hold down to search within a
track.
Press
ress
to return to the beginning of the current track (wait 5
seconds after current track begins).
For menu navigation: Toggle or confirm options; return to previous
menu or screen.
In radio mode: Tune frequencies. Hold down to start auto scan or
select a preset station when appears.
MENU
Hold down to return to the menu during music or radio playback
down to return to the menu during music or radio playback
display. Press once or more to scroll through main function menus:
Music/Now playing/Setting/Radio.
Scroll through function menus: Music/Radio/Setting/Now playing.
Press during playback to enter Music Options or Radio Options.
Playlist: Press and hold to add a song to Playlist during track
Press and hold to add a song to Playlist during track
playback, or enter Playlist view from main Music display.
+/–
Increase/
decrease the
volume.
Clip
Clip your player to
your pocket, belt,
etc. for handsfree
music on the go.
Integrated Speaker
Disconnect earphones to listen
via the speaker.
In FM radio mode, activate
the speaker mode with your
earphones connected.
©2008. RadioShack Corporation. All rights reserved. Gigaware is a trademark and RadioShack is a registered trademark used by RadioShack Corporation.
Windows
and Windows Media are registered trademarks, and
Windows Vista is a trademark of Microsoft Corporation in the United States and/or other countries.
Rhapsody and Rhapsody logo are trademarks or registered trademarks of RealNetworks Inc. All Rights Reserved.
STEP 2
Connect to your PC & Download Music
We’ve provided some sample tracks if you want to turn on the
music immediately (go to STEP 3). To listen to your own songs:
1. Connect to your PC as above for charging your MP3 player. The
player is automatically detected and the directory removable
disk appears on your computer.
2. Drag and drop the desired files from your computer to the
player, OR use music management software, such as Windows
Media
®
Player 11 or Rhapsody (included; see Using Rhapsody
Software).
Important Copyright Notice
Distribution of MP3 files without permission from the content
owner is against copyright laws. RadioShack will not be liable
against such actions.
CAUTION! ONLY EJECT THE PLAYER WHEN THE PC ICON HAS
STOPPED FLASHING AND ALL DOWNLOADS HAVE
COMPLETED to prevent corrupting files and accidentally
reformatting your player.
Key lock
Slide down to lock the keys to
to
prevent accidental button
pressing when on the go..
appears. Slide up to unlock.
Earphone jack
Connect supplied
3.5mm earphones.
USB port
Open cover to
reveal USB port.
Reset
Press if the
keys do not
respond. See
Troubleshooting.
Display
Shows information
during playback or
menu navigation.
STEP 1
Charge your MP3 Player
Before using your player for the first time, charge it for about 3
hours. Flip open the USB jack cover and connect the supplied USB
cable to the player and your PC.
The player shows the Gigaware splash screen,
followed by the connected to PC display with
battery charging icon.
The battery full icon appears when fully charged.
Note: Use only the supplied USB cable to charge your player.
If the player is connected to the PC via a hub, the hub must
be self-powered to charge the player.
Getting Started
STEP 3
Play Music
1. Press § to turn on your MP3 player. The Gigaware splash screen appears, followed by Updating
(updates may take time). When updates are complete, Music displays.
2. Use the navigation buttons to start playing music, or see next page for more detailed instructions.
3. To turn off, press and hold § until the Power Off icon disappears.
Using Rhapsody Software (optional)
The supplied CD contains Rhapsody software, an
optional music file management program and online
service for your player.
For more information on Rhapsody,
visit www.Rhapsody.com
To install the software:
1. Load the CD into your PC’s CD-ROM drive. The
installation starts automatically. If it does not, select
Start Run, and type the path for your CD drive).
2. Double-click the setup application, follow the on-
screen instructions.
3. When setup completes, click Finish.
42-420.073008.indd 1
08/08/2008 15:15:51