N4 professional grade network recorder quick guide – OpenEye OE5-N4 User Manual
Page 2
N4 PROFESSIONAL GRADE NETWORK RECORDER
Quick Guide
31138AC
Copyright ©2013 OpenEye. All Rights Reserved. Information contained in this document is subject to change without prior
notice. OpenEye does its best to provide accurate information but cannot be held responsible for typos or mistakes.
23221 E Knox Ave
Liberty Lake, WA 99019
1.888.542.1103
LED STATUS INDICATOR
Power
Illuminates when power is supplied to the recorder.
HDD
1-16
Flashes when the hard drive is being accessed.
System
HDD
Flashes when the system hard drive is functioning properly.
Network
(1 and 2)
Illuminates when the recorder is connected to a network.
Power
Failure
Illuminates when recorder has lost power.
!
Operating Temperature Range
-40˚F~122˚F (-40˚C~50˚C)
POWER
To reduce the risk of electrical shock or damage to the equipment:
•
Do not disable the power grounding plug. The grounding plug is an
important safety feature.
•
If the electrical plug you are using does not have a ground plug
receptacle, contact a licensed electrician to have it replaced with a
grounded electricl outlet.
•
Plug the power cord into a grounded electrical outlet that is easily
accessible at all times.
•
Disconnect the power from the recorder by unplugging the power cord
either from the electrical outlet or the recorder.
INSTALLING THE FRONT BEZEL
If you choose to mount the front bezel onto your
recorder, you will need to remove the attached
handles and attach the bezel before attaching
the rackmount rails.
1. Remove the two screws from each handle.
2. Install the included bezel clips and fasten
with screws.
3. Align and slide the right side of the bezel
into the right clip.
4. Slide the left side of the bezel into the left
clip.
5. Lock the bezel by turning the key counter-
clockwise.
1
2
1
2
1
2
VIDEO DISPLAY ICONS
1st Four Camera View
Displays cameras 1 through 4 in the Video Display
Area.
2nd Four Camera View
Displays cameras 5 through 8 in the Video Display
Area.
3rd Four Camera View
Displays cameras 9 through 12 in the Video
Display Area.
4th Four Camera View
Displays cameras 13 through 16 in the Video
Display Area.
1st Nine Camera View
Displays cameras 1 through 9 in the Video Display
Area.
2nd Nine Camera View
Displays cameras 8 through 16 in the Video Display
Area.
All Camera View
Displays all 16 cameras within the Video Display
Area.
Full Screen
Allows Video Display Area to be viewed on entire
screen. No menu options will be visible in Full
Screen.
Auto Sequence
Sequences through Screen Divisions sets.
Use the CPU meter to monitor the system resources on your recorder.
Green System configuration OK
Yellow Consider decreasing load
Red
System configuration exceeded
Decrease load or upgrade system
CPU METER
MENU
Search
Access search functions.
Setup
Set recorder and camera configurations.
Pan/Tilt Set camera positions and tours (PTZ cameras only).
Backup Control scheduled and emergency video backup.
Login
Login as user or administrator.
Exit
Power off, restart system, or restart system in Windows
Mode.
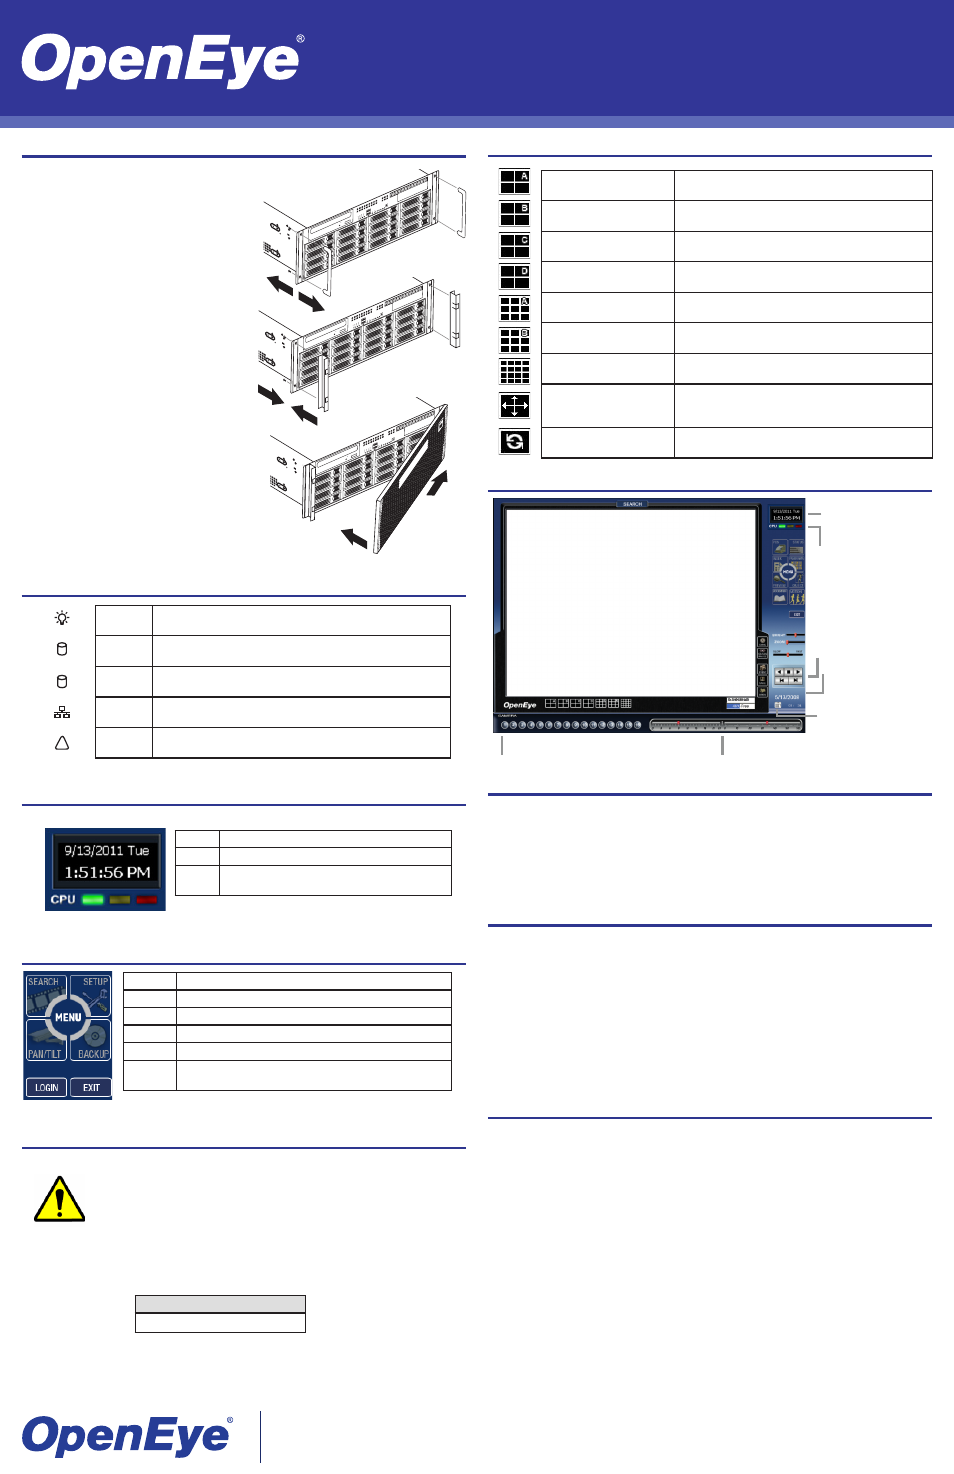
SEARCH MENU
Current Date/Time
Playback Controls
Playback Date/Time
Calendar Button
Camera Selection Buttons
Hour/Minute Control Bar
CPU Meter
BASIC SEARCH
1. In the Search screen, Click the
Calendar button to select a date.
2. Select a time by clicking the up and down arrows to the right of the time display.
3. Click
OK.
4. Select one or more cameras.
5. Click
Play. Video can be played forward, backward, or frame-by-frame.
CLIP BACKUP
1. From the Search screen, click
Save.
2. Select the drive from the file tree (Hard disk drive, USB, CD/DVD drive).
3. Select desired cameras from list.
4. Define the
Start and End time and date that you want to back up.
5. Select
Include Viewer to include a copy of the proprietary Backup Viewer Software to
view the clip on virtually any Windows workstation.
6. Click
Backup.
7. If backing up to a removeable USB device, click
Unplug or Eject Hardware after the
backup is complete to safely remove the device.
GENERAL BACKUP
1. Click
Backup on the Display Screen.
2. Select the date or dates to ack up using the calendar. Dates highlited in blue contain
recorded data.
3. Select the blcoks of time to back up using the Hour/Minute grid. Blocks of time with
recorded video are highlighted green. Blocks of time selected for backup are highlited
in red.
4. Select the backup drive or drives under
Select Backup Media, or click Network Drive,
or
Browse. When selecting the CD-ROM drive you must specify the number of CDs to
use for backup.
5. Click
Backup Order to set the backup order.
6. Select the
Include Viewer check box to include the Backup Viewer Application.
7. Click
Start Backup to begin the backup process. A progress bar will be displayed in the
lower right corner of the Display screen.