Directional and playback control buttons, Function buttons, Quick installation – OpenEye OE2-E120 Quick Start User Manual
Page 2: How to use ir remote controller
diReCtionaL and pLayBaCk ContRoL BUttonS
Live
Go to PTZ mode.
PTZ
Adjust zoom, focus, and iris on a PTZ channel.
Search
Start reverse playback of recordings. When pressed successively, the
search jumps back in time by 30 minute increments.
Search-Pause
When pressed successively, the reverse playback rate
decreases from 1/2X speed to 1/8X.
Live
Start playback of the latest recordings.
(By default, the system searches recordings in the past 30 secs. If no
recording is archived, the system will play back the latest one.)
PTZ
Adjust zoom, focus, and iris on a PTZ channel.
Search
Start playback of recordings. When pressed successively, the search
jumps forward in time by 30 minute increments.
Search-Pause
When pressed successively, the playback rate increases from 1/2X
speed to 1/8X.
Navigation
Move up.
PTZ
Move the camera view point up.
Search
Start Panorama Search.
Navigation
Move to the right.
PTZ
Move the camera view point to the right.
Search
Play recorded videos.
Search-Pause
Step forward one frame.
Navigation
Move to the left.
PTZ
Move camera’s view point to the left.
Search
Play recorded videos in reverse.
Search-Pause
Step back one frame.
Navigation
Move down.
PTZ
Move the camera view point down.
Search
Start Smart Search.
Operation Modes:
Live Mode, Live Freeze Mode, Search Mode, Search-Pause Mode,
Navigation Mode, and PTZ Mode.
FUnCtion BUttonS
Live
Freeze live channels.
Live Freeze
Resume live view.
Search
Pause playback channels.
Search Pause
Resume playback.
Rotate
Rotate through to the remaining channels in the current display mode or
rotate the display configuration.
Preset
In PTZ mode, press to use the Preset function.
Setup
Open the setup menu.
Live
Change the display mode. Display switches in the following order when
the LIVE key is pressed successively: (Single > 4 > 7 > 9 > 10 > 13 > 16
> Single > 4 > 7 > 9 ...split screen mode)
Search
Open the search menu.
Focus
In PTZ mode, press to use the Focus function.
Use the buttons to adjust.
Backup
In live mode, press to open the backup menu.
In the search mode,
Press once, to set the start time for Backup.
Press twice, to set the end time for Backup.
Press three times, to complete Backup.
•
•
•
Zoom
In PTZ mode, press to use PTZ Zoom function.
Use the buttons to adjust.
Key
Log out the current user. Use to prevent accidental or unauthorized sys-
tem-wide changes.
Iris
In PTZ mode, press to use the IRIS function.
Use the buttons to adjust.
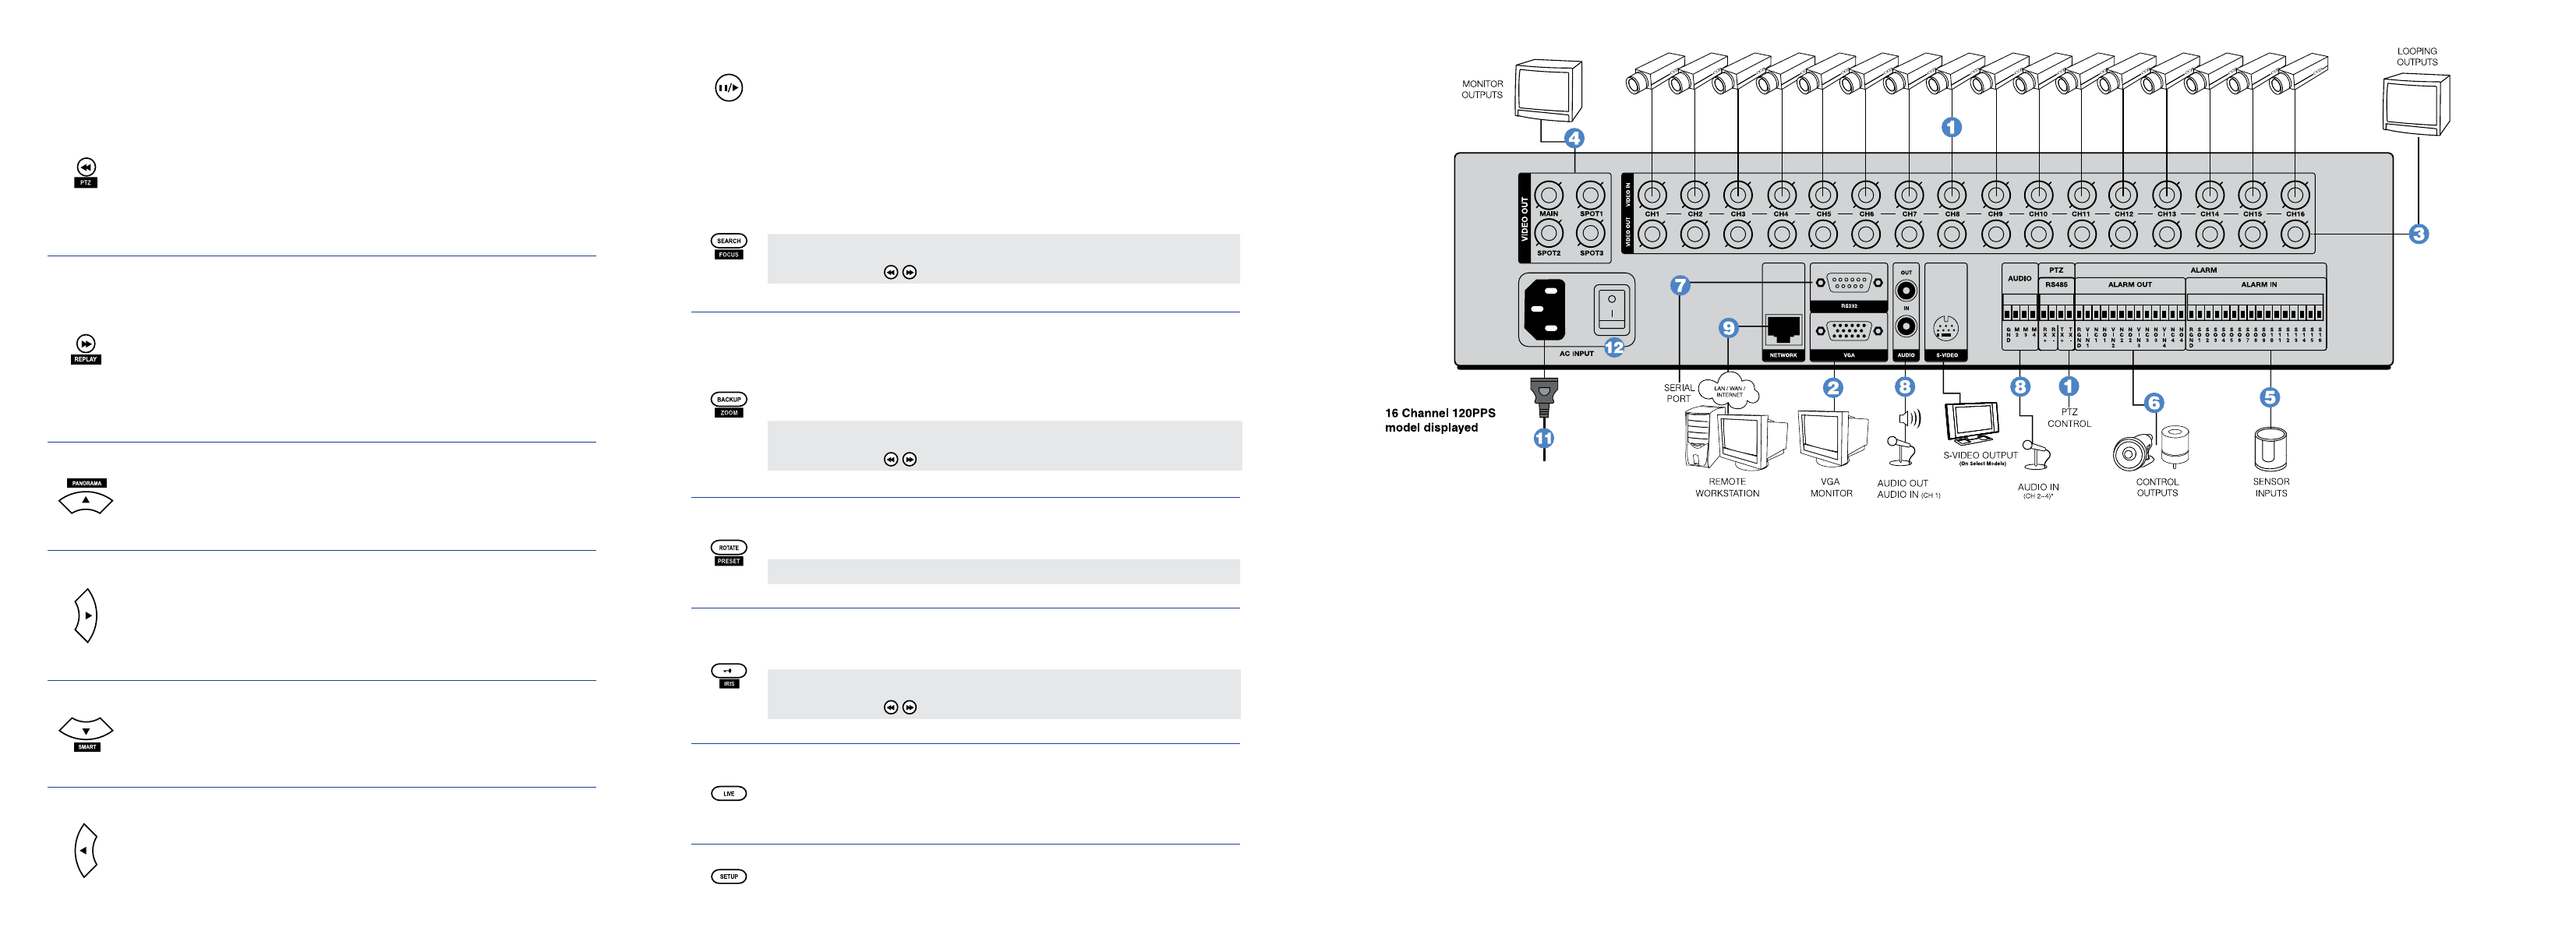
Connect cameras to video inputs, and if using, connect PTZ camera control lines to RS485
connector.
Connect the main monitor to the VGA monitor output or main video output - BNC.
Connect analog monitors to looping video outputs. (optional)
Connect the monitor to SPOT video outputs (up to 3 on 16CH only). (optional)
Connect sensors to alarm signal inputs. (optional)
Connect alarm devices such as buzzers to alarm signal outputs. (optional)
Connect external controllers to RS232 connector. (optional)
Connect a speaker and microphone to the audio inputs and output. (optional)
Connect a network cable to the network port.
Power on all the connected equipment.
Connect the power cord to the DVR.
Turn the power switch on.
1.
2.
3.
4.
5.
6.
7.
8.
9.
10.
11.
12.
QUiCk inStaLLation
When more than one E-Series DVR is installed in the same location, use one remote controller
to control multiple DVRs. To control multiple DVRs, you must change the remote controller ID to
match the SYSTEM ID of the DVR.
Follow the instructions below to change the remote controller ID.
on the dVR
Press SETUP on the front of the DVR or the Remote Controller.
Go to SYSTEM > SYSTEM SETUP.
Enter the desired SYSTEM ID number.
on the Remote Controller
Press and hold the ID button on the remote controller and enter the desired SYSTEM ID
number to operate the corresponding DVR.
note
The SYSTEM ID must be input as two numbers on the remote controller. Therefore you
should input 00 for the DVR ID 0 and input 01 for 1.
1.
2.
3.
4.
How to USe iR ReMote ContRoLLeR