4/8 channel poe model 16 channel non-poe model, Directional and playback control buttons, Function buttons – OpenEye OE-ENVR Quick Start User Manual
Page 2: Quick installation, Enable reportstar
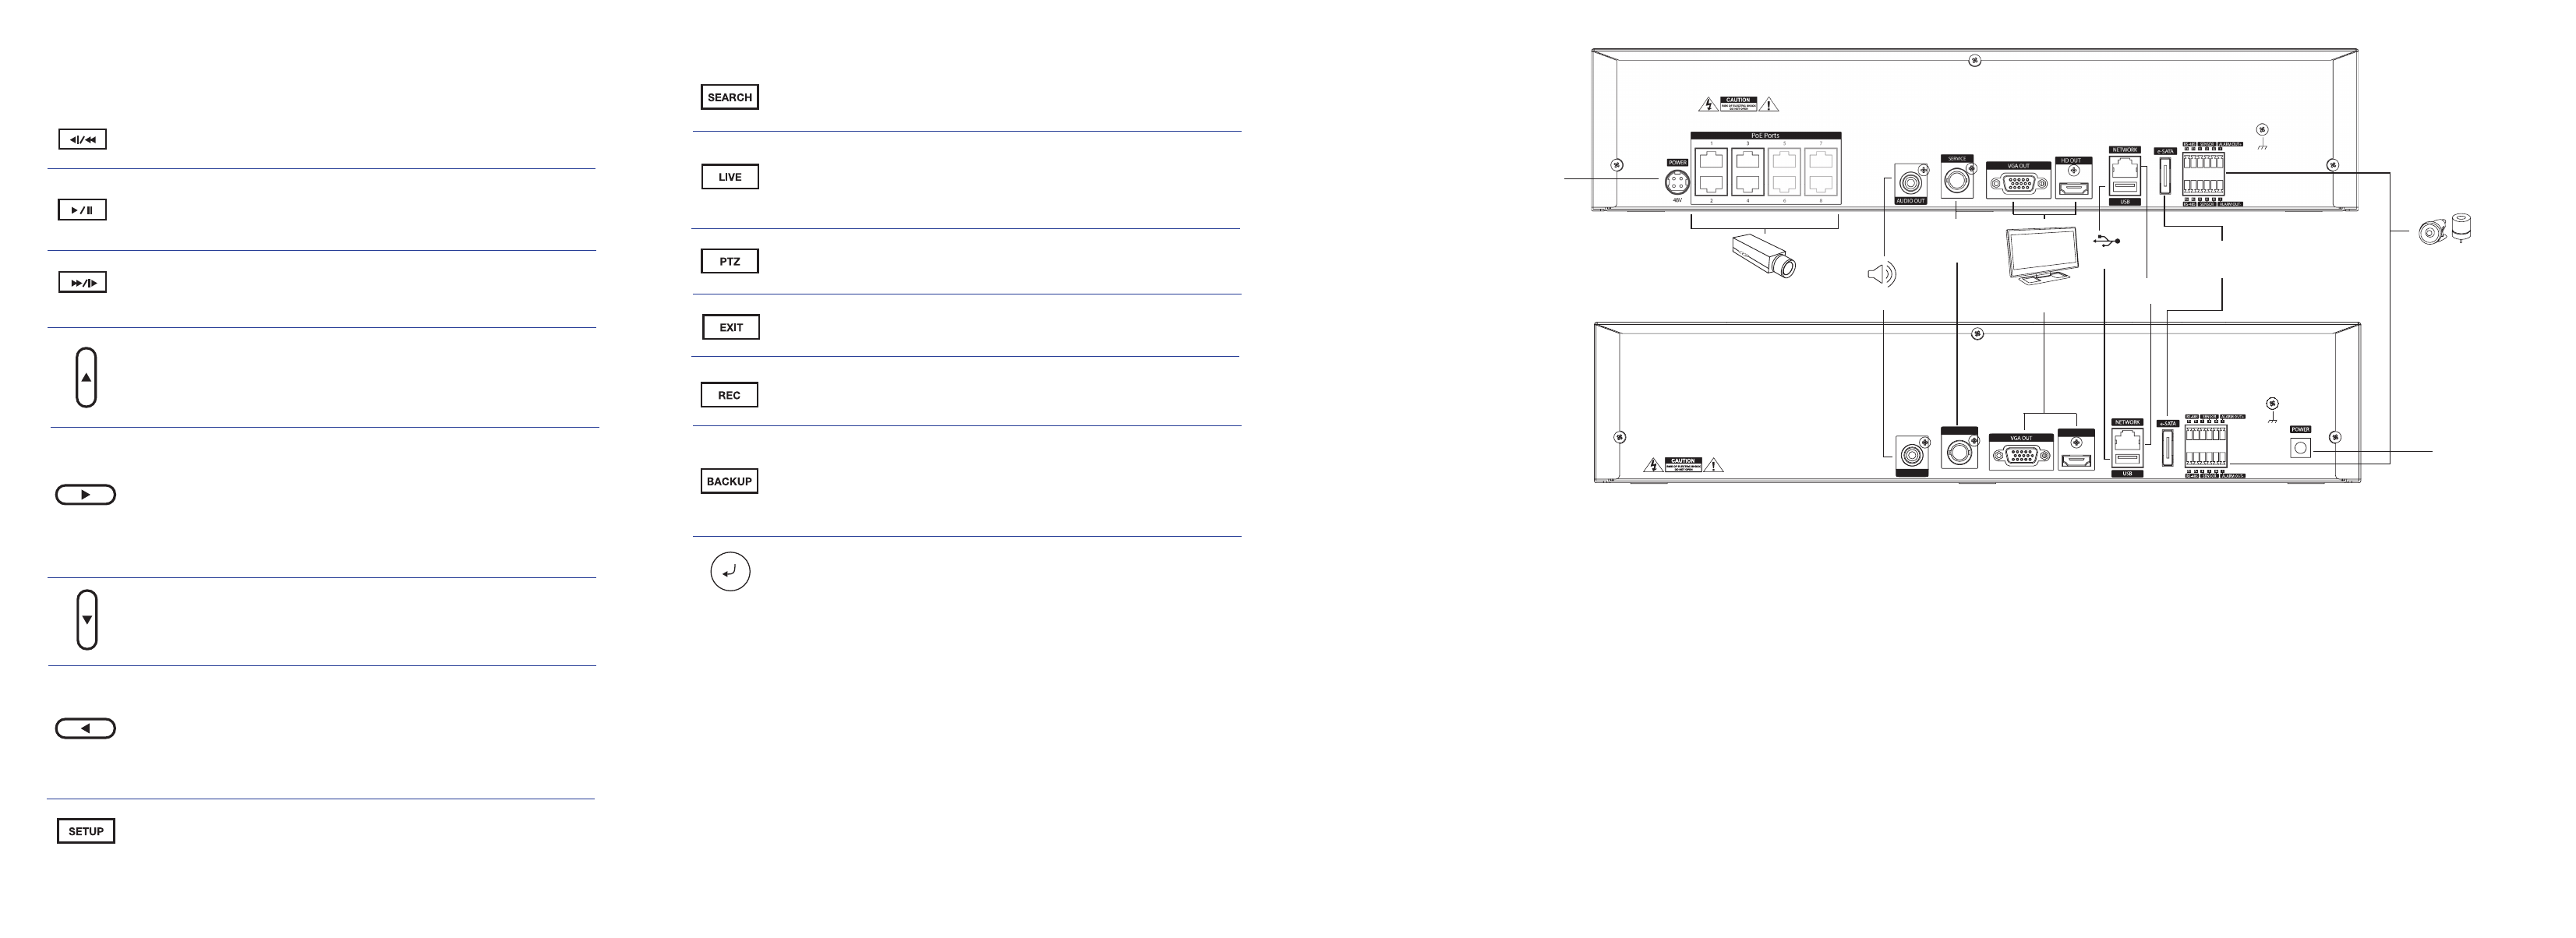
AUDIO OUT
HD OUT
SERVICE
Monitor
(HDMI or VGA Out)
Network Camera
Ports
Audio Out
USB
Alarm Input /
Output
12vDC Power
48vDC Power
Network Port
e-SATA Port
(for external storage only)
Service Port
(manufacturer use
only)
Search
Start reverse playback of recordings. Press successively to
change the fast reverse speed.
Search
Start playback of recordings. Press successively to change the
fast forward speed.
Replay
Start playback of the most recent recording.
Search
Press to Pause or Play in Search mode.
Navigation
Move up.
PTZ
Move the camera view point up.
Navigation
Move to the right.
PTZ
Move the camera view point to the right.
Search
Play recorded videos. When pressed successively, the search
jumps forward in time by 30 minute increments.
Search-Pause
Step forward one frame.
Navigation
Move to the left.
PTZ
Move camera’s view point to the left.
Search
Play recorded videos in reverse. When pressed successively,
the search jumps back in time by 30 minute increments.
Search-Pause
Step backwards.
Navigation
Move down.
PTZ
Move the camera view point down.
DIRECTIONAL AND PLAYBACK CONTROL BUTTONS
Operation Modes: Live Mode, Live Freeze Mode, Search Mode, Search-Pause Mode,
Navigation Mode, and PTZ Mode.
FUNCTION BUTTONS
Live
Change the display mode. Display switches in the following order
when the LIVE key is pressed successively:
(Single > 4 > 9 > 16 > Single > 4 > 9 > etc).
Search
Open the search menu.
QUICK INSTALLATION
1.
Connect the main monitor to the HDMI or VGA video outputs.
2.
Connect sensors to alarm signal inputs. (optional)
3.
Connect alarm devices such as buzzers to alarm signal outputs. (optional)
4.
Connect a network cable to the network port.
5.
Power on all the connected equipment.
6.
Connect the power cord to the recorder.
7.
Power ON the recorder.
8.
Connect your IP cameras. See ‘Connecting IP Cameras Using PoE Network Ports and
Connecting IP Cameras Using External PoE Network Switch.’
Backup
In live mode, press to open the backup menu.
In the search mode,
• Press once, to set the start time for Backup.
• Press twice, to set the end time for Backup.
• Press three times, to complete Backup.
Exit
Exit current menu / function.
PTZ
In live view, press to enter PTZ mode.
Record
Start Emergency Recording when viewing live video.
4/8 Channel PoE
Model
16 Channel non-PoE
Model
CONNECTING IP CAMERAS USING POE NETWORK PORTS (4 AND
8 CH ONLY)
1.
Plug the IP camera into a PoE network port. The port numbers will correspond with the
camera channels once cameras are connected.
2.
Wait up to 2 minutes, and then live video will display.
3.
If desired, use the CAMERA SETUP menu to further configure the camera.
CONNECTING IP CAMERAS USING EXTERNAL POE NETWORK
SWITCH (required for 16 CH)
1.
Plug IP cameras into the external PoE switch.
2.
Connect a PoE switch to your network, then plug the switch into the NETWORK port on
the recorder.
3.
Click
MENU on the hover menu, and then click SETUP.
4.
Click
CAMERA DISCOVERY and then wait for the recorder to search and display the
cameras connected to the network.
5.
Enter the ID and PASSWORD, and then drag and drop the selected cameras to the
camera channels to view the camera in Live Display.
Enter
Input data and make selections.
Setup
Open the setup menu.
ENABLE REPORTSTAR
When starting the recorder for the first time, the ReportStar window will open first. To enable
ReportStar during the initial configuration, follow these instructions.
1.
Click ENABLE REPORTSTAR NOW.
2.
Log in using th admin user account (default username: admin, password: 1234).
3.
Set the CUSTOM DAY/NIGHT TIME.
4.
Click SEND to send a test report to ReportStar.
5.
To send alarm events to ReportStar, set SEND ALARM EVENTS INSTANTLY to ON.
6.
To send actcive updates to ReportStar every 5 minutes, set
HEARTBEAT to ON.
7.
Click SAVE to save your settings.
Note:
To enable ReportStar at any time after the initial configuration, go to NETWORK >
REPORTSTAR SETUP and then set ENABLE REPORTSTAR to ON.