Prime 200, Lowel prime, Led control panel – Tiffen Lowel Prime LED 200 User Manual
Page 2: Controlling lowel prime led, Manual & dmx operation, Power in, Ac power switch, Fuse, Dmx in/out connectors, Led window & function buttons
Controlling Lowel
Prime LED
The fixtures of the Lowel Prime LED Series are all
dimmable models, which can be controlled either
manually on the fixture or remotely via a console
with DMX-512 protocol.
To operate the Control Panel, first familiarize
yourself with the placement and functions of
the controls.
Manual & DMX Operation
Lowel Prime
™
LED Control Panel
Power In
This IEC connector accepts the AC cable. The fix-
ture will auto-set itself from 90-240 VAC. Use the
proper cable for the country of use.
AC Power Switch
Turning on the AC Power switch causes the fix-
ture to light at whatever dimming level it was at
when last powered down (factory shipped at
100%). The unit will retain its previous dimming
level even if unplugged.
Fuse
Always power down & unplug the fixture before
changing its fuse. Open the fuse holder with a
phillips head screwdriver to replace the fuse.
Lowel Prime 400 LED's use fuses rated at 3
Amps and 250 Volts.
DMX In/Out Connectors
There are two 4 pin XLR style DMX connectors,
labeled IN and OUT. In a DMX chain, remember
that the last fixture in the chain needs a DMX
Terminator plugged into its DMX Out connector.
LED Window
& Function Buttons
The LED window shows the status of choices
made with the function buttons beneath it.
MENU Repeated pressing of the MENU Key
scrolls the unit thru its sub-menu list (DIMM,
RUN, DMX, SET).
ENTER To select a menu or to confirm the values
selected.
UP Button To increase a value, 1 step at a time,
or scroll up thru a sub-menu.
DOWN Button To decrease a value, 1 step at a
time, or scroll down thru a sub-menu.
Manual Dimming
0% to 100%
Lowel Prime fixtures can be dimmed manually on
the rear of the unit, or by DMX console.
To manually dim the light to a desired level, press
the MENU button until you see DIMM, then Press
ENTER. Use the Up & Down buttons to set dim-
ming level from 1-100. Powering the fixture down
keeps its dimming level set, so it will return to
that level the next time it is turned on.
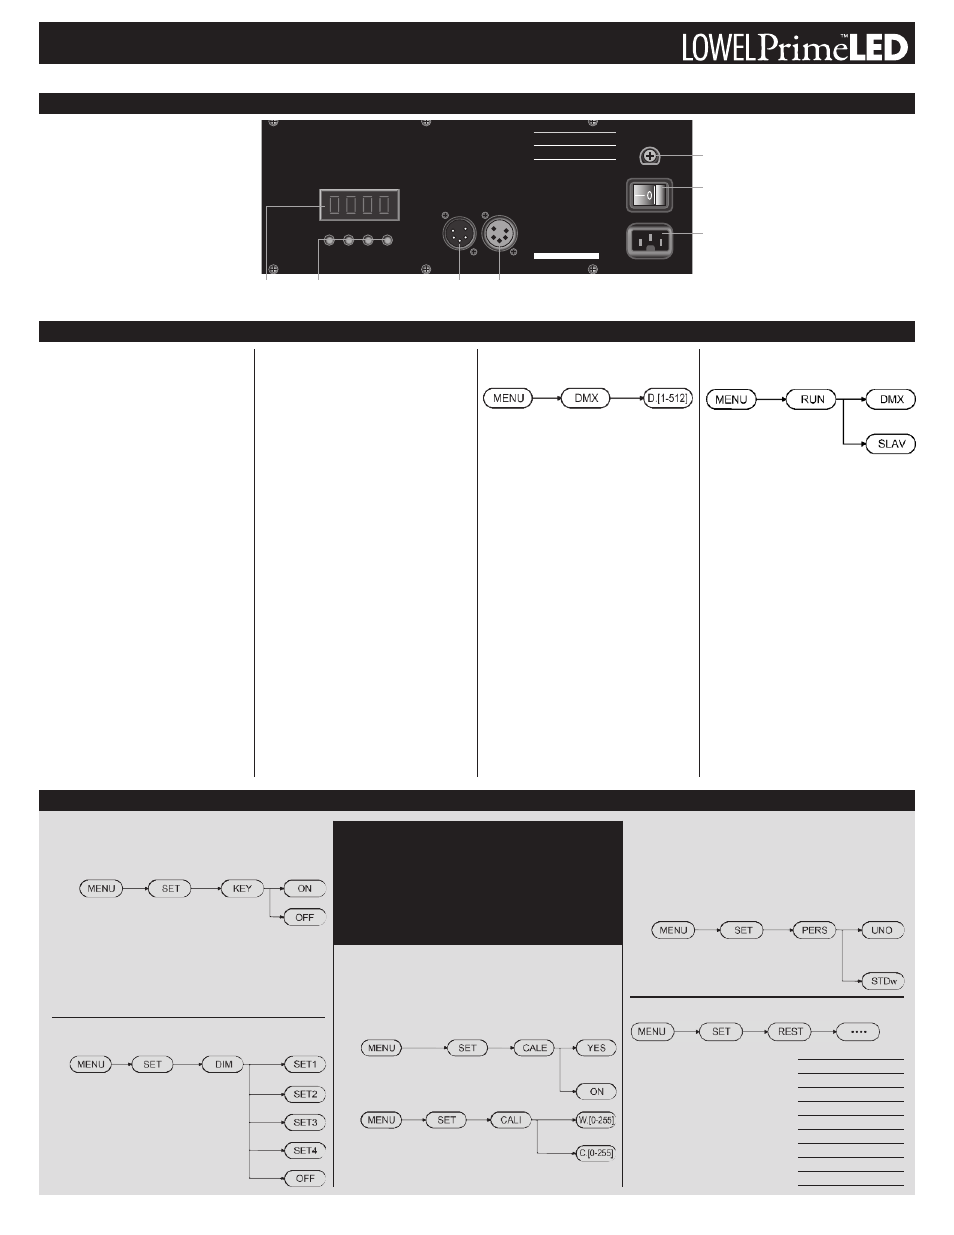
DMX Addressing
& Dimming
DMX-512 protocol allows you to assign one of
512 possible control addresses to the fixture.
Multiple fixtures must be connected to each
other, daisy chain style, using DMX cables, with
the DMX OUT on the console connected to the
first fixture's DMX IN connector. The DMX OUT
connector of the 1st fixture is then connected to
the DMX IN connector of the second fixture, and
so on, until all fixtures are connected. The last
fixture needs a DMX Terminator plugged into its
DMX OUT connector.
When the fixture is receiving a valid DMX signal,
a blinking red dot is visible in the lower right cor-
ner of LED Window.
To ADDRESS a fixture, scroll the MENU list to
DMX, and hit ENTER. Next, scroll to the DMX
address number you want for the fixture.
Pressing ENTER again and hitting MENU sets
fixture to that address and enables DMX dim-
ming. After addressing the whole chain, fixtures
may be controlled alone or in a group, from the
DMX console. Manual dimming on each unit is
inoperative during DMX operation.
Slave Controlling Fixtures
Without Console
Multiple fixtures, connected with DMX cables as
described above, can all be controlled as one by
using the Slave function. This means they will all
dim up or down together, controlled by the first
fixture in the chain (not by a DMX console).
On the first fixture in the chain, in MENU, select
RUN and hit ENTER. Using the up/down but-
tons shows 2 choices, DMX and SLAV. Select
DMX for the first fixture in the chain and SLAV
for the rest.
Rear Panel Connections & Functions
MENU
ENTER
UP
DOWN
DOWN
DOWN
DMX IN
DMX OUT
DOWN
LO
W
EL
LED
TUNGSTEN
Prime
200
TUNGSTEN
ON
OFF
FUSE 3A
POWER IN
Serial Number
MODEL:
PRM-200TU
Input
Nominal Peak
Voltage Current Current
Fuse
120VAC
0.714A
0.97A
3A/250V (USA/Canada)
220VAC
0.403A
0.610A
3A/250V (Worldwide)
WARNING:
Not for residential use. For
professional use only. Read our instructions
and lamp manufacturer’s warnings first.
Disconnect from main supply before servicing.
AVERTISSEMENT:
Impropre à l’usage
domestique. Emplacements mouillés.
CAUTION:
Risk of fire - Use replacement
fuses rated at 3.00 Amps and 250 Volts. Use
only in dry locations. Disconnect Power Before
Changing Fuse.
CAUTION:
Employer des fusibles de rechange
de 3.00 Amps et 250 Volts. Emplacements secs.
Débrancher avant de changer le fusible.
AMPERAGE:
0.97 Amps at 120 Volts.
0.610 Amps at 220Volts
AC POWER INPUT
USA/Canada:
110-120V, 60Hz, 82W
Worldwide:
100-240V, 60Hz, 82W
Cable Diameter:
6.5~8mm
Power Cable:
18~16AWG
Data Cable:
3 pin shielded
Light Source:
LED
™
DMX
In
DMX
Out
Function Buttons:
Menu / Enter / Up / Down
LED
Display
AC Power Switch
AC Input
Fuse
Locking / Unlocking User Control
This tamper proof security ability allows the user to disable the
function buttons, locking out the fixture from manual control.
It can be restored by use of a keycode password.
n
To Lock (Disable Use):
Choose ON, and press ENTER. LED display window
will show only a single red dot. NOTE: Lock takes aprox.
10 seconds to engage.
n
To Unlock (Enable Use): Press these buttons in the following
order: MENU + UP + DOWN + UP + DOWN + ENTER. Then
press: MENU + SET + KEY+ OFF + ENTER.
Accessing Stored Alternate
Dimming Curves
To vary the rate of dimming when using a DMX
console, there are four factory installed dimming
behavior curves. They are accessible thru
the SET menu. Press ENTER to advance
at each step.
The fixture ships preset to dimming curve
number 4.
Changing DMX Operation Mode
This sequence allows the daylight & tungsten LEDs to be separated,
and given DMX addresses, for separate control.
n
UNO - the fixture operates as 1 address.
n
STDw - creates separate DMX channels for each color.
Second color gets next numerical DMX address.
Note: When using this Mode, make sure the next
numerical DMX address is available for the second
color's address.
Resetting the System
Reset the fixture to its factory default
settings, by following the above button
sequence. See the chart for default
values.
The '4 dots' sequence is as follows:
UP + DOWN + UP + DOWN +
ENTER. UP + DOWN + UP +
DOWN + ENTER. LED says OK when
fixture is reset
Enabling / Adjusting Factory Calibration
It is not recommended to make adjustments to the Calibration set-
tings. They are used by the factory to calibrate the fixture to estab-
lished specifications. Calibration levels for warm and cool LED sets
are listed on a label found inside the Front Accessories door for use
in restoring the fixture to Mfrs. Spec. after Resetting it.
A.
Calibration must first be enabled, using sequence A,
and choosing YES. (Default setting is NO).
B.
Use sequence B to alternate between the cool
and the warm color LED sets, adjusting levels.
Set by hitting ENTER.
Choosing SET allows access to functions that most users will
not ever need access to. They include locking access to fix-
ture controls, using stored alternate dimming curves, mfrs
calibration settings, as well as restoring the fixture to all of
its original (pre-calibration) settings. Always hit ENTER to
advance thru the Menu choices.
IMPORTANT – If you accidentally wander in any of the SET
sub-menu's, hit MENU button to return to the main Menu.
MENU
DEFAULT VALUE
DIMM
D.100
RUN
DMX
DMX
D.001
SET -> KEY
OFF
SET -> DIM
DIM4
SET -> CALE
NO
SET -> CALI
W.255
C.255
SET -> PERS
UNO
The SET Function