VXL Instruments Itona TC7521d Series Thin Client User Manual
Itona tc7521d series thin client, English, Hardware installation guide
Itona TC7521d Series
Thin Client
This Class B digital apparatus complies with Canadian ICES-003.
Cet appareil numérique de classe B est conforme à la norme canadienne ICES-003.
Dieses digitale Class B-Gerät entspricht der Canandian ICES-003.
Este aparato digital de Clase B cumple la normativa canadiense ICES-003.
© 2013 VXL Instruments Limited.
600011054539 A02
Itona TC7521d Series Thin Client
Hardware Installation Guide
The Itona TC7521d Series package consists of the items listed
below:
• Itona TC7521d series Thin client
• Universal Wall Mounting Bracket – Sliding Type
• DVI – I splitter cable (Provides DVI-D and Primary VGA)
• Power cord Y Cable (Optional)
• Power cord applicable to your country (Optional)
• Pedestal (Optional)
• Mouse (Optional)
• This manual
Safety Instruction
Follow these precautions when installing Itona TC7521d:
• Use Approved 3 Pin Grounded power cord only. Ensure
you plug the power cord into a grounded 3 pin electrical
outlet.
• Allow approximately 4 Inches of space around the product
for effective ventilation.
• Always place the product in the direction indicated by the
arrow mark on the front bezel.
• Do not operate this equipment in corrosive or explosive
environment.
Setting up the Itona TC7521d
1. Unpack the unit from the carton. Take care not
to drop the product when removing from the carton
as it may damage the product.
2. Install Itona Universal Wall Mounting Bracket. For
information on assembling and installing the bracket refer
to the installation document in the following link:
ftp://mcdonalds:[email protected]/Documentation/
Installation_Manual_for_Itona_TC7521d_with_Wall_
Mounting_Bracket_A01.pdf
3. Connect the mouse and keyboard to their respective PS/2
ports. If you are using a USB keyboard or mouse, connect
them to two USB ports.
4. Connect the network cable to the Ethernet Port.
5. Connect the power cable to a
grounded 3 pin electrical
outlet.
6. Single monitor can be connected to
Secondary VGA or
Primary VGA or DVI-I.
7. You can connect dual monitors in two different ways:
a. Primary VGA and Secondary VGA
b. Primary VGA and DVI-D
Caution: Do not connect DVI-D and Secondary VGA
monitors at the same time.
English
1
2
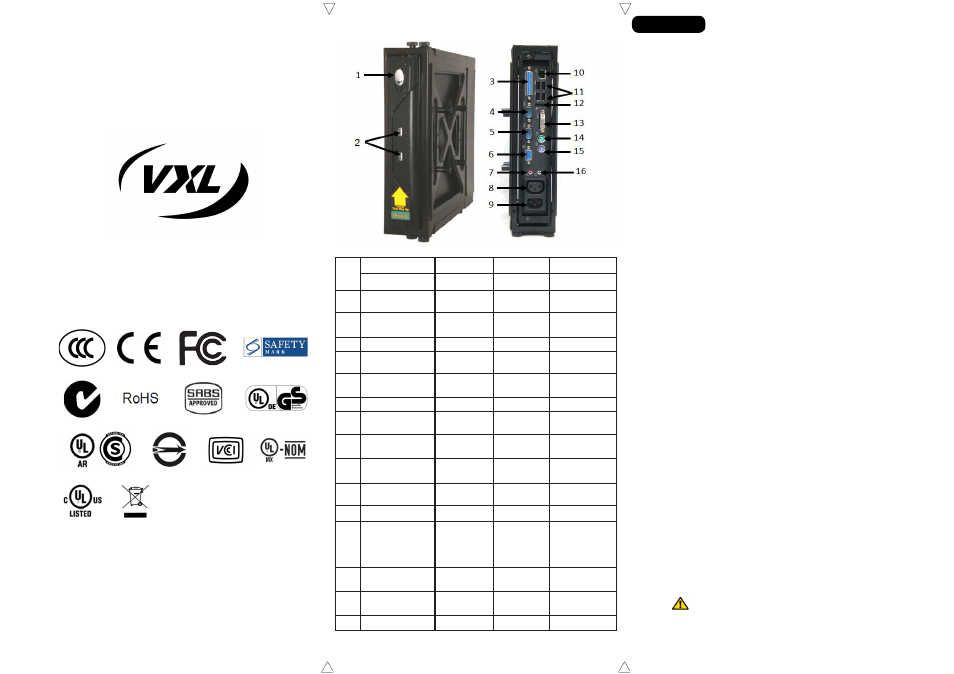
Front View
Rear View
Ref
English
Français
Deutsch
Español
Components
Composants
Bauteile
Componentes
1
Power Button
Bouton d’alimen-
tation
Ein/Aus-Taste
Botón de encen-
dido
2
2 USB Ports
2 ports USB
2 USB-An-
schlüsse
2 puertos USB
3
LPT Port
Port LPT
LPT-Anschluss
Puerto LPT
4, 5
2 COM Ports
2 ports COM
2 COM-An-
schlüsse
2 puertos COM
6
Secondary VGA Port
Port VGA sec-
ondaire
Sekundär-VGA-
Anschluss
Puerto VGA
secundario
7
Mic
Microphone
Mic
Micrófono
8
AC Power Out
Alimentation
sortie CA
AC Stromaus-
gang
Salida CA
9
AC Power In
Alimentation
entrée CA
AC Stromein-
gang
Entrada CA
10
Ethernet Port
Port ethernet
Ethernet-An-
schluss
Puerto Ethernet
11
4 USB Ports
4 ports USB
4 USB-An-
schlusse
4 puertos USB
12
DP Port
Port DP
DP-Anschluss
Puerto DP
13
DVI-I Port
(DVI-D + Primary VGA
provided by
splitter
cable)
Port DVI-I
(DVI-D + VGA
primaire fourni
par le câble
répartiteur)
DVI-I Anschluss
(DVI-D +
Primär-VGA
über Splitterk-
abel)
Puerto DVI-I
(DVI-D +
VGA primario
mediante cable
divisor)
14
Mouse PS/2 Port
Port souris PS/2
Maus PS/2-An-
schluss
Puerto de ratón
PS/2
15
Keyboard PS/2 Port
Port clavier PS/2
Tastatur PS/2-
Aschluss
Puerto de teclado
PS/2
16
Audio Out
Sortie audio
Audioausgang
Salida de audio