Operating instructions – Laney LG35R User Manual
Page 6
P
OWER
C
ONSUMPTION
- 50 W
ATTS
~50/60H
Z
~100VA
C 50/60H
Z
P
OWER
S
OURCE
~230V A
C 50/60H
Z
~120VA
C 50/60H
Z
~240V A
C 50/60H
Z
P O W E R TO T H E M U S I C
W
ARNING
- T
HIS
EQUIPMENT
MUST
BE
EARTHED
.
W
ARNING
- T
O
REDUCE
THE
RISK
OF
FIRE
OR
ELECTRIC
SHOCK
DO
NOT
EXPOSE
THIS
APPLIANCE
TO
RAIN
OR
MOISTURE
.
C
AUTION
- T
O
REDUCE
THE
RISK
OF
ELECTRIC
SHOCK
DO
NOT
REMOVE
COVERS
.N
O
USER
SERVICEABLE
PARTS
INSIDE
. R
EFER
SERVICING
TO
QUALIFIED
PERSONNEL
ONLY
.
A
TTENTION
- R
EMPLACER
LE
FUSIBLE
SEULEMENT
PAR
LE
MEME
TYPE
ET
LE
MEME
CALIBRE
.
A
TTENTION
- D
EBRANCHER
LE
CORDON
D
’
ALIMENTATION
AVANT
TOUTE
INTERVENTION
.
A
VIS
- R
ISQUE
DE
CHOC
ELECTRIQUE
-
NE
PAS
OUVRIR
.
C
AUTION
- F
OR
CONTINUED
PROTECTION
AGAINST
RISK
OF
FIRE
REPLACE
ONLY
WITH
SAME
TYPE
AND
RATED
FUSE
.
!
S
ERIAL
N
UMBER
D
ESIGNED
IN
THE
UK
BY
L
ANEY
M
ODEL
LG35R
M
ADE
I
N
C
HINA
F
ABRIQUE
E
N
C
HINE
T500
M
A L / 125V
T250
M
A L / 250V
N15039
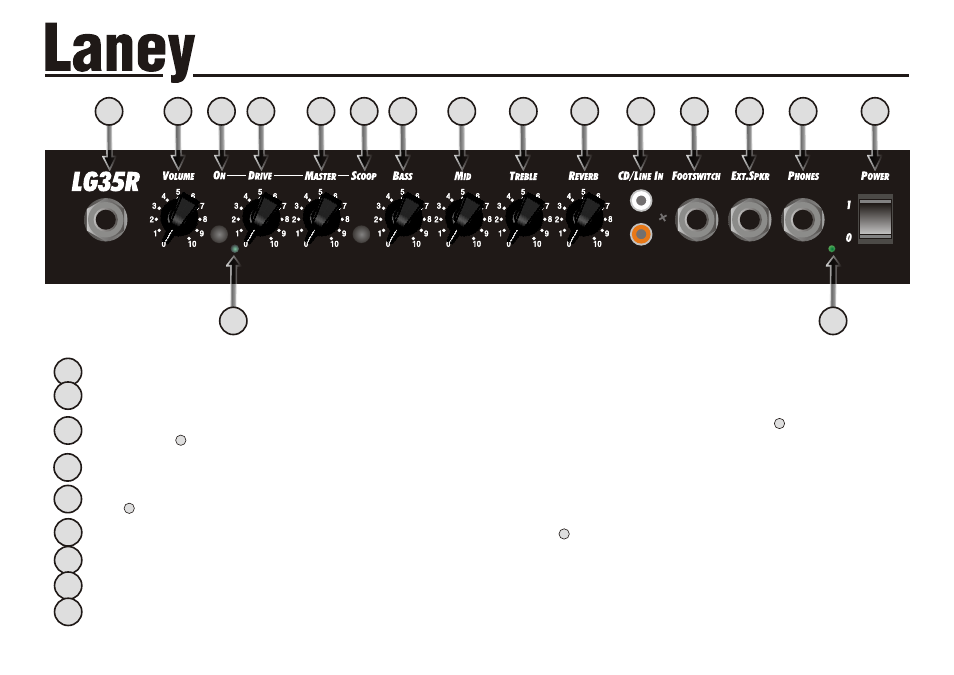
Controls the amount of treble present on the clean channel.
Controls the amount of reverb applied to the signal.
Fancy playing along with a backing track? Connect your CD/MP3 player here.
Connect a Laney FS2 footswitch here (not included) to allow remote switching of the drive channel and reverb on/off. Note,
that the drive channel must be active (with ) and the reverb level control turned up (with ) for this to work.
Connect an external loudspeaker cabinet here. The internal loudspeaker is automatically disabled. The impedance of the
external cabinet must not be less than 4 Ohms. Connecting cabinets that have a lower impedance than 4 Ohms will result in
the amplifier overheating. Continual use in this manner may cause permanent damage.
Don’t want to wake your neighbours? Connect your headphones here. The internal loudspeaker is automatically switched off.
When ‘on’ indicates that power is connected to the unit and it is ready to go.
(Always switch off and disconnect the power cord when not in use)
Main power switch for the unit.
Displays the model number, power requirements and serial number of the unit.
3
11
This socket should be used for connecting your instrument to the amplifier. Only use a good quality screened cable.
Controls the overall volume level for the clean channel.
Switch in to activate the overdrive ‘Crunch’ channel. When active, control the amount of distortion with and the overall
volume with
When lit, indicates that the drive channel is active.
Controls the Drive channel gain, low down for classic rock and blues, higher up for hard rock and metal. Use in conjunction
with to get the overall level balanced how you want it.
Controls the overall level of the drive channel. Use in conjunction with
Switch in to apply a scooped mid tone to the drive channel. Also boosts certain key frequencies and ‘thickens’ up the sound
Controls the amount of bass or bottom end present on the clean channel.
Controls the amount of mid present on the clean channel.
5
6
6
5
1
Page 6 /12
Page 7 /12
2
3
4
12
FRONT PANEL CONTROLS
OPERATING INSTRUCTIONS
OPERATING INSTRUCTIONS
1
2
6
10
9
7
11
10
12
13
5
6
7
8
9
4
11
19
16
3
5
8
14
15
17
13
14
15
16
17
19