Initial use, Preparing the spraying surface, Turning the device on / off – Parkside PDFP 500 A1 User Manual
Page 33: Adjusting the paint jet, Regulating the quantity of paint, Regulating the quantity of air
33
GB/MT
dispersion and results in too rapid evaporation of
the liquid. The surfaces become rough and develop
poor adhesion properties. If the working pressure is
too low on the other hand, the paint material is not
sufficiently atomised. Undulating surfaces and the
formation of drops are the result.
j
Connect the compressed air hose with the
rapid-release coupling to the compressed air
connection
6
of the device. This automatically
locks into place.
j
Use the filter pressure reducer of the compressed
air source to set the working pressure to 3 bar.
Q
Preparing the spraying surface
j
Mask off the surroundings of the spraying sur-
face thoroughly over a wide area. Otherwise
all non-covered areas or surfaces may become
soiled.
j
Make sure that the spraying surface is clean,
dry and free of grease.
j
Roughen smooth surfaces and then remove the
sanding dust.
Q
Turning the device On / Off
Working Instructions:
- When working with the device you should open
the vent
1
.
- When diluting the material, make sure that the
spraying material and the dilution are suitable
for one another. If an incorrect dilution is used,
lumps may form and clog the gun as a result.
- Screw the flow cup
3
clockwise firmly on to
the gun.
- Fill the spraying material into the flow cup
3
and screw the lid
2
on tight.
- Always hold the paint spray gun at the same
distance from the object. The ideal spraying
distance is approximately 15 cm.
- Determine the appropriate settings in each
case by experimenting.
- Do not turn the device on / off when it is over
the spraying surface, but start and end the
spraying process approximately 10 cm outside
of the spraying area.
j
Press the trigger
8
to start spraying and keep
it held down.
j
In order to stop spraying, release the trigger
8
again.
Q
Adjusting the paint jet
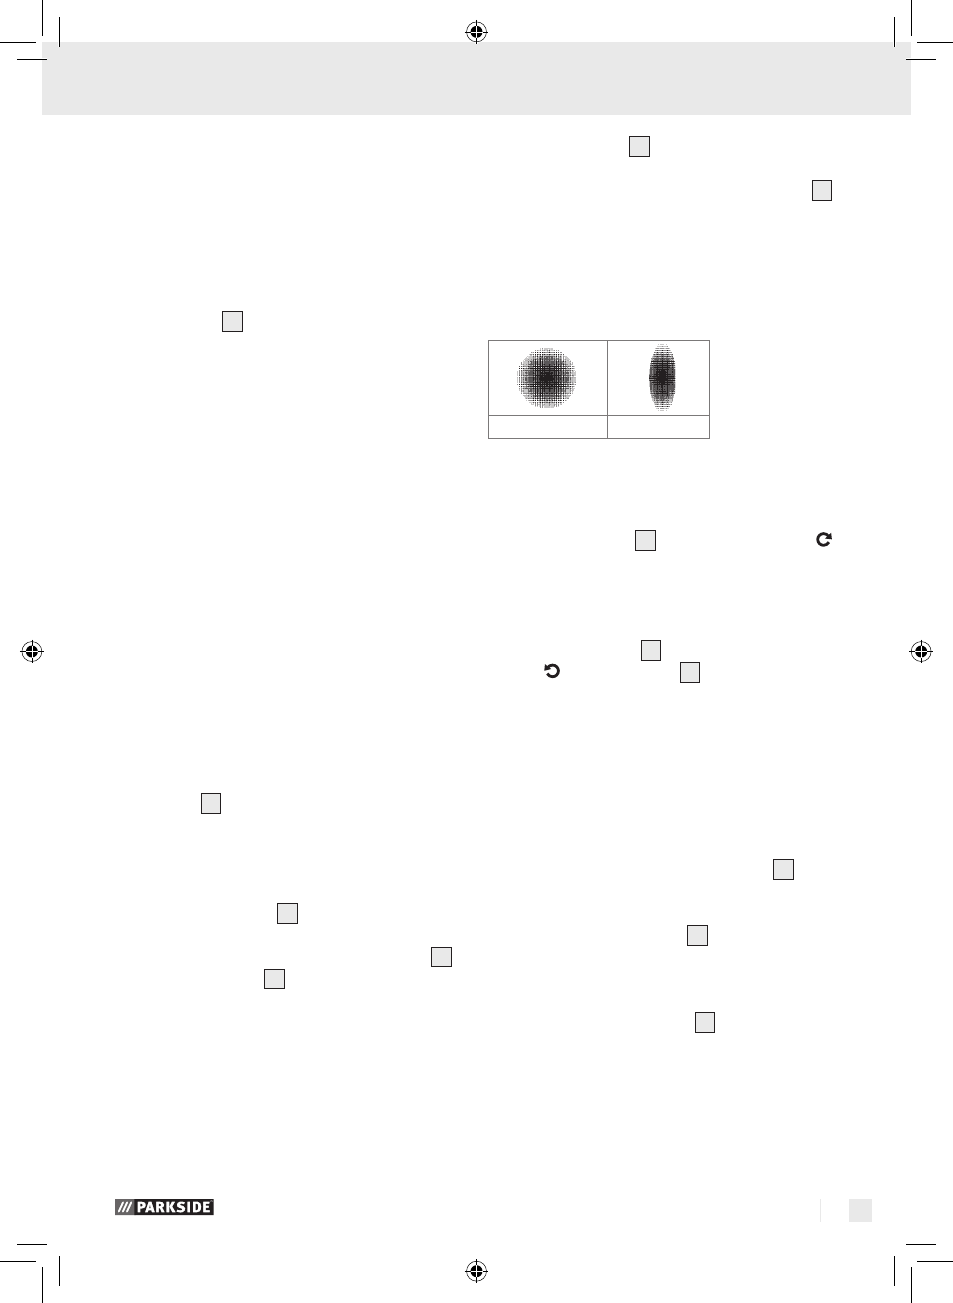
The device has the settings round and broad jet.
Round jet
Broad jet
Adjusting the round jet:
j
Use the round jet, for example, for small surfaces,
corners and edges.
j
Turn the regulator
5
in a clockwise direction .
Adjusting the broad jet:
j
Use the broad jet vertically and horizontally
over larger areas.
j
Turn the regulator
5
in an anticlockwise direc-
tion . The nozzle head
9
can be continuously
adjusted vertically and horizontally by turning
to the desired position.
Q
Regulating the
quantity of paint
Note: The front locking screw is used to limit the
adjustment range of the stroke stop screw
4
.
Increasing the quantity of paint:
j
Turn the stroke stop screw
4
in an anticlockwise
direction.
Reducing the quantity of paint:
j
Turn the stroke stop screw
4
in a clockwise
direction.
Q
Regulating the quantity of air
Note: It is advisable to start with the maximum
amount of air. In order to do this, open the air volume
Initial use
64576_par_Druckluft-Farbspritzpistole_content_LB5.indd 33
31.03.11 10:49