Parkside BLK 520 User Manual
Instructions for use, Explanation of symbols, Intended use
Instructions for Use
No. 48520 Cordless Soldering Iron BLK 520
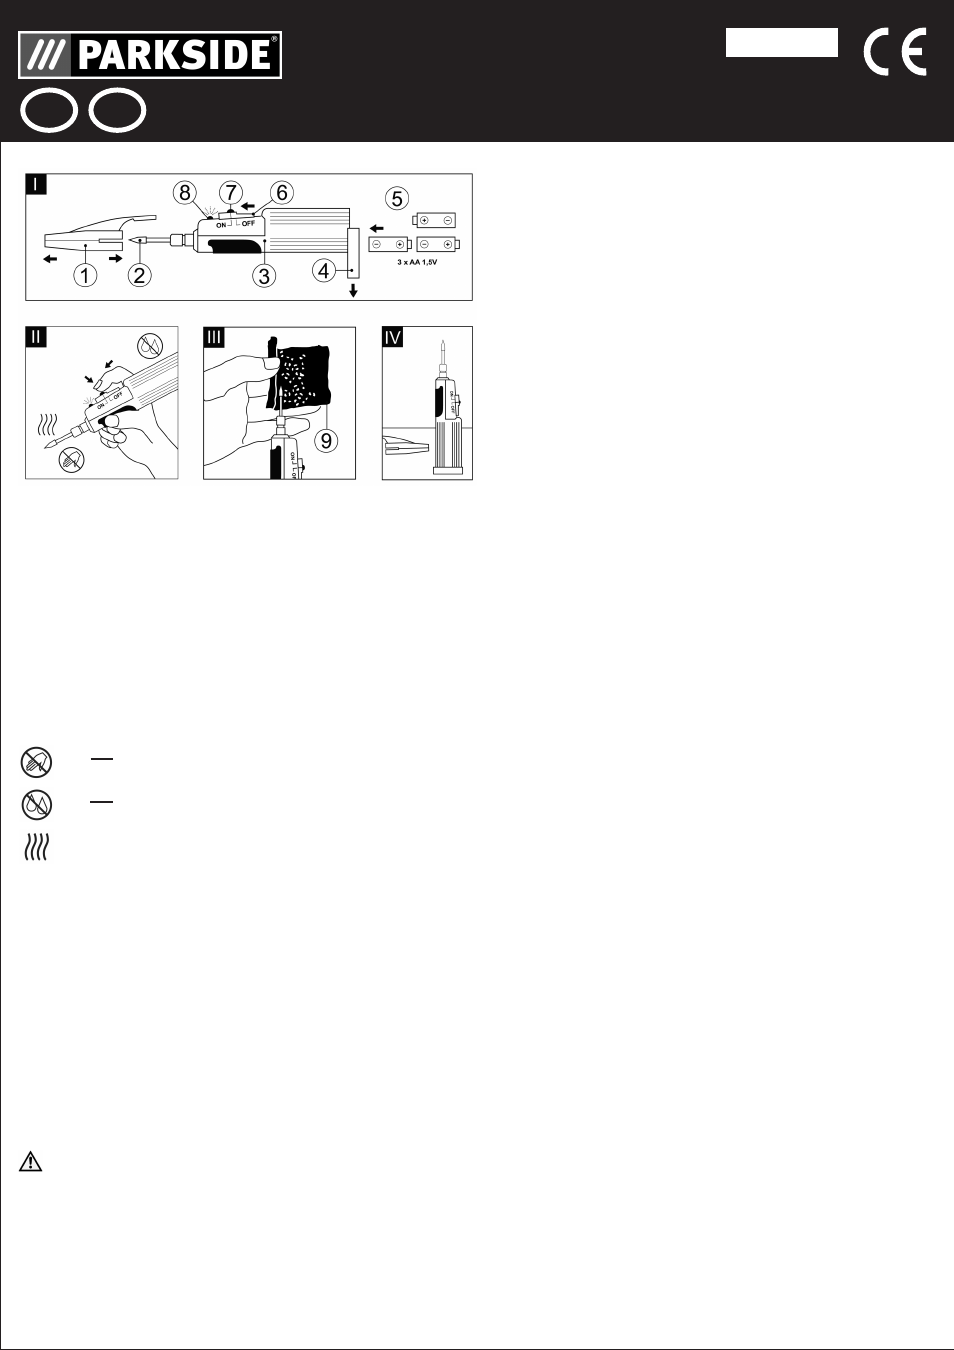
Scope of delivery and explanation of signs
A cordless soldering iron with a soldering tip and a protective cap as
well as a set of operating instructions is included in the delivery. Please
unpack the goods and check it for completeness.
(1) protective cap
(2) soldering tip (tool tip)
(3) cordless soldering iron
(4) battery cover
(5) batteries (3 x 1,5V AA)
are not included in the scope of delivery!
(6) switch ON /OFF
(7) contact button
(8) function control lamp
(9) cleaning abrasive mat -
is not included in the scope of delivery!
Explanation of symbols
Do
not touch the tip of the tool when the appliance is on!
The soldering tip is very hot! Risk of burns!
Do
not emerge the appliance into water and do not expose it to
moisture. Moisture can damage the appliance!
The temperature on tool tip is very high during operation!
Risk of burns!
Intended use
The cordless soldering iron is a portable multi-purpose device. It is
intended for fine soldering in electronics, model constructing and for
hobby work. Any other use is not permitted as it can lead to injuries. In
these cases, the manufacturer carries no liability.
The cordless soldering iron is operated by means of 3 à 1,5V (type AA)
batteries. Batteries are not included in the scope of delivery and must
be purchases separately.
Important information: Please read these instructions for use carefully
to get acquainted with the device. Keep this leaflet for further references.
Do not change any settings or modifications made by the manufacturer.
It is dangerous to change the structure of the device on your own authority,
to remove parts or to use parts, which are not approved by the
manufacturer. (If you change the structure of the device on your own
authority you risk e.g. burns).
This device is only intended for use in private households. Never use
the device for commercial purposes.
Safety Instructions
· CAUTION! When not in use, this appliance must be put down as
shown in picture IV.
· When the cordless soldering iron is in use or when it cools down, it
must be always put down on a firm, flat and heat resistant surface
(see picture IV).
· This appliance is not intended for use by persons (including children)
with restricted physical, sensory or intellectual abilities or lacking
experience and/or lacking knowledge unless they are supervised by
a person responsible for their safety or they receive instructions on
how to use the appliance.
· Children should be supervised in order to ensure that they do not play
with the appliance.
· In order to avoid hazards, the appliance must be repaired by the
manufacturer or his customer service or a similarly qualified person.
· A fire can break out if the appliance is not handled carefully.
· Before use, remove combustible objects, liquids and gases from the
working area of the appliance.
· Keep your working area clean in order to prevent accidents.
· Before use, check that the tool tip is correctly attached to the appliance.
The hot tool tip must not be brought into contact with skin, hair, etc.
Risk of burns.
· As long as it is in use, do not leave the appliance unsupervised. Do
not emerge the appliance into water.
· After use always switch off the cordless soldering iron by sliding the
switch ON/OFF (6) to position OFF.
· After use put the appliance down according to the picture IV and let
it cool down. Only after that you can store it away.
· When the appliance is not in use, store it in a safe place protected
from dust and moisture.
· When storing the appliance, put the protective cap (1) onto the cooled
down tip (2), so that the protective cap (1) protects the switch ON/OFF
(6) in position OFF.
· Check the appliance for damage. Do not use if damaged!
· During use, ensure adequate ventilation. Ensure that no poisonous
vapors or gases can be inhaled. Wear protective clothing (e.g. long
sleeved clothing).
· Please remove the batteries from the cordless soldering iron, if it is
not going to be used for a longer period of time (the batteries can leak
after some time and the cordless soldering iron will be damaged).
· Observe national and international safety, health and work protection
regulations.
Important information before start up
· Before putting the appliance into operation read the operating
instructions!
· In order to achieve best working results use alkaline batteries. To use
the cordless soldering iron you will need 3 batteries á 1,5 V (type AA).
· Replace the batteries only in a dry work environment. Moisture has
a negative influence on the durability of the batteries.
Start up
· Slide open the battery cover (4) (see picture I).
· Place 3 batteries á 1,5 V (type AA) (5) as shown above inside and
replace the battery cover (4).
· Remove the protective cap (1) from the soldering tip (2).
· Make sure the soldering tip (2) is firmly fitted.
· Slide the ON//OFF switch (6) to the position ON.
· Hold the cordless soldering iron (3) like a pen (see picture II).
· Press now the round contact button (7) on the top of the ON/OFF
switch (6) and hold it pressed continuously for approximately 15
seconds (the current flows when the ON/OFF switch is in position
ON and the contact button is pressed at the same time - see picture
II).
· After this time the soldering tip (2) has reached the working temperature
and you can start working.
· In order to save power, only press the contact button (7) when you
are actually soldering.
· When you hold the contact button (7) pressed the function control
lamp (8) is on.
· If the cordless soldering iron is not in use, put it down only in a vertical
position with the soldering tip (2) pointing up (see picture IV) and let
it cool down completely.
Shut down
· After use put the ON/OFF switch (6) into position OFF.
· Put the cordless soldering iron down according to picture IV and let
the soldering tip (2) cool down.
· To cool down always put the cordless soldering iron onto a firm, flat
and heat resistant surface.
· The soldering tip (2) cools down from the maximum working temperature
of 480°C to about 25° within approximately 10 minutes. (The ambient
temperature also has an important influence on the cooling down
time.)
· Afterwards put the protective cap (1) onto the cooled down soldering
tip (2). The protective cap (1) protects the ON/OFF switch (6) in position
OFF.
Repairs, maintenance and cleaning
· Never mix old and new batteries at the same time. This would lead
EN
CY
IAN 90371