Inputting text, Label creation example, Inputting text on the handwriting panel – Casio KL-T100 User Manual
Page 3: Confi guring printer settings, Selecting japanese or chinese input, Inputting chinese text
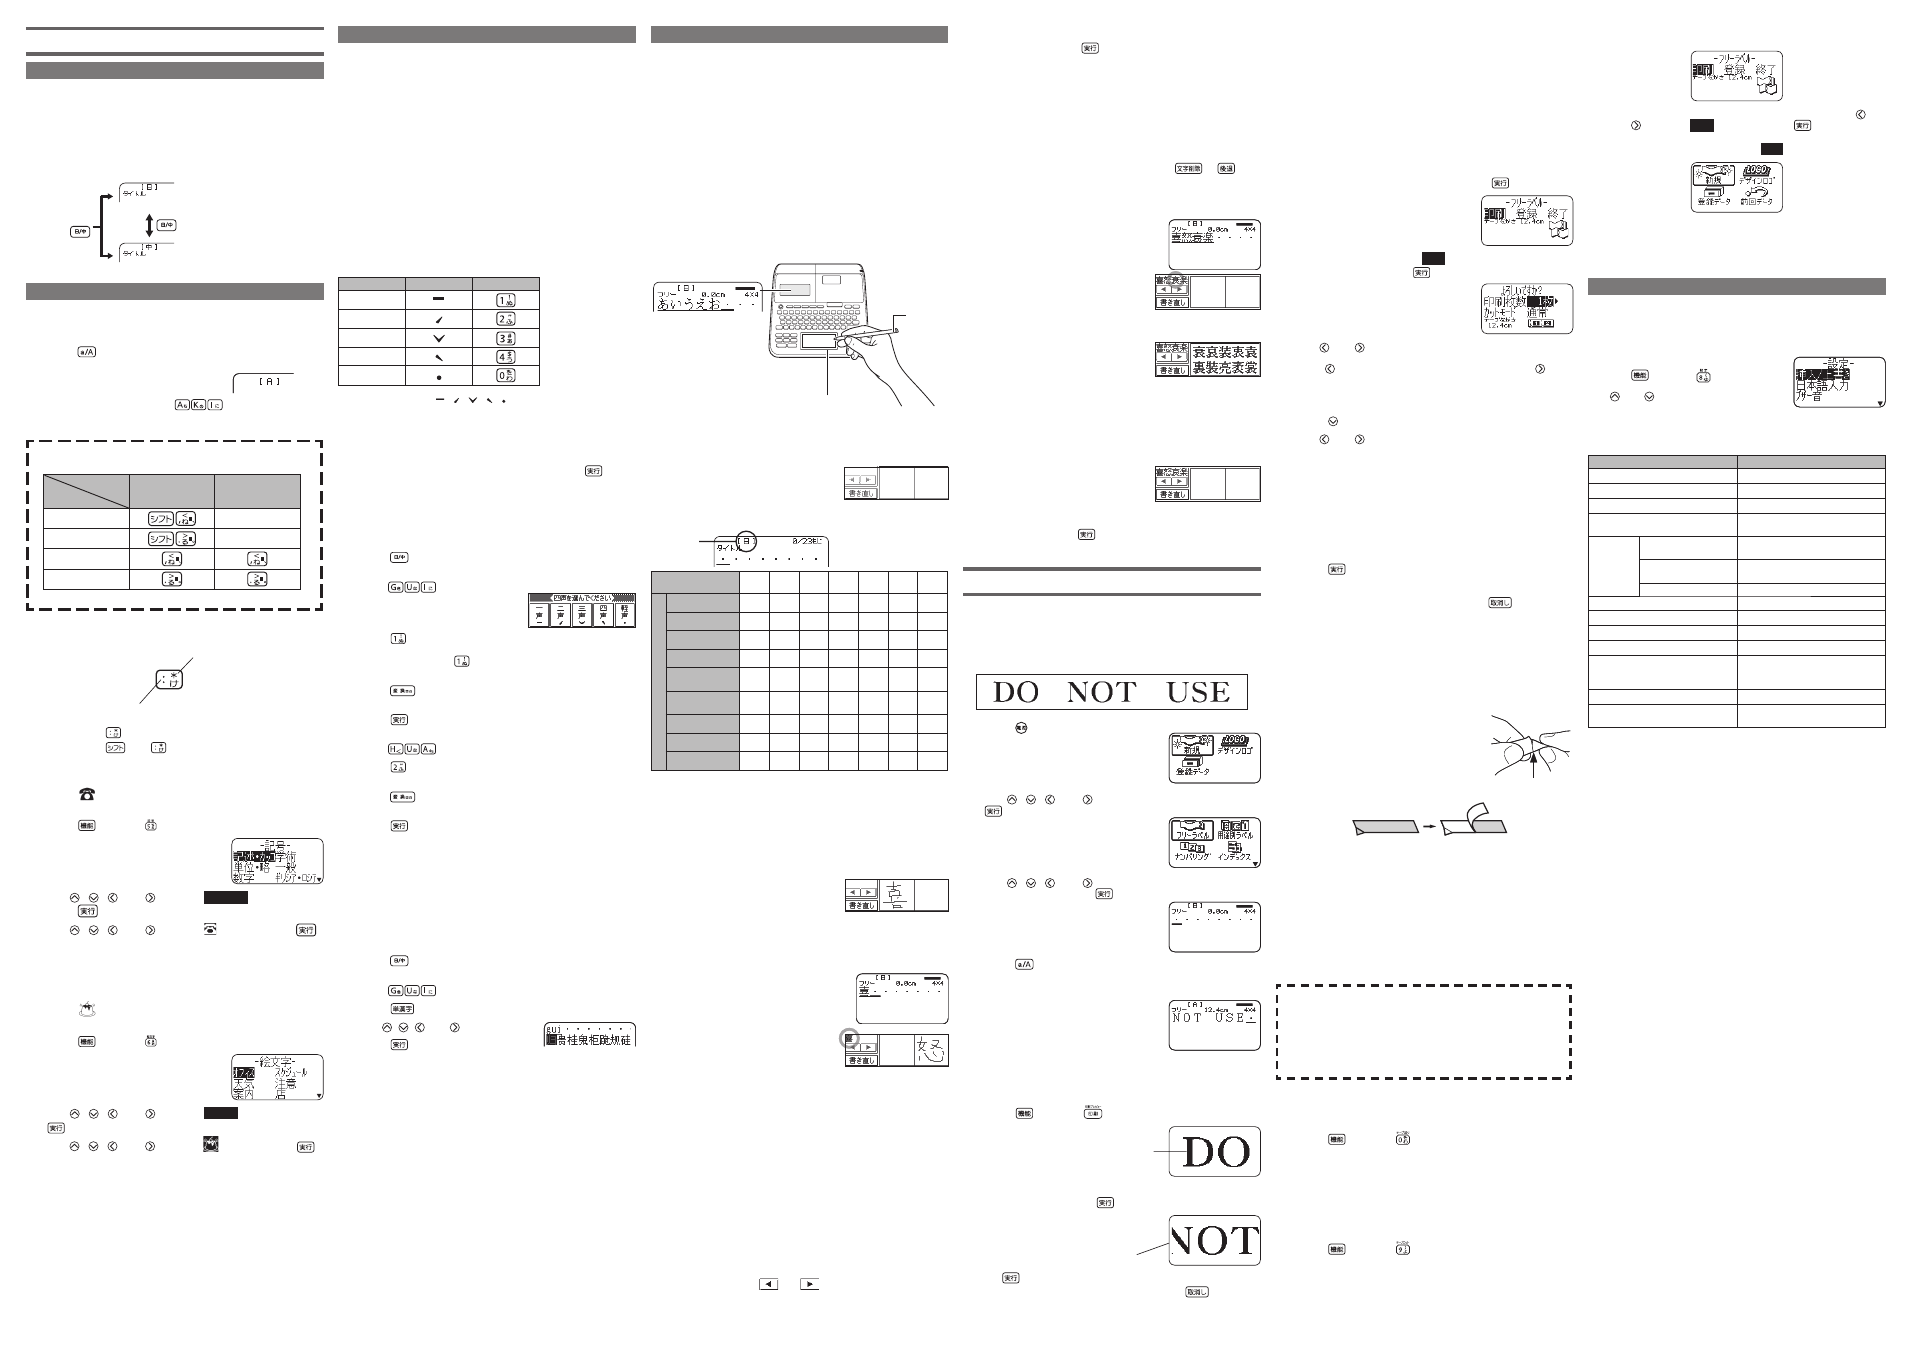
Inputting Text on the Handwriting Panel
You can input text using the printer’s handwriting panel. The
handwriting panel lets you directly input kanji characters that
cannot be input using the keyboard.
Use the touch pen that comes with the printer to write on the
handwriting panel.
Excessive force is not required for touch operations.
The handwriting panel supports input of the following types
of characters.
Japanese kanji
Japanese hiragana and katakana
Chinese kanji
Alpha characters (A to Z, a to z)
Numerals (0 to 9)
Long vowel mark
Some symbols (
)
Touch pen
Recognizes and input written
text
Handwriting panel
Write text here with the touch pen.
When handwritten input is enabled
Cells for writing characters appear on the handwriting panel to
indicate that handwritten input is enabled.
Characters that are recognized for handwritten input depends
on the function you are using and the input mode.
Current input
mode
Indicator
[
] [
]
[
]
[
]
[
]
[
]
[ 1 ]
Recognized text
Japanese kanji
Hiragana
Katakana
Chinese kanji
Alpha characters
(lower case)
Alpha characters
(upper case)
Numerals
Long vowel mark
Some symbols
* Enabled for some functions only.
Handwritten Input Basics
Cells for writing characters appear on the handwriting panel to
indicate that handwritten input is enabled. You can use all of
the cells to write successive characters.
1
On the handwriting panel, write the character you want
in an empty cell.
You can write characters in any
sequence in any cell. Characters
are recognized in the sequence
they are written, regardless of
which cells are used.
To clear the written characters, touch
.
2
Next, write another character in an empty cell on the
handwriting panel.
When you start to write a character,
the fi rst character you wrote is
recognized and input.
3
Write the next character in an empty cell.
This causes the second character to be recognized and
input.
4
Continue writing characters in the cells until you input
all of the text you want. After you are fi nished, touch
on the handwriting panel.
You also can touch
after each character if you want to
input one character at a time to ensure correct input.
When inputting a two-digit number, write each digit in a separate
cell.
You also can confi gure the printer so it automatically attempts to
recognize what you wrote if you do not perform any operation for
about one second after writing a character in a cell.
Inputting more than fi ve characters will cause characters to scroll
off of the handwriting panel. When this happens, you can touch
the handwriting panel
and
keys to scroll left and right.
Pressing any of the printer’s keys during handwriting input
will cause any displayed characters that have not yet been
recognized to be cleared.
•
•
•
•
•
•
•
•
•
•
•
•
•
•
•
•
•
Ending a Print Operation
1
When the above screen is on the display, use the
and
to select
and then press
twice to
return to the screen below.
To save data you created, select
on the above screen.
To recall saved data, select
.
You can select
here to recall data you input
before you last turned off the printer (last text).
Confi guring Printer Settings
You can confi gure text input method, display brightness, and
other settings to adapt printer operation to your specifi c needs.
Settings
Immediately after turning on the printer,
pressing
and then
displays the
screen shown nearby.
Use
and
to select an item and
display a screen you can use to change its
setting.
Some setting items may be omitted if you display this screen any
time other than immediately after turning on the printer.
Setting
Description
/
Input method: Insert/Overwrite
Japanese input method
Buzzer on/off
Handwriting input recognition
method
Screen (main panel) brightness
adjustment
Handwriting panel brightness
adjustment
Handwriting panel calibration
Print density adjustment
Initial font setting for input text
Date and time settings
Message display language
Stores readings, terms, and
expressions that are displayed as
idiom candidates.
Battery settings
Produces a demo print of labels
that use various printer functions.
•
•
•
•
Inputting Text
Selecting Japanese or Chinese Input
With this printer, you can input text either by pressing character
keys or by writing on the handwriting panel.
You can input either Japanese or Chinese text. The initial
default setting after you turn on the printer is Japanese text
input.
Switching between Japanese and Chinese Input
Japanese input enabled.
Press
Chinese input enabled.
Inputting Alpha Characters, Symbols, and Pictographs
To input alpha characters
Example: AKI
1
Press
as many times as necessary until
or A
is displayed in the upper left corner of the screen.
a: Lower case alpha character input
A: Upper case alpha character input
2
Press the following keys:
.
In the case of alpha character input, characters are accepted
as soon as you press a key.
Inputting a Japanese comma ( ) or period ( ), or an alpha
character comma ( , ) or period ( . )
Input
Mode
Symbol
[
]
[a] or [A]
•
To input symbols marked on key caps
2
1
1
Pressing
inputs a colon ( : ).
2
Pressing
then
inputs an asterisk (
).
To input other symbols
Example:
(Group:
)
1
Press
and then
.
Symbol group name
2
Use ,
,
,and
to select
and then
press
.
3
Use ,
,
,and
to select
and then press
.
In step 1, the handwriting panel will show the symbol that
was displayed the last time you used symbol input. You can
input the symbol you want by touching it.
To input pictographs
Example:
(Group:
)
1
Press
and then
.
Pictograph group name
2
Use ,
,
,and
to select
and then press
.
3
Use ,
,
,and
to select
and then press
.
In step 1, the handwriting panel will show the pictograph that
was displayed the last time you used pictograph input. You
can input the pictograph you want by touching it.
•
•
Inputting Chinese Text
This section explains how to input Chinese text.
The initial default setting after you turn on the printer is
Japanese text input.
You can input Chinese text using either of two different
methods.
Inputting pinyin on the printer keyboard
Inputting with the handwriting panel
For information on Japanese text input, see the KL-T100
.
Chinese Text Input Rules
When using the keyboard for input, type alpha character to
enter pinyin.
To input ü
, press [v].
After phonetic input using alpha characters, press one of the
keys shown below to specify a tone or the neutral tone, which
will narrow down the list of Chinese language candidates.
Tone
Symbol
Key
1
2
3
4
Neutral
The tone symbols (
) are not actually marked on
the printer’s keyboard keys.
The four tone and neutral tone symbols also can be entered on
the handwriting panel.
Alpha character pinyin can be converted to kanji characters.
When the kanji you want to input is displayed, press
to
accept it.
Inputting Pinyin
Use the following procedure to input Chinese text using pinyiin.
Example: 规划
1
Press
as many times as necessary until
is
displayed in the upper left corner of the screen.
2
Input
.
In the pinyin input mode, the
handwriting panel will appear as
shown nearby.
3
Press
.
This will narrow down the kanji candidates to those with Tone 1.
Instead of pressing
, you could touch
on the
handwriting panel.
4
Press
as many times as necessary until 规 is
displayed.
5
Press
.
This accepts 规 .
6
Input
.
7
Press
.
This will narrow down the kanji candidates to those with Tone 2.
8
Press
as many times as necessary until 划 is
displayed.
9
Press
.
This accepts 划 .
Chinese text also can be input without specifying the four
tones or neutral tone.
Inputting and Converting Individual Kanji
Characters
You can use the following procedure to convert kanji characters
one-by-one.
Example: 规划
1
Press
as many times as necessary until
is
displayed in the upper left corner of the screen.
2
Input
.
3
Press
.
4
Use ,
,
,and
to highlight 规 .
5
Press
.
This accepts 规 .
6
Repeat steps 2 through 5 to input and convert the
second character.
Numerals and symbols input during Chinese input are entered in
accordance with the
setting or
setting.
The Song font
is always used for Chinese. This font
results in characters that are narrower compared to Japanese
kanji, alpha characters, numerals, and other characters. Because
of this, mixing Chinese with other languages may result in
balance problems.
•
•
•
•
•
•
•
•
•
•
•
5
To accept recognized characters, touch
.
You also can press
instead of touching
.
Chinese kanji recognition is performed in accordance with
the GB18030-2000 standard.
You cannot use the handwriting panel to input pinyin.
Correcting Recognition Errors
You can use the procedure below to correct recognition errors
that result in input of something different from what you wrote
on the handwriting panel.
Note that you will not be able to correct a character after it is
accepted. In this case, you will need to press
or
to
delete the character and then input it again.
Example: If input of
is mistakenly recognized as
1
On the handwriting panel, touch the character you
want to correct (
in this example).
This will cause up to 10 alternate candidates for the character
to appear on the handwriting panel.
If you cannot fi nd the character you want among the
candidates, touch
on the handwriting panel. This
will delete the character you touched for correction. Write it
again on the handwriting panel to re-input.
2
Touch the correct character (
in this example).
This will change
to
.
3
After you are fi nished with your corrections, touch
.
You also can press
instead of touching
.
Label Creation Example
This section provides an example how a label can be created
and printed.
Creating a Label
Sample Printout
1
Press to turn on the printer.
2
Use ,
,
,and
to select
and then press
.
3
Use ,
,
,and
to select the label type you want
to use and then press
.
Here we will select
.
4
Press so [A] is displayed in the upper left corner of
the screen.
5
Input the text you want.
Here, input DO NOT USE .
Previewing the Print Image
You can preview the print image on the printer’s display before
printing it. Note that you can preview the print image only if
there is a tape cartridge loaded in the printer.
1
Press and then
.
The display scrolls to
show a preview of the
print image.
2
If there is a portion of the print image you need to
check carefully, press
while it is displayed.
This will stop print
image scrolling.
Press
again to resume print image scrolling.
To exit the print image preview operation, press
.
Characters made up of fi ne lines and kanji with a large number of
strokes may not appear correctly in the print image preview.
•
•
•
•
•
•
•
•
•
•
•
•
Printing a Label
Printing a label is quick and simple. You can print a single
label or multiple copies of the same label. You also can specify
whether or not a cut operation should be performed after each
label is printed.
Note that the label length shown on the display is approximate
and is intended for reference only. The length of the actual label
depends on the operating environment and print content, and
may be different from what appears on the display.
Before starting a print operation, check to make sure a tape
cartridge is loaded in the printer and that nothing is hindering
output from the printer's tape outlet.
1
Input the text you want and then press
.
2
Check to make sure that
is highlighted on the
screen, and then press
.
3
Use and
to specify the number of copies.
Here we will specify 1
.
Use
to decrease the currently selected value and
to
increase it.
You also can input values directly, if you want. You can
specify printing of up to 100 copies (consecutive print).
4
Press .
5
Use and
to specify the cut mode.
If you want to print without cutting the backing paper of the
label tape, specify
.
If you want to perform a cut operation after each label,
specify
.
If you have self-adhesive tape, cloth transfer tape, or instant
lettering tape loaded in the printer, specify
.
If you have refl ective tape, magnetic tape, or iron-on cloth
tape loaded in the printer, specify
.
Here we will specify
.
6
Press
.
This starts the print operation.
To stop an ongoing print operation, press
.
Affi xing a Label
1
Use scissors or some other implement to trim the label
to the required size, if necessary.
2
Peel the backing off of the label and affi x it to the
surface you want.
If you are using half-cut label
Carefully twist the label at the position of
the half-cut and then peel the backing from
the label.
If you are using a full-cut label
Bending a corner of the label helps when
belling off the backing.
HAPPY!
PPY!
Affi xing a label to a surface may cause adhesive to remain on the
surface when the label is removed.
Do not affi x tape labels to objects and in the locations
described below.
Locations exposed to direct sunlight or rain
On the skin of a person or animal
On property belonging to others, utility poles, etc.
In parks, train stations, or other public places
Containers that will be used for heating in a microwave oven
Incompatible Surfaces
The label tape may not adhere properly to the following
types of surfaces.
Surfaces that are rough
Surfaces that are wet, oily, dusty, etc.
Surfaces made of special plastics (silicon, PP, etc.)
•
•
•
Feeding the Tape
You can feed the tape before or after printing.
1
Press and then
to feed the tape.
This operation feeds the tape 21 mm.
When
is selected for the tape margins
If you have
specifi ed for the tape feed operation, the
tape is not cut automatically even when the end of the print
operation is reached. Use the following operation to cut the
tape.
1
Press and then
to cut the tape.
Make sure that the printer is on a level surface when cutting
the tape.
Never pull on the tape or open the printer cover when
performing a tape cut operation.
•
•
•
•
•
•
•
•
•
•
•
•
•
•
•
•
•
•
•
•