Fig.5, 9fig.7, Fig.6 fig.8 – Sealey RB320E User Manual
Page 2
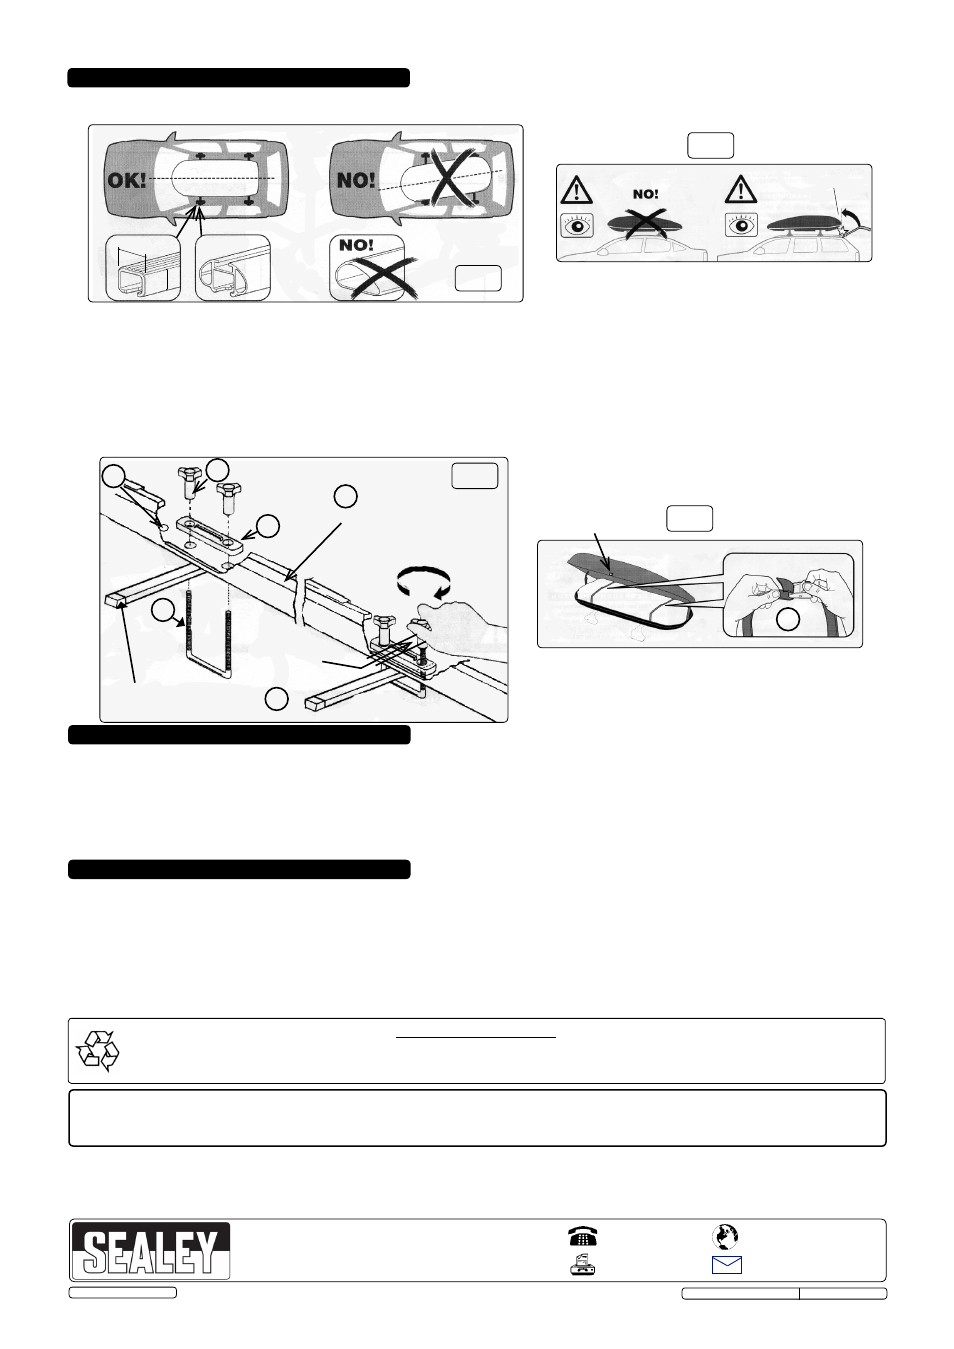
The following instructions assume the roof rails are already installed on the vehicle and the roof bars can be adjusted to suit the roof box. The
roof bars must be rectangular in section, or offer two flat parallel faces top and bottom, for clamping successfully (fig.5).
4.1. Take some steps to plan the position of the roof bars by measurement of the available holes in the base of the roof box. If additional
holes are required in the roof box base, the box must be fixed to the front existing holes. New holes must be punched for the rear bar.
4.2. Place the completed box on to the roof bars, on the centre line of the vehicle ensuring the tailgate will not foul the roof box (fig.6).
4.3. Fix the roof box (fig.7) to the bars inserting the "U" bolts (item 5) beneath the bars and through the pre-punched holes in the roof box
base.
4.4. Place the clamp plates (item 6) over the "U" bolts and secure with the clamp knobs (item 7) hand tight. dO NOT use tools.
4.5. Secure the roof bars to the roof rails with its proprietory fixings.
4.6. Unused holes in the base of the roof box must be sealed with the supplied self adhesive patches (item9).
4.7. Insert the luggage straps (item 8) through the slot of the clamp plates.
4. INSTALLATION
5. LOAdING THE ROOFBOX
5
6
7
2-2.5Nm
Roof box base
Feed the luggage
straps through
clamp plate slot
Patch
unused
holes
8
1
Roof bars
(not supplied)
fig.5
5.1
Release the safety lock (fig.1) and unlock (fig.2) the roofbox cover prior to opening fully against sprung loaded stops (fig.4).
NOTE! The safety lock access, now on the roof of the vehicle, may require the use of steps to reach.
5.2. Distribute the load evenly over the width and length of the roofbox base. dO NOT overload, 50kg maximum.
5.3. Strap in the contents (fig.8). If possible avoid compartment gaps on the length to minimise inertia movements.
5.4. Close and key lock (fig.2) the roofbox cover. To close the cover, apply equal pressure with hands near to opposite ends. Ensure the
load does not impede closure. Remove and store the key, in the glove box for example.
5.5. Engage the safety lock (fig.1).
C/L Vehicle & Roofbox
9
fig.7
6. MAINTENANCE
6.1. Remove from the vehicle when not in use.
6.2. Check all components for integrity, regularly when in use and every time it is removed or fitted. Especially fixing points (fig.7).
6.3. Clean with soap and water. dO NOT use alcohol or solvents.
6.4. Store loose components in the roofbox and key lock.
6.5. Keep the keys safe.
NOTE: It is our policy to continually improve products and as such we reserve the right to alter data, specifications and component parts without prior notice.
IMpORTANT: No liability is accepted for incorrect use of this product.
WARRANTY: Guarantee is 12 months from purchase date, proof of which will be required for any claim.
INFORMATION: For a copy of our latest catalogue and promotions call us on 01284 757525 and leave your full name and address, including postcode.
01284 757500
01284 703534
Sole UK distributor, Sealey Group,
Kempson Way, Suffolk Business Park
,
Bury St. Edmunds, Suffolk,
IP32 7AR
www.sealey.co.uk
W e b
Original Language Version
RB320E,RB420E,RB480E ISSUE 1 09/01/14
parts support is available for these products. To obtain a parts listing and/or diagram, please log on to
www.sealey.co.uk, email [email protected] or phone 01284 757500.
© Jack Sealey Limited
Environmental protection.
Recycle unwanted materials instead of disposing of them as waste.
Packaging should be sorted, taken to a recycle centre and disposed of in a manner which is compatible with the environment.
70mm
max
40mm
-
max
fig.6
fig.8
See fig.2
8
Tailgate clearance!