Fig.1 fig.2, Installation & assembly 4. operation, Maintenance – Sealey TP9912 User Manual
Page 2
3. INSTALLATION & ASSEMBLY
4. OPERATION
Original Language Version
TP9912,TP99230 Issue: 1- 05/06/13
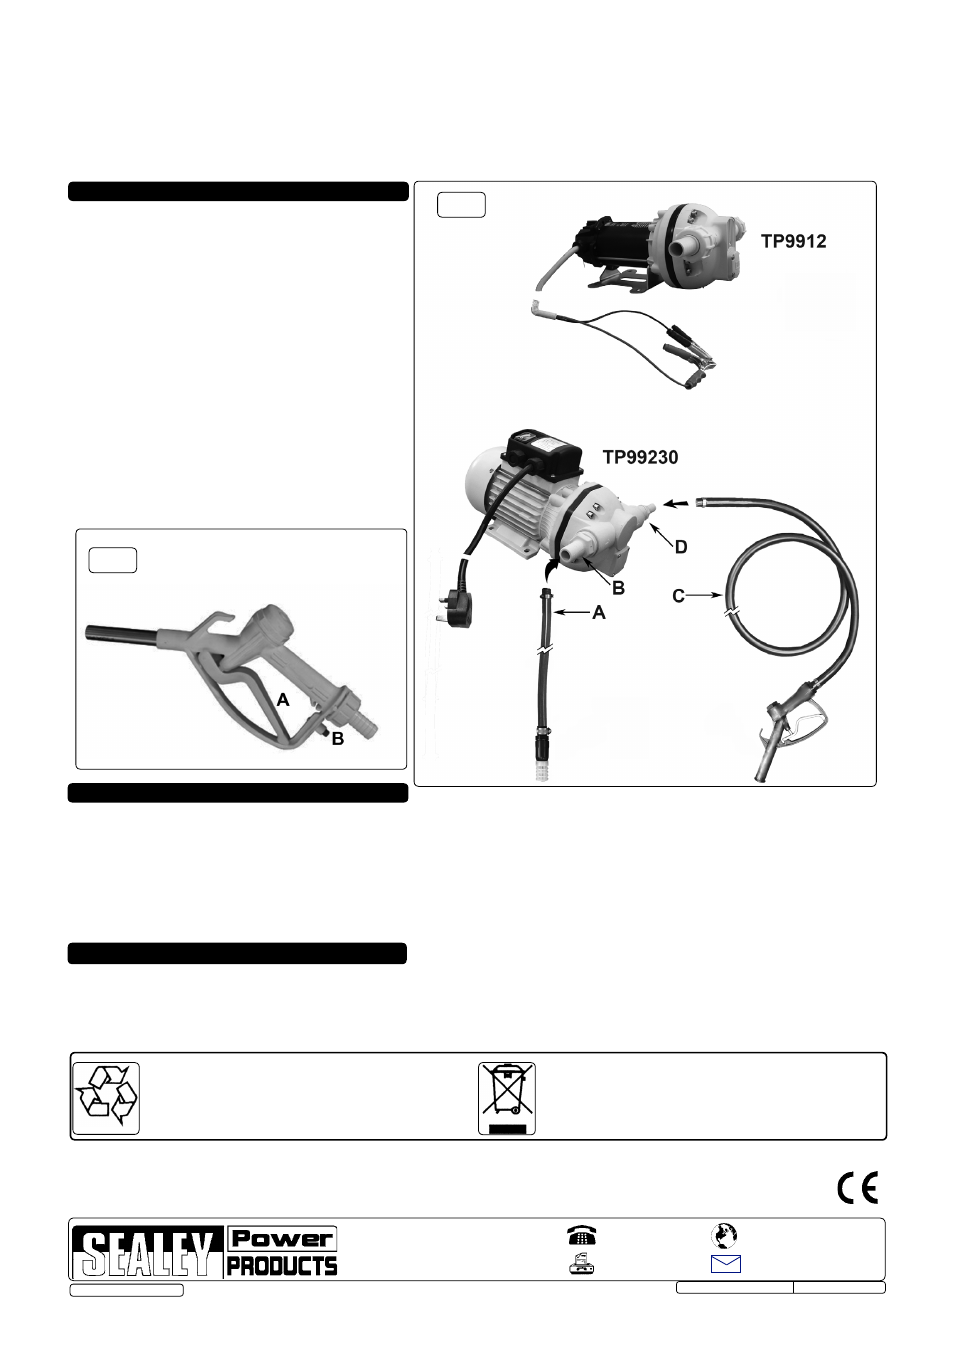
fig.1
fig.2
3.1. Attach the feet of the pump unit to a stable surface
using 4 suitable screws or bolts (not supplied).
3.2. Remove blanking plugs from suction (fig.1.B) and
delivery (fig1.D) ports and push hoses (figs.1.A and
1.C) onto the connectors, first placing a loose hose
clip over the hose. Note: the flow direction is marked
on the pump.
3.3. Tighten the hose clips onto the hoses.
3.4. Immerse the suction strainer in the AdBlue® container.
3.5. Connect to the appropriate electric power supply by
means of battery clips (TP9912) or mains plug
(TP99230).
SITE INSTALLATION. It is the responsibility of the
owner of the equipment to ensure that the siting
of the AdBlue
®
container and the installation and
operation of the pump is carried out in such a way
as to prevent any leakage which could
contaminate water courses or drinking water for
people or animals. The owner should liaise with
local authorities, health and safety and water
authorities to ensure that the installation is safe.
These pumps, being of positive displacement design, do not require priming. When first used, there will be a slight delay as air is cleared
from the system.
4.1. To operate: switch the pump motor on using the rocker switch above the motor (O="OFF", I="ON"). The motor will start.
4.2. Place the nozzle in the AdBlue® vessel to be filled and squeeze the delivery trigger (fig.2.A).
4.3. If using the latch (fig.2.B),use with care as there is no automatic cut-off fitted to the nozzle.
4.4. When delivery is complete, release the delivery trigger: delivery will stop but the pump will continue to run.
4.5. Turn the pump off using the rocker switch. To avoid damage DO NOT run the pump with no delivery for longer than necessary. IN NO
CIRCUMSTANCES
run in this state for more than 3 minutes.
4.6. Store the nozzle so as to prevent spillage of urea into the environment.
5. MAINTENANCE
5.1. The pump has been designed for low maintenance. Should any problems occur return the unit to your local Sealey dealer.
5.2. Clean the entire installation and inspect all piping connections for leaks. Rectify any damage immediately.
5.3. Inspect the filter at the end of the suction tube every time the tank is refilled. Clean if necessary.
Environmental Protection.
Recycle unwanted materials instead of disposing of them as
waste. All tools, accessories and packaging should be sorted,
taken to a recycle centre and disposed of in a manner which
is compatible with the environment.
WEEE Regulations.
Dispose of this product at the end of its working life in compliance
with the EU Directive on Waste Electrical and Electronic Equipment.
When the product is no longer required, it must be disposed of in an
environmentally protective way. Contact your local solid waste
authority for recycling information.
NOTE: It is our policy to continually improve products and as such we reserve the right to alter data, specifications and component parts without prior notice.
IMPORTANT: No liability is accepted for incorrect use of this product.
WARRANTY: Guarantee is 12 months from purchase date, proof of which will be required for any claim.
INFORMATION: For a copy of our latest catalogue and promotions call us on 01284 757525 and leave your full name and address, including postcode.
01284 757500
01284 703534
Sole UK Distributor, Sealey Group,
Kempson Way, Suffolk Business Park
,
Bury St. Edmunds, Suffolk,
IP32 7AR
www.sealey.co.uk
Web
© Jack Sealey Limited
Model No: . . . . . . . . . . . . . . . . . . . . . . TP9912 . . . . . . . . . . . . . . . . . . . . . . . . . . . TP99230
Voltage: . . . . . . . . . . . . . . . . . . . . . . . . 12V dc . . . . . . . . . . . . . . . . . . . . . . . . . . . . .230V ac
Speed: . . . . . . . . . . . . . . . . . . . . . . . . . 2800rpm. . . . . . . . . . . . . . . . . . . . . . . . . . . 2900rpm
Current::. . . . . . . . . . . . . . . . . . . . . . . . 18A. . . . . . . . . . . . . . . . . . . . . . . . . . . . . . . . . . . . 2A
Power: . . . . . . . . . . . . . . . . . . . . . . . . . 260W . . . . . . . . . . . . . . . . . . . . . . . . . . . . . . . .370W
Duty Cycle: . . . . . . . . . . . . . . . . . . . . . 30min/hr. . . . . . . . . . . . . . . . . . . . . . . . . Continuous
Flow Rate: . . . . . . . . . . . . . . . . . . . . . . 40ltr/min. . . . . . . . . . . . . . . . . . . . . . . . . . . 40ltr/min