Declaration of conformity 5. maintenance – Sealey SGA4 User Manual
Page 2
For Jack Sealey Ltd. Sole UK importer of Sealey Power Welders.
Declaration of Conformity We, the sole UK importer, declare that the product listed below is in
conformity with the following standards and directives.
The construction file for this product is held by the Manufacturer and may be inspected, by a national
authority, upon request to Jack Sealey Ltd.
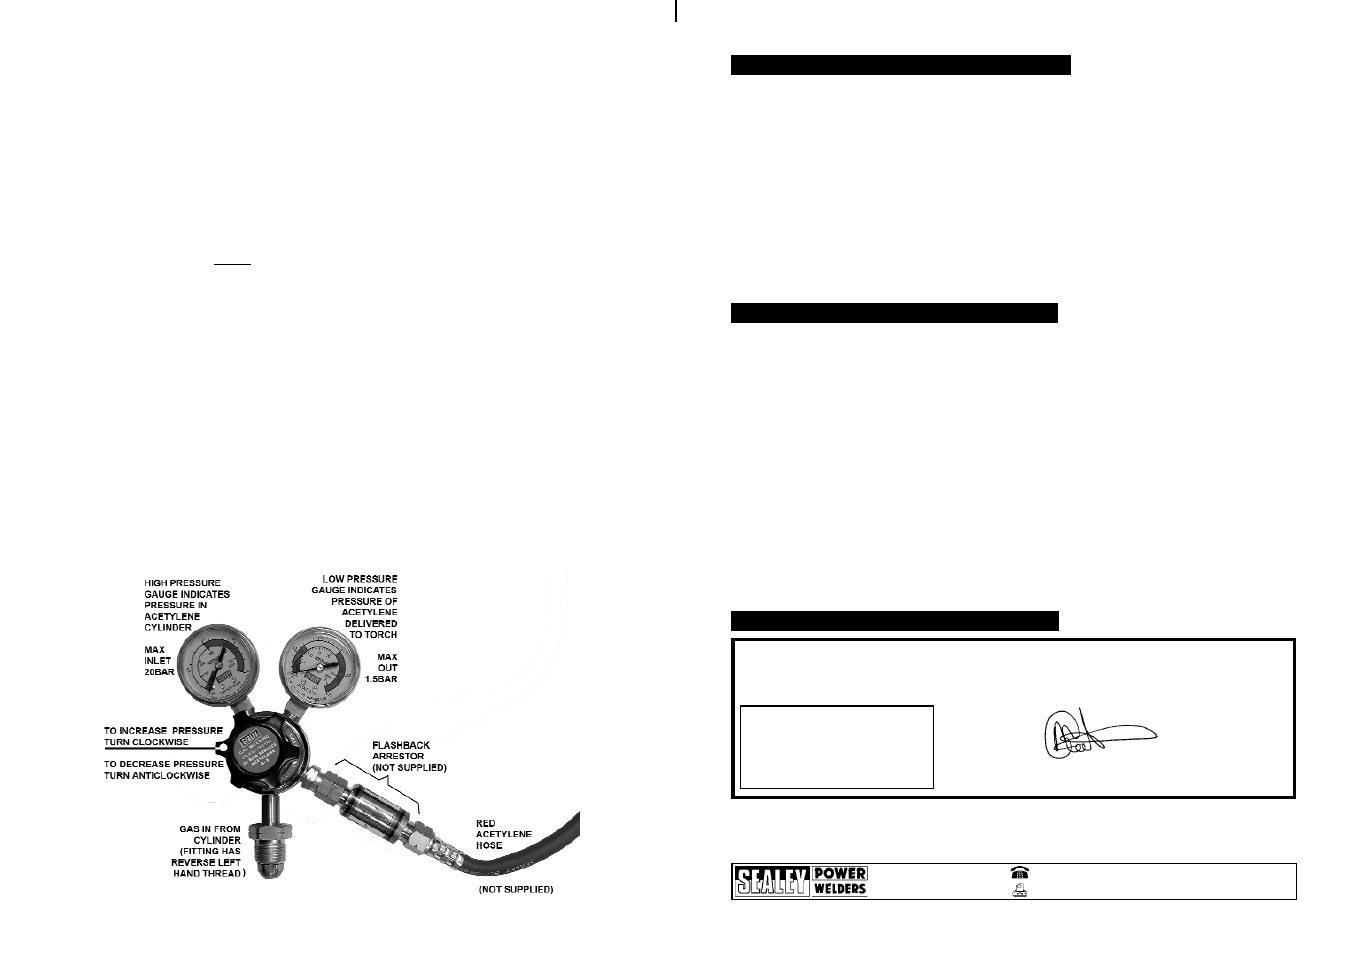
ACETYLENE REGULATOR
Model: SGA4
BS EN 2503,1998 Gas Welding
Equipment
Signed by Mark
Sweetman
19th October 2005
6. DECLARATION OF CONFORMITY
5. MAINTENANCE
5.1 Each time the equipment is used.
5.1.1 The regulator should be visually examined to determine its suitability for service. If any of
the following conditions apply the regulator should be withdrawn from service:
5.1.2 There should be no contamination with oil or grease or solvents.
5.1.3 The inlet and outlet connections should be free from grit and other particles.
5.1.4 There should be no damage to threads, sealing surfaces, or seals.
5.1.5 There should be no visible damage to the pressure gauges or dials and indicators under the
pressure gauge windows.
5.2 When assembled to an acetylene cylinder with flashback arrestor and hose attached all
joints shall be leak tested.
5.3 Annually.
5.3.1 The gauge should be tested under known conditions to determine that it is still working properly.
5.4 Replacement/refurbishment intervals.
5.4.1 Subject to conditions of use the regulator should be replaced with a new, repaired, or service
exchange unit every 5 years or in accordance with the manufacturers recommendations. If
regulators are repaired or refurbished this should be done in accordance with the BCGA
(British Compressed Gas Association) Code of practice CP7.
4. OPERATION
4.1 Ensure that the regulator is closed by turning the adjusting knob anti-clockwise to relieve
the pressure on the diaphragm before opening the cylinder valve. If this is not done,
pressure from the cylinder can damage the diaphragm and render the regulator inoperative.
4.2 Slowly open the acetylene cylinder valve. As you do so the high pressure gauge (left hand)
will register the cylinder pressure.
4.3 Slowly open the regulator by turning the adjusting knob clockwise. As you do so the outlet
pressure gauge (right hand) will register the outlet pressure of gas being fed to the torch.
Adjust the pressure according to the size of nozzle in use and the thickness of the material
to be cut or welded. The manufacturer of the torch will normally supply a data chart to refer to.
4.4 Shutting down process. On completion close the cylinder valve.
4.5 Drain gas from the regulator and hose by opening the appropriate acetylene control valve
on the torch for a few seconds.
Ensure adequate ventilation when doing this.
3.10. Close the regulator by turning the adjusting knob anti-clockwise.
01284 757500
01284 703534
E-mail: [email protected]
Sole UK Distributor
Sealey Group,
Bury St. Edmunds, Suffolk.
Web address: www.sealey.co.uk
NOTE: It is our policy to continually improve products and as such we reserve the right to alter data, specifications and
component parts without prior notice. IMPORTANT: No liability is accepted for incorrect use of this product.
WARRANTY: Guarantee is 12 months from purchase date, proof of which will be required for any claim. INFORMATION: For a copy of
our catalogue and latest promotions call us on 01284 757525 and leave your full name, address and postcode.
3.3. Attaching the regulator. Ensure the inlet filter is in place and is not blocked or contaminated.
If an '0' ring is fitted to the inlet, check for damage and replace if necessary with an '0' ring
recommended by the regulator manufacturer. Do not use any form of jointing paste or
tape between regulator and cylinder valve. Before attaching the regulator wipe the fitting
with a clean dry cloth. Screw the union at the base of the regulator to the cylinder by hand.
Ensure that the gauges are correctly orientated so as to be seen properly by the operator.
The regulator to cylinder fitting has a reverse left handed thread.To tighten turn
anticlockwise. A wrench should be used to ensure tight connections.
3.3.1 Close the regulator by turning the adjusting knob anti-clockwise to relieve the pressure on
the diaphragm before opening the cylinder valve. If this is not done, pressure from the
cylinder can damage the diaphragm and render the regulator inoperative.
3.3.2 The cylinder valve-to-regulator connection should be checked for leaks using an approved
leak detection spray or water and soap solution. Stand so that the cylinder valve is between
you and the regulator. Slowly open the cylinder valve.
3.4 Connecting a flashback arrestor. According to safety regulations, when regulators are
used with acetylene, it is compulsory to use a flashback arrestor. This should be connected
directly to the gas outlet on the regulator as shown below and the gas hose should then
be fitted to the flashback arrestor. The flash back arrestor should be colour coded RED for
ACETYLENE and has to be fitted the right way round. It will have the direction of flow
marked on it. Follow the instructions provided with the arrestor. The arrestor will have
reverse threaded unions which have to be turned anticlockwise to attach them.
3.5. Connecting a hose.
3.5.1 NOTE: New hoses contain a preservative talc which must be blown out with
compressed air before use.
3.5.2 Connect a hose coded RED for ACETYLENE to the flashback arrestor as shown below.
Tighten nut securely with wrench. The nut will have a reverse thread which will have to be
turned anticlockwise to attach it. If any sign of oil or grease is found, discontinue use
immediately.
3.5.3 Prior to attaching the torch blow out the hose to eliminate any particles or debris. Perform this
on the hose in a well ventilated area, otherwise you may create conditions for fire or explosion.
a. Turn the regulator adjusting screw slowly clockwise until the outlet gauge registers 5psi
and acetylene begins to pass through hose.
b. Allow the acetylene to flow for approximately 10 seconds to purge the hose.
SGA4 - 4 - 22/11/05