Silvercrest EIM-803 UK User Manual
Silvercrest Accessories for electrical
GB/IE
GB/IE
GB/IE
GB/IE
GB/IE
GB/IE
GB/IE
GB/IE
GB/IE
GB/IE
GB/IE
GB/IE
GB/IE
GB/IE
GB/IE
GB/IE
GB/IE
GB/IE
GB/IE
5
Manually ending the countdown
Press the ON / OFF button
5
to halt the countdown.
Press the ON / OFF button
5
again to continue the
countdown.
Press the time button
3
to change from the countdown
display to the current time.
Press the time button
3
again to change from the
current time to the countdown display.
Press the time button
3
and the ON / OFF button
5
simultaneously to cancel the countdown.
Twilight sensor
This function orients the time switch’s switching times to
dawn and dusk twilight. The programmed switching times
are automatically adjusted to the light conditions. The time
switch automatically switches on or off as soon as the twilight
sensor
1
detects a change of light conditions lasting for
more than 15 seconds. This function is only active at dawn
or dusk. It does not affect operation during the day or night.
Press the day of the week button (Day)
6
and the hour
button (h+)
8
again to cancel the random mode.
Setting the countdown
Press the timer button
4
to access the timer menu.
Press and keep pressed the timer button
4
until the
“
ON
C” symbol appears in the LC display
2
.
Press the ON / OFF button
5
to switch the countdown
function on and off.
Press the hour button (h+)
8
repeatedly until the desired
hour value appears in the LC display
2
.
Press the minute button (m+)
7
repeatedly until the
desired minute value appears in the LC display
2
.
Press the timer button
3
to store the setting. The
current time appears again.
Press the time button
3
and the ON / OFF button
5
simultaneously to start the countdown.
Note: The countdown can be set from 1 minute to
99 hours, 59 minutes.
ON: All switching times are cancelled and the attached
consumer is permanently switched on.
Press ON / OFF switch
5
for about 5 seconds. The
switching times and twilight sensor are activated again.
The indicator “A” appears in the LC display
2
.
Setting the random mode
Note: This function switches the time switch arbitrarily on
and off. This is intended to prevent burglaries by simulating
an occupied house with e.g. lights switching on and off at
irregular intervals. Your preprogrammed switching commands
are moved by a random amount up to 30 minutes on each
day. This function is only possible if one or more switching
commands have been set.
Press the day of the week button (Day)
6
and hour
button (h+)
8
simultaneously. The symbol “Timer”
flashes in the LC display
2
and the random mode is
switched on.
Cancelling switching times
Press the timer button
4
. The programmed switching
times appear in the display.
Press the ON / OFF button
5
to cancel the selected
programmed switching time. The symbol “H I : d E”
appears in the LC display
2
.
Press the ON / OFF switch
5
for longer than 5 seconds
to cancel the switching time. The “- - : - -” symbol appears
in the LC display
2
.
Switching the time switch manually
At any time, and independently of programmed times,
you can manually skip a subsequent switching time.
To do this, press the ON / OFF button
5
until the
symbol “A” disappears from the time indicator.
Press the ON / OFF button
5
once to choose between
the following options:
OFF: All switching times are cancelled and the attached
consumer is permanently switched off.
Changing or checking switching
times
To change or check the switching times, press the timer
button
4
and the programmed switching times appear
one after the other in the display.
To change the days, hours or minutes, proceed as described
in the section “Entering switching times”.
Skipping switching times
Press the timer button
4
. The programmed switching
times appear one after the other in the display.
Press the ON / OFF button
5
to cancel the selected
programmed switching times. The symbol “H I : d E”
appears in the LC display
2
.
Press the time button
3
to return to normal operating
mode.
Note: The programmed switching times are not deleted
from the memory and can be reactivated by pressing the
ON / OFF button
5
again.
Press the minute button (m+)
7
repeatedly until the
desired minute value appears in the LC display
2
.
Press the day of the week button (Day)
6
repeatedly
until the desired day of the week or block of days of the
week appears in the LC display
2
.
Press the timer button
4
again to store the setting.
Press the time button
3
to return to normal operating
mode.
Note: You can program up to 9 different on / off programs.
To do this, repeat the above-described programming proce-
dure in each case. The ON 2 “- - : - -” indicator etc. appears
in the LC display
2
when each further setting is stored. As
soon as you have programmed at least one switching time,
the symbol “A” appears in the time indicator.
• MO TU WE TH FR SA SO
Monday – Sunday
Note: As soon as a particular day or combination of days
has been stored, the device executes the programmed
on / off switching program at the same time on each of
these days of the week.
Press the timer button
4
again to store the setting.
The OFF 1 “- - : - -” indicator appears in the LC display
2
.
Note: Two switching programs must be set if the desired
switching program overlaps the time 12:00 pm. In this case,
one of the programs ends at 11:59 pm and the next starts
at 12:00 am.
Switching-off time:
Press the hour button (h+)
8
repeatedly until the desired
hour value appears in the LC display
2
.
Press the day of the week button (Day)
6
repeatedly
until the desired day of the week or block of days of the
week appears in the LC display
2
. The following days
of the week or blocks of days of the week are possible:
• MO TU WE TH FR
Monday – Friday
• SA SU
Saturday + Sunday
• MO TU WE TH FR SA
Monday – Saturday
• MO WE FR
Monday + Wednesday + Friday
• TU TH SA
Tuesday + Thursday + Saturday
• MO TU WE
Monday – Wednesday
• TH FR SA
Thursday – Saturday
Entering switching times
You can enter values for 9 on / off switching programs on
this time switch.
ATTENTION! The program periods must not overlap
Otherwise the device may malfunction. A program period
always consists of a switching-on time and a switching-
off time, which must be entered one after the other. If
only the switching-on time has been programmed then
the attached consumer will not be switched off until
another program period becomes active.
Switching-on time:
Press the timer button
4
once. The ON 1 “- - : - -”
indicator appears in the LC display
2
.
Press the hour button (h+)
8
repeatedly until the
desired hour value appears in the LC display
2
.
Press the minute button (m+)
7
repeatedly until the
desired minute value appears in the LC display
2
.
Operating the time switch
manually
Note: If the indicator “A” appears in the LC display
2
,
the time switch switches according to the programmed
switching times and the twilight sensor. If the indicator
“A” does not appear in the LC display
2
, then the
device can be switched on and off manually.
Press the ON / OFF button
5
for approx. 5 seconds
to activate the switching times and the twilight sensor.
The indicator “A” appears in the LC display
2
.
Switching manually:
Press the ON / OFF button
5
for about 5 seconds.
The indicator “A” appears in the LC display
2
. The
manual mode is now active. The twilight sensor and the
activated switching times are not activated.
Now press the ON / OFF button
5
once to switch
the time switch on or off.
Press the minute button (m+)
7
repeatedly until the
desired minute value appears in the LC display
2
.
Press the day of the week button (Day)
6
repeatedly
until the desired day of the week appears in the LC
display
2
.
Note: MO = Monday, TU = Tuesday, WE = Wednesday,
TH = Thursday, FR = Friday, SA = Saturday, SU = Sunday
Release the time button
3
.
Note: The time switch is now in operation. This is indi-
cated by the flashing of the colon in the LC display
2
.
Activating summer / winter time
Press the minute button (m+)
7
and hour button (h+)
8
simultaneously. In the summer time mode, the additional
word “SUMMER” appears in the time indicator, in winter
time mode this is absent.
Note: Open the protective flap LC display
9
to make
settings on the device. Open the protective flap output
socket
11
to access the outlet socket.
Press the time button
3
. The digits stop blinking.
Operation
Setting the day of the week and
time
Keep the time button
3
pressed during the whole of
the following setting procedure.
Press the hour button (h+)
8
repeatedly until the desired
hour value appears in the LC display
2
.
Tip: By pressing and keeping pressed the hour button
(h+)
8
for approx. 3 seconds you can accelerate the
setting process and reach the desired value more quickly.
This quicker method can also be used for making the
following settings.
Before use
The time switch has an integral rechargeable battery. This
serves to retain stored data, e.g. time, date and switching
procedures. The rechargeable battery must be charged for
24 hours before first use. You can make settings on the
device during the charging process.
Plug the device into a properly installed 220–250 V /
50 Hz mains outlet socket.
As soon as the flashing digits appear on the LC display,
press the reset button
10
using a sharp object.
Note: In the event of a power cut, the in-built recharge-
able battery ensures that the time is kept going and the
existing settings are retained. The device is fully pro-
grammable without a power supply, as long as the
rechargeable battery is fully charged.
Do not use the device with power outlet strips or
extension cables.
Please note that damage arising from improper handling,
non-observance of the operating instructions or interfer-
ence with the inside of the device by unauthorised persons
is excluded from the warranty.
The device is not suitable for inductive loads, e.g. for
electric motors or fluorescent lights .
Do not open the device. Never attempt to replace or
repair parts yourself.
Before cleaning the device, always disconnect it from
the mains outlet socket and pull all mains plugs out of
the device.
Please ensure that the device is always easily accessed.
In the event of malfunctions, pull the device out of the
mains outlet socket.
Use the device only with a properly installed mains
outlet socket.
CAUTION! Do not have one digital time switch inserted
behind another. There is the danger of mechanical dam-
age if one adapter plug is inserted behind another.
Do not allow the device to be subjected to extreme heat
or cold.
Do not cover the device with newspapers, articles of
clothing or the like. Otherwise the device may heat up,
which is not permitted.
Always check the device for damage before plugging it
into a mains outlet socket. Do not use the device if you
discover it is damaged in any way. In the event of dam-
age, repairs or other problems with the device, please
contact a specialist repair shop.
Do not plug in any devices that hang from and exert
their self-weight on the plug. This will prevent any non-
permitted heating up of and mechanical damage to the
mains outlet socket.
General safety advice
DANGER OF LOSS
OF LIFE OR ACCIDENT TO INFANTS
AND CHILDREN! The product is not a toy.
Never leave children unsupervised with the packaging
material or the device. The packaging material presents
a suffocation hazard and there is a risk of loss of life
from electric shock.
This device is not intended to be used by persons (including
children) with restricted physical, sensory or mental abili-
ties or with insufficient experience and / or knowledge,
unless they are supervised by a person who is responsible
for their safety or they have received instruction on how
to use the device from such a responsible person. Children
should be supervised in order to ensure that they do not
play with the device.
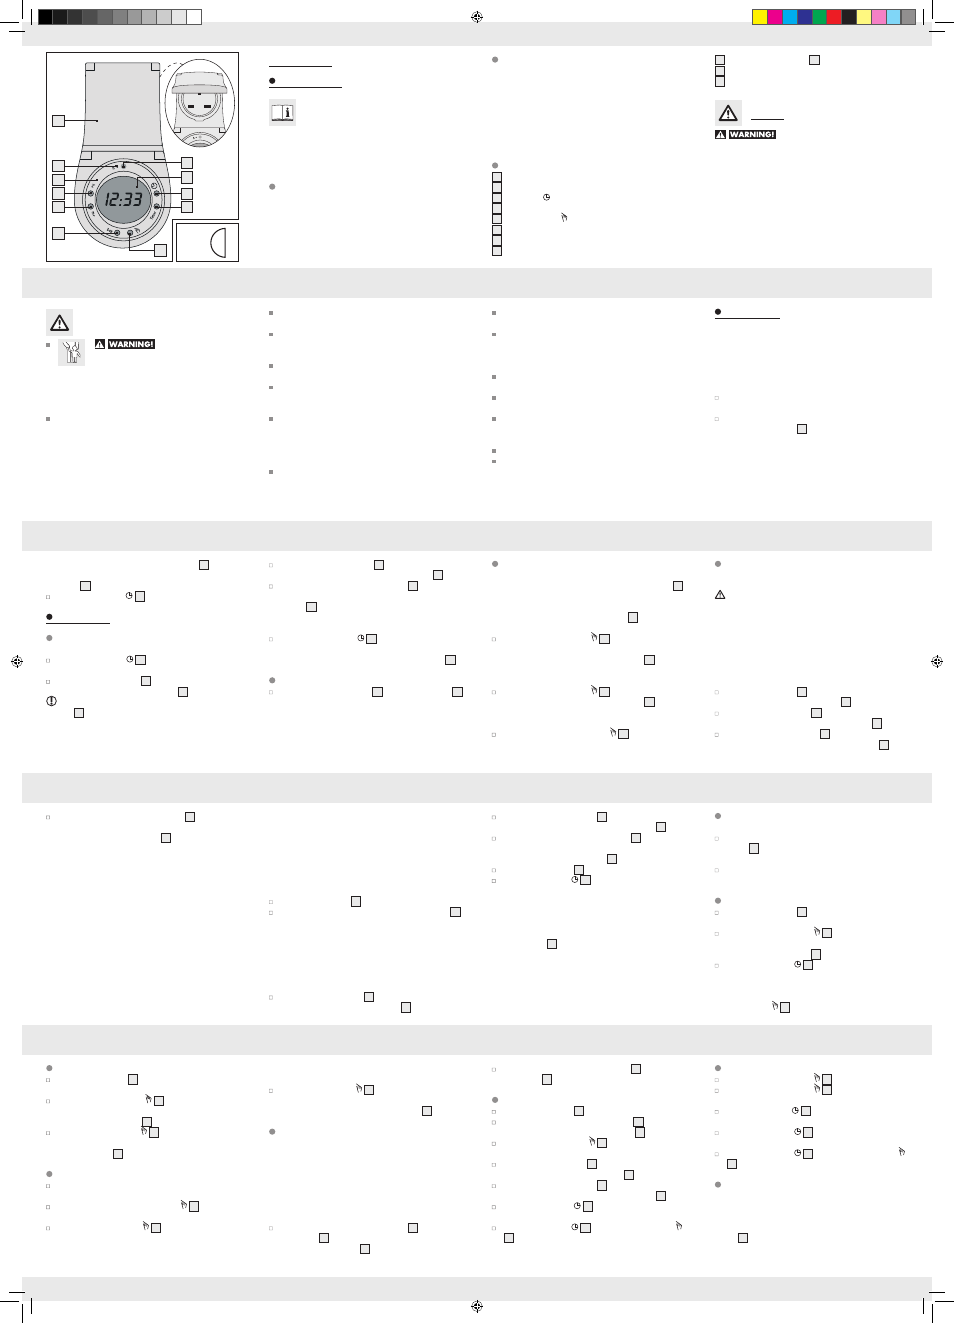
9
Protective flap LC display
2
10
Reset button (R)
11
Protective flap outlet socket
Safety
Read all the safety advice and instructions.
Failure to observe the safety advice and instructions may
result in fire and / or serious injury.
KEEP ALL THE SAFETY ADVICE AND INSTRUCTIONS IN
A SAFE PLACE FOR FUTURE REFERENCE!
Technical data
Power supply:
240 V ∼, 50–60 Hz
Maximum load
Ohmic load
(e.g. incandescent bulb): 3000 W, 13 A
IP rating:
IP44 (spray water protected)
Timer accuracy:
+ / – 1 second / day at 20 °C
Shortest switching time:
1 minute
Operating temperature: –10 °C bis + 55 °C
Description of parts
1
Twilight sensor
2
LC display
3
Time button
4
Timer button
5
ON / OFF button
6
Day of the week button (Day)
7
Minute button (m+)
8
Hour button (h+)
Digital Timer
Introduction
Before using the device for the first time, please
make yourself familiar with the way it works. Please
refer in addition to the operating instructions
below and the safety advice. Use the device only as described
and for the indicated purposes. Keep these instructions in a
safe place. If you pass the device on to anyone else, please
ensure that you also pass on all the documentation.
Proper use
This product is intended for the automatic switching on and
off of electrical devices. Any modification to the device shall
be considered as improper use and can lead to considerable
risk of accident. The manufacturer will not accept liability for
loss or damage arising from improper use. This device is not
intended for commercial use.
8
10
9
11
7
6
4
3
1
2
6
66402_Zeitschaltuhr_Daemmerungssensor_LB6.indd 1
02.08.11 09:13