Introduction of water heater, General features, Technical specifications – İhlas Aura Water Heater User Manual
Page 2
BOSB,Mermerciler Sanayi Sitesi, 7.Cadde
No:14, 34524-Beylikdüzü-İstanbul/Turkey
Tel:(+90) 212 875 35 62
Fax:(+90) 212 875 36 64
www.iea.com.tr - [email protected]
838002ZEN01
Rated Voltage
: 230 V AC
Frequency
: 50 - 60 Hz
Rated Power
: 7 kW
Inlet controlled pressure
: 0 Pa
(model 105A5S1T.)
Outlet controlled pressure : 600 kPa
(model 105A5S1TC)
Min.Operating Pressure
: 25 kPa (2.5 mSS)
Max.Operating Pressure
: 600 kPa (61mSS)
Flow Rate
: 100 - 240 L/hour
Size (H, W, D)
: 330x230x110 mm
Net Weight
: 2 kg
Protection Class
: I
Protection against moisture : IP34
TECHNICAL SPECIFICATIONS
Congralutions for having Aura Instant Water Heater !
You have had very reliable and advanced instant water
heater. Please read these instructions carefully before
installation. Otherwise it may cause severe damages or
serious injuries!
This user manuel is available for two each model.
INTRODUCTION OF WATER HEATER
IMPORTANT WARNINGS
1- This appliance must be grounded.
2- Disconnect this appliance from the electrical supply before cleaning,
servicing or removing the cover.
3- Warning! Do not install the heater in a location where it may be subjected to
freezing.
4- Warning! Do not switch the heater on if you suspect that the water is frozen.
Wait until you are sure it is comptletely unfrozen.
5- All water line elements (fittings, hoses) must be suitable for minimum of 6 bar
pressure.
6- This appliance must be connected to the main line with minimum of 32 A
circuit breaker.
7- Use a pressure regulator if the inlet water pressure is higher than 6 bar.
8- Do not use other electrical devices with the power more than 1kW, while your
water heater is operating.
9- This appliance is not intended for use by person (including children) with
reduced physical, sensory or mental capabilities or lack of experience and
knowledge, unless they have been given person responsible for their safety
10- Children should be supervised to ensure that they do not play with the
appliance.
11- The instruction for appliances connected to the water mains by detachable
hose-sets shall state that the new hose-set supplied with the sets should not
be reused.
12- For an appliance intended to be permanently connected to the water mains and
not connected by a hose-set.
13- Installation and repair of the appliance should only be performed by
Authorized Services. Otherwise, your appliance shall not be covered by
warranty.
CAUTION!
In order to prevent danger caused by the thermal cutter acciden-
tally starting, the appliance should not be fed through an outer switchgear
like a timer or connected to a circuit which is opened and closed regularly
with the help of a program.
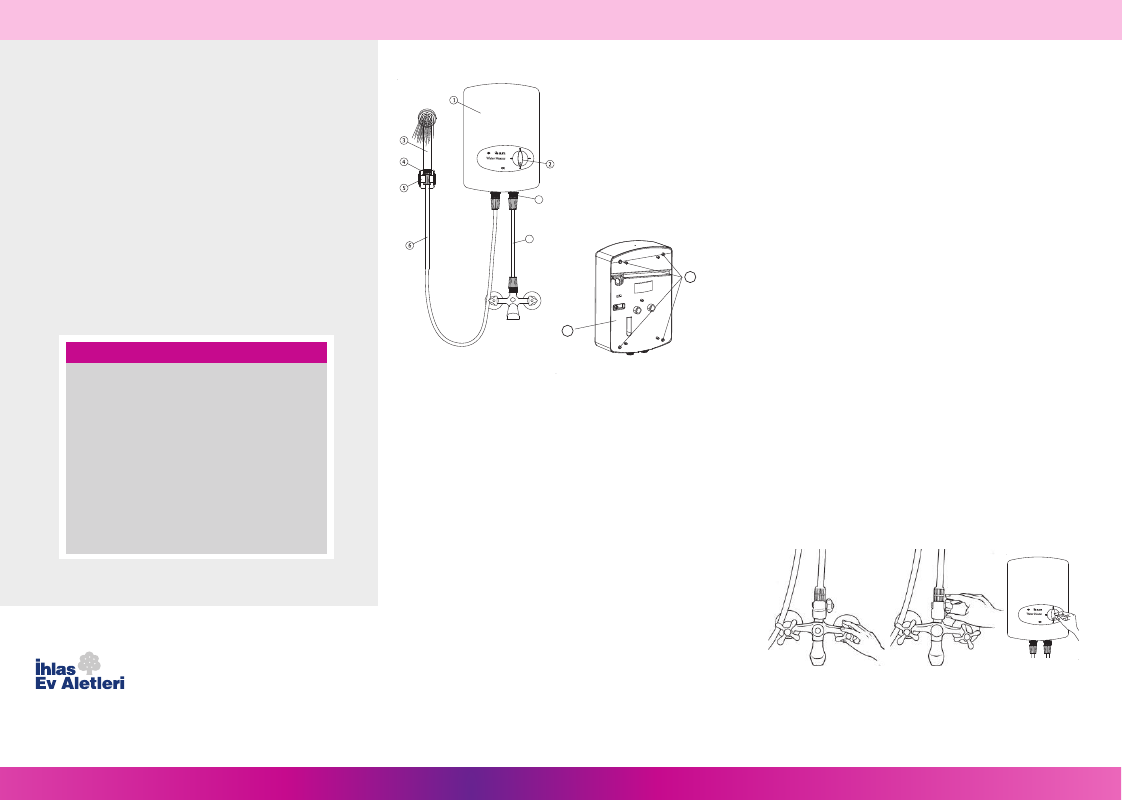
GENERAL FEATURES
POWER SELECTOR SWITCH
Controls the power as 3 different level (3,4,7 kW) to adjust the water
temparature.
INDICATION LAMPS
The lamp at the top indicates the power.
DIAPHRAGM GROUP
This sophisticated group (specially desingned) controls the power
depending on the differential pressure on both sides of rubber membrane.
It shuts of the power when the differential pressure is not enough.
THERMOSTAT
Prevents the over heating of the water by shutting off the heating
element.
HOW TO OPERATE
1. Turn on the water tap (Figure 1).
2. Adjust the flow rate by using the spherical valve (Figure 2).
3. Depending on the season and water temparature desired, the selector
switch should be positioned to the desired level of 1,2 or 3.
4. To turn off your water heater, the power selector switch should be at
“0” position first. Wait until water cools down.
5. When water cools down, close the water tap.
6. This shut off prosess will protect the heater resistance against lime
scale deposits resulting decrease on heating and resistance failure.
Figure 1
Figure 2
Figure 3
1) Front cover
2) Power selector switch
3) Shower head
4) Adjustable holder
5) Fixed holder
6) Outlet hose
7) Inlet hose
8) Lock nut
9) Rear cover
10) Mounting holes
10
9
7
8