Setting up the s zone, Quick start, English – Samson SZONE 4 Channel/4 Zone Stereo Mixer User Manual
Page 12
Quick Start
We recommend that you take the time to read through
this manual, and then, use it as a reference guide. If you are
installing your first system you should read through the
section “Designing an Installation Plan” on page 6 before
you start connecting your S zone. If you’re a professional
installer you can skip over that section and if you want to
get started running some signals through your inputs and
outputs, you can follow the following quick start example.
Setting up your S zone is a simple procedure, which takes
only a few minutes. The following section describes the
set-up and operation of a simple installation using the S
zone with a CD player and paging microphone.
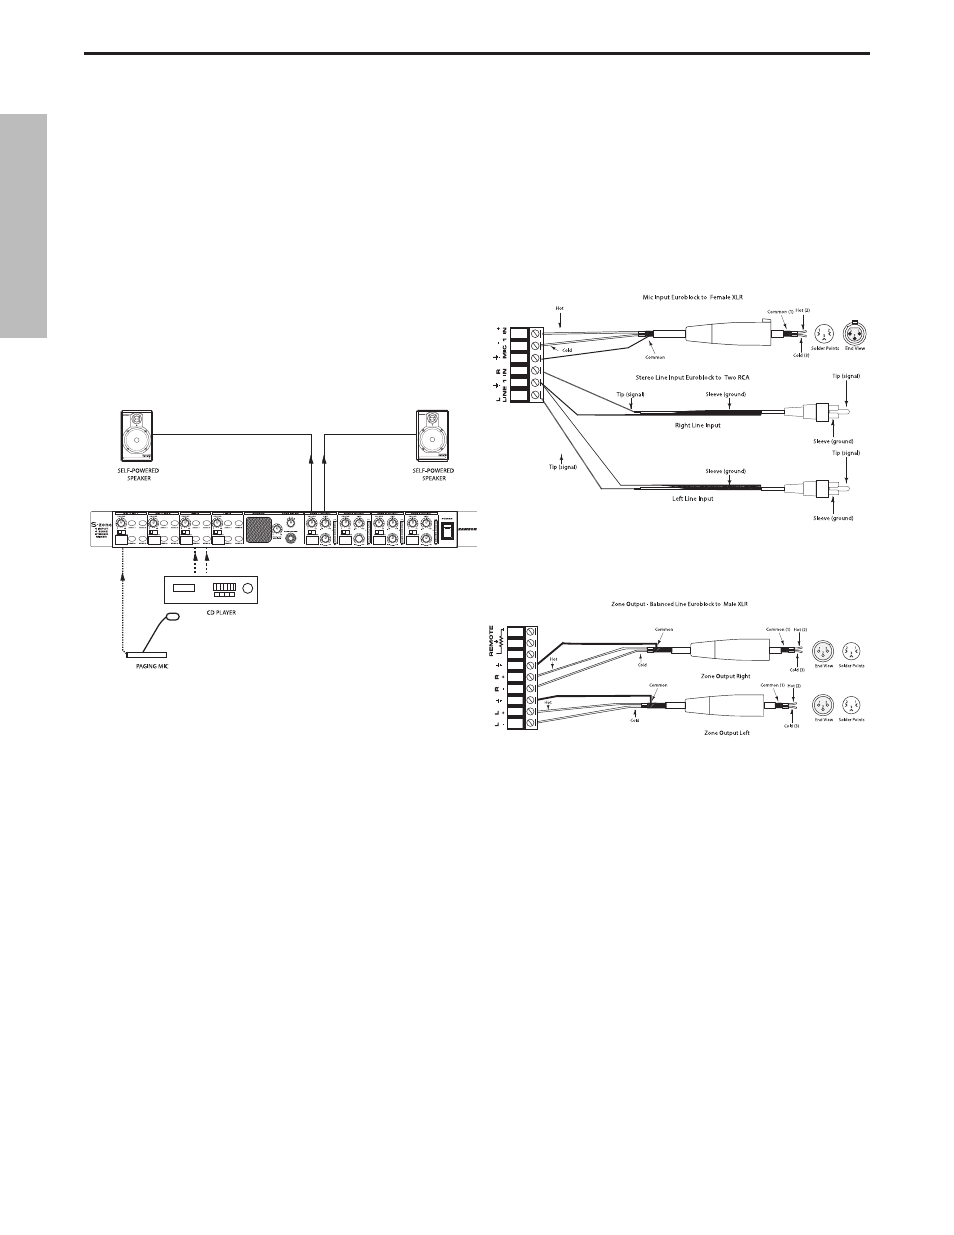
In this set up example, a paging microphone connected to
the S zone’s CHANNEL 1 input and a CD player connected to
CHANNEL 3. The S zone’s ZONE OUTPUT 1 is connected to a
pair of active (self powered) speakers. If you are using passive
speakers, the S zone’s ZONE OUTPUT should be connected to
the power amp input.
•
Remove all packing materials (save them in case of
need for future service) and decide where the unit is
to be physically placed—it can be used freestanding
or mounted in a standard 19” rack (The S zone requires
only a single rack space).
•
Make sure the power to all input sources (like CD, DVD,
MP3 & TAPE players) and amplifiers in your audio sys-
tem is off.
•
Turn the volume control of your active speakers all the
way off. If you are using passive speakers with a sepa-
rate power amplifier, be sure to turn the power amp
volume controls all the way off.
Setting up the S zone
•
On the front panel of the S zone, set all the VOLUME
control knobs to their bottom-most “OFF” setting.
•
Set all ZONE OUTPUT LOW and HIGH Equalizer control
Knobs to their flat (“0”) center detented position.
•
Now, make the S zone input connections, using the
Euroblock connectors on the rear panel.
•
Next, make the S zone output connections, using the
Euroblock connectors on the rear panel.
•
Plug in the supplied AC connector and connect it to
any standard AC socket.
•
Press the front panel Power switch in order to turn on
the S zone.
•
Power on your CD player, then power your active
speaker or power amp.
•
On the Line 3 input channel, press the Zone 1 Switch.
•
Apply an input signal from the CD player to the S zone
and slowly raise the front panel LINE 3 Volume control
knob to the “0” point.
•
While the input signal is present, slowly raise the front
panel ZONE OUTPUT 1 control knob to the “0” point (if
sending signal from a CD Player, drive the mixer’s out-
put meters at approximately 0 VU).
ENGLISH
8