Epson WorkForce Pro WF-M5799 Workgroup Monochrome Multifunction Printer with Replaceable Ink Pack System User Manual
Start here, Load paper, Unpack
Start Here
7
Close the ink pack tray cover and lock it.
8
Press
OK on the LCD screen to start charging the ink.
Ink charging takes approximately 7 minutes. A message
appears when ink charging is complete.
Caution:
Don’t turn off the printer, raise the scanner unit, or
open the ink pack tray cover while the printer is charging or you’ll
waste ink.
4
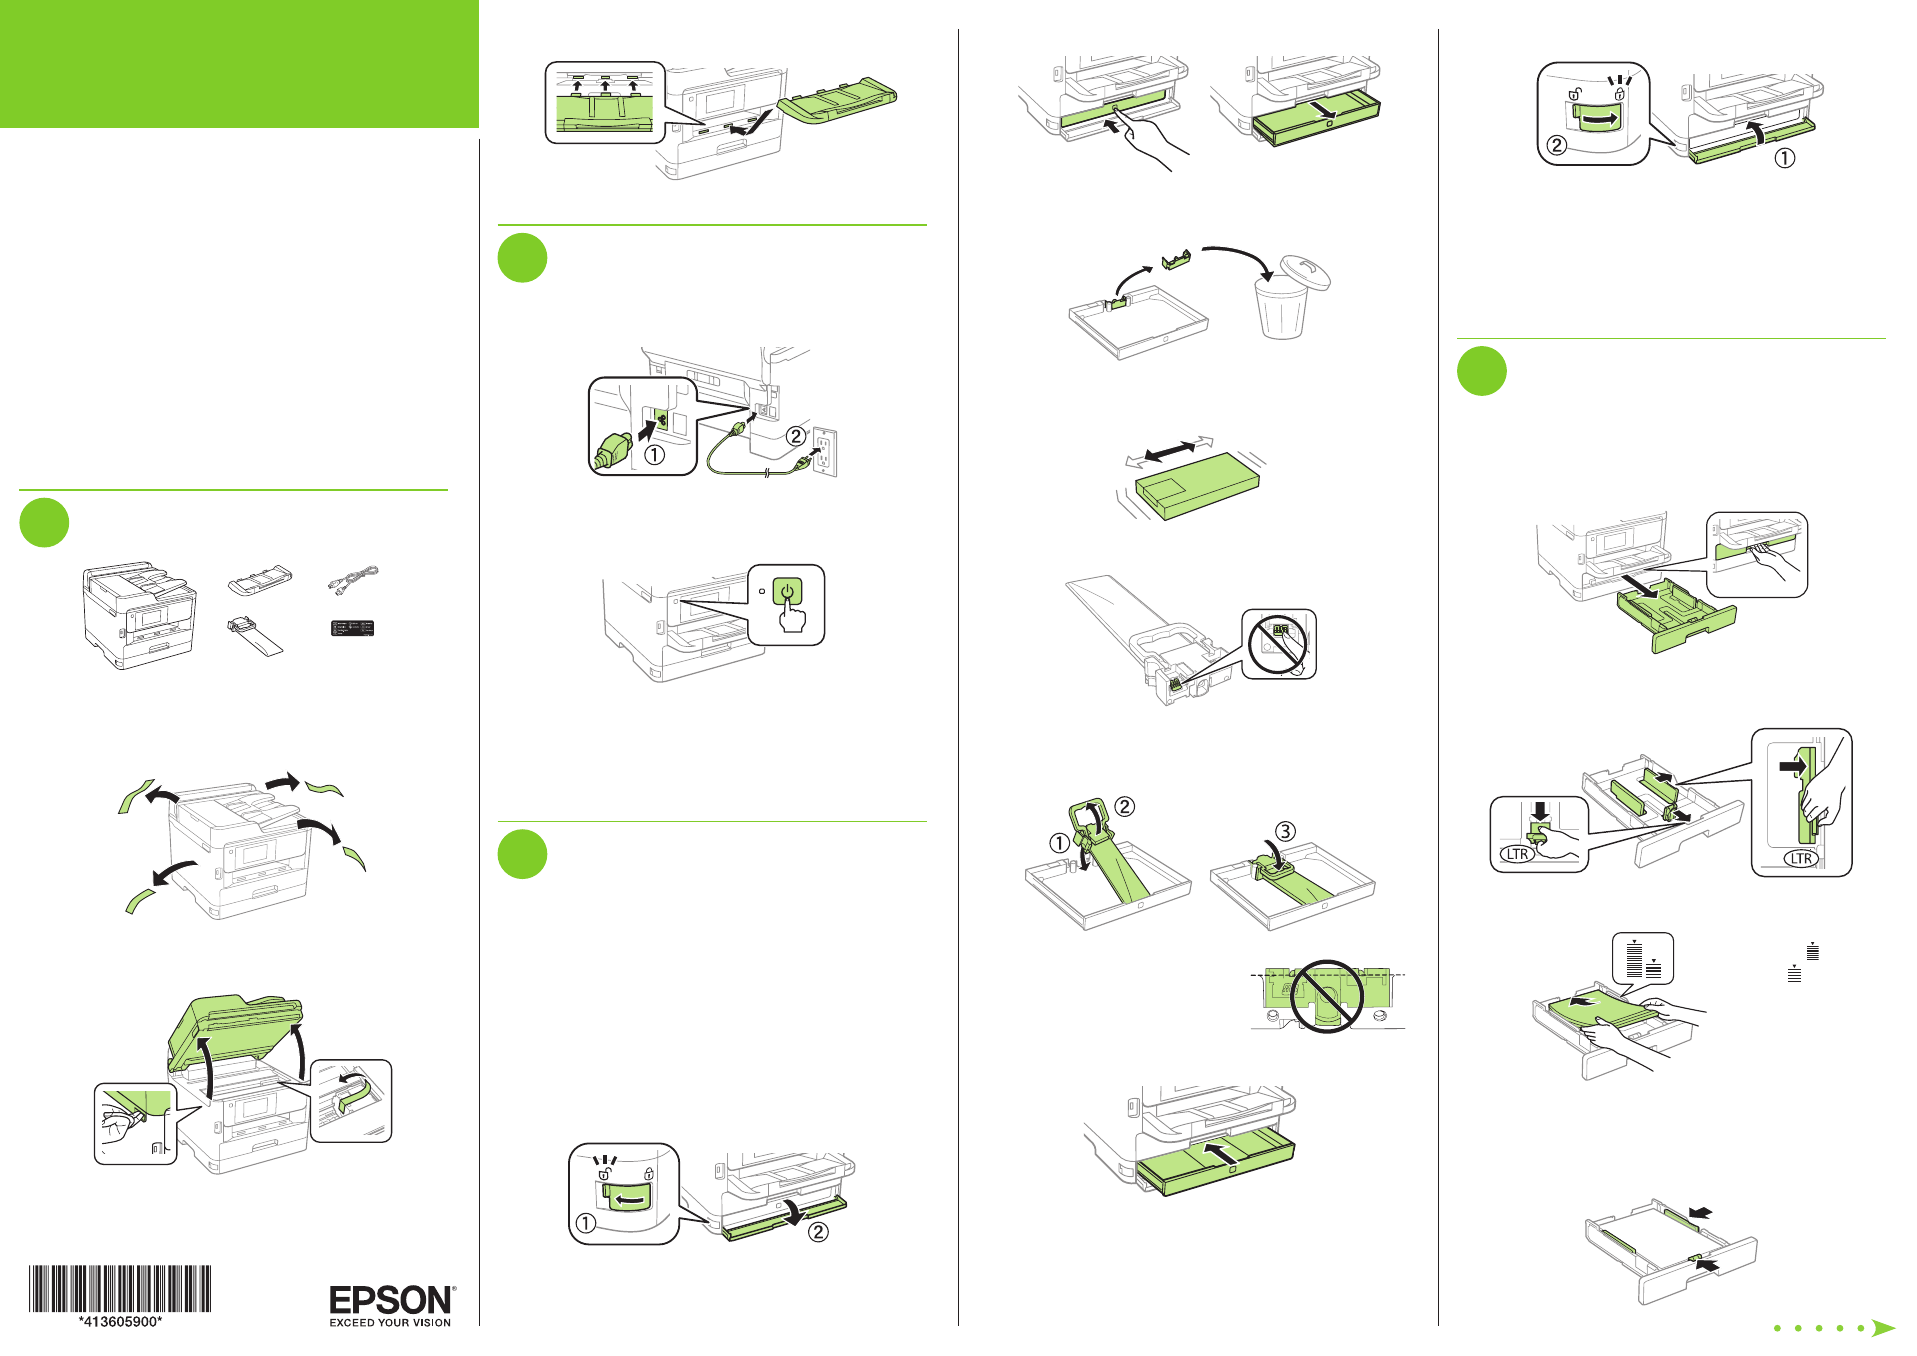
Load paper
For instructions on loading envelopes or legal-size paper, or
using the rear paper feed slot, see the online User’s Guide.
1
Make sure the product is done charging the ink, then pull
out the paper cassette.
2
Slide the side edge guides all the way out and set the
front edge guide to the paper size you are using.
3
Insert paper with the glossy or printable side down.
Standard paper:
Thick paper:
Note:
Make sure the paper is under the arrow mark for your
paper type and loaded against the front edge of the cassette.
4
Slide the edge guides against the paper, but not too
tightly.
Read these instructions before using your product.
Note for Spanish speakers/Nota para hispanohablantes:
Para obtener instrucciones de configuración en español, consulte
la Guía de instalación en
www.epson.com/support/wfm5799sp
(requiere una conexión a Internet).
Important Safety Instructions:
When using telephone equipment, you
should always follow basic safety precautions to reduce the risk of fire,
electric shock, and personal injury, including the following:
• Do not use the Epson
®
product near water.
• Always keep this guide handy.
• Avoid using a telephone during an electrical storm. There may be a
remote risk of electric shock from lightning.
• Do not use a telephone to report a gas leak in the vicinity of the leak.
Caution:
To reduce the risk of fire, use only a No. 26 AWG or larger
telecommunication line cord.
1
Unpack
French control
panel stickers
Warning:
The product is heavy and should be lifted and moved by
two people.
1
Remove all protective materials from the product.
2
Lift up the scanner unit and remove all protective materials
from inside the product, then close the scanner unit.
3
Insert the output tray, then set it down gently.
2
Turn on and configure
1
Connect the power cord to the back of the product and to
an electrical outlet.
Caution:
Do not connect to your computer yet.
2
Turn on the product.
3
Select your language, country, and time on the LCD
screen.
Note:
You can change these settings later using the product’s
control panel. For more information, see the online User’s Guide.
3
Install ink supply unit
(ink pack)
Note:
• The product is designed for use with Epson ink packs only, not
third-party ink.
• The ink pack included with the product is designed for product
setup and not for resale.
•
After some ink is used for charging, the rest is available for printing.
Caution:
Keep ink packs out of the reach of children and do not drink
the ink.
1
Unlock and open the ink pack tray cover, then remove the
packing material.
2
Press the ink pack tray to release it, then pull the tray out.
3
Remove and discard the protective piece from the ink
pack tray.
4
Shake the ink pack 10 times, then remove it from the
packaging.
Note:
Do not touch the green chip on the ink pack.
5
Place the ink pack into the ink pack tray, move the
handle forward, then move the handle back to its original
position.
Note:
Make sure the ink pack is fully
inserted and level with the top of the
ink pack tray.
6
Insert the ink pack tray into the printer.
WF-M5799