Nomenclature, Installation, Installing batteries – Godox ML-150 II Macro Ring Flash User Manual
Page 5: Mounting ring flash on the camera
If the flash unit is idle for long, please take out all batteries and keep
the flash unit in dry area.
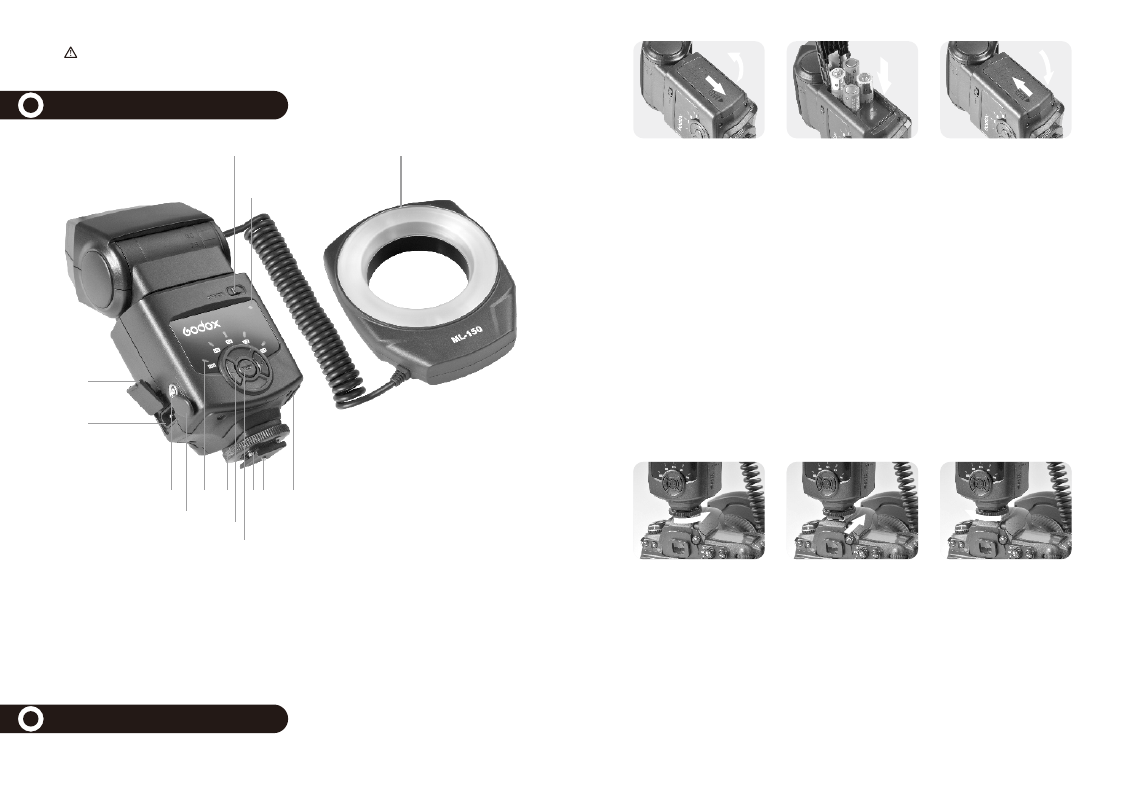
NOMENCLATURE
01
)
Ring Flash Head
02
)
Locking Ring
03
)
Hot Shoe Stand
04
)
Dedicated Hot Shoe Contact
05
)
Output Level Indicator
06
)
Flash Power Level Button
07
)
Test Button
08
)
Battery Chamber Cover
09
)
Power Switch
10
)
Charging Indicator
11
)
External Power Pack Terminal Cover
12
)
External Power Pack Terminal
13
)
PC Sync Socket Cover
14
)
PC Sync Socket
1
2
3 4
5
6
7
8
9
10
11
12
13
14
INSTALLATION
Installing Batteries
1
.
Open the Battery
Chamber Cover
.
Slide the battery
chamber cover along
the arrow direction and
then open it by thumb.
Mounting Ring Flash on the Camera
NOTE:
Take care of the hot battery when changing them after continuous flashes.
Take out of the battery when idle in case the battery leakage damages the flash
unit.
2
.
Insert the Batteries
.
Install the batteries
according to the
direction indicated by
the sticker in the battery
holder and make sure
the + and
-
battery
contacts are correctly
inserted at the battery
compartment.
3
.
Close the Battery
Chamber Cover
.
Slide the battery
chamber cover along
the arrow direction and
slide it back in place.
The battery chamber
cover will be locked
when there is a “click”
sound.
●
Twist the mounting
lock anticlockwise to
loosen it to the highest
point.
●
Slide the mounting foot
of control unit into the
camera's hoe shoe
completely.
●
Twist the mounting lock
clockwise to tighten it.
1
.
Attach the Control Unit on the Camera
●
To remove the flash, loosen the fixed knob and slide it out of the hot shoe of camera.
2
.
Attach the Flash Ring on the Camera
.
6 types of adapter rings available to suit the camera lens: 49mm, 52mm,
55mm, 58mm, 62mm and 67mm.
Choose the adapter ring needed for your camera and attach to the
camera
lens.
Mount the flash ring onto the adapter ring.