Bower SFD35 Digital Flash for Cameras User Manual
Sfd35, Perating, Nstruction
Dual Autofocus Flashgun
SFD35
1
for Canon
BL/STD
for Nikon
2
F/stop
Maximum Effective TTL Range (ISO 100)
F2.0
17m / 56ft
F2.8
12m / 40ft
F4.0
8.5m / 28ft
F5.6
6.0m / 20ft
F8.0
4.3m / 14ft
3
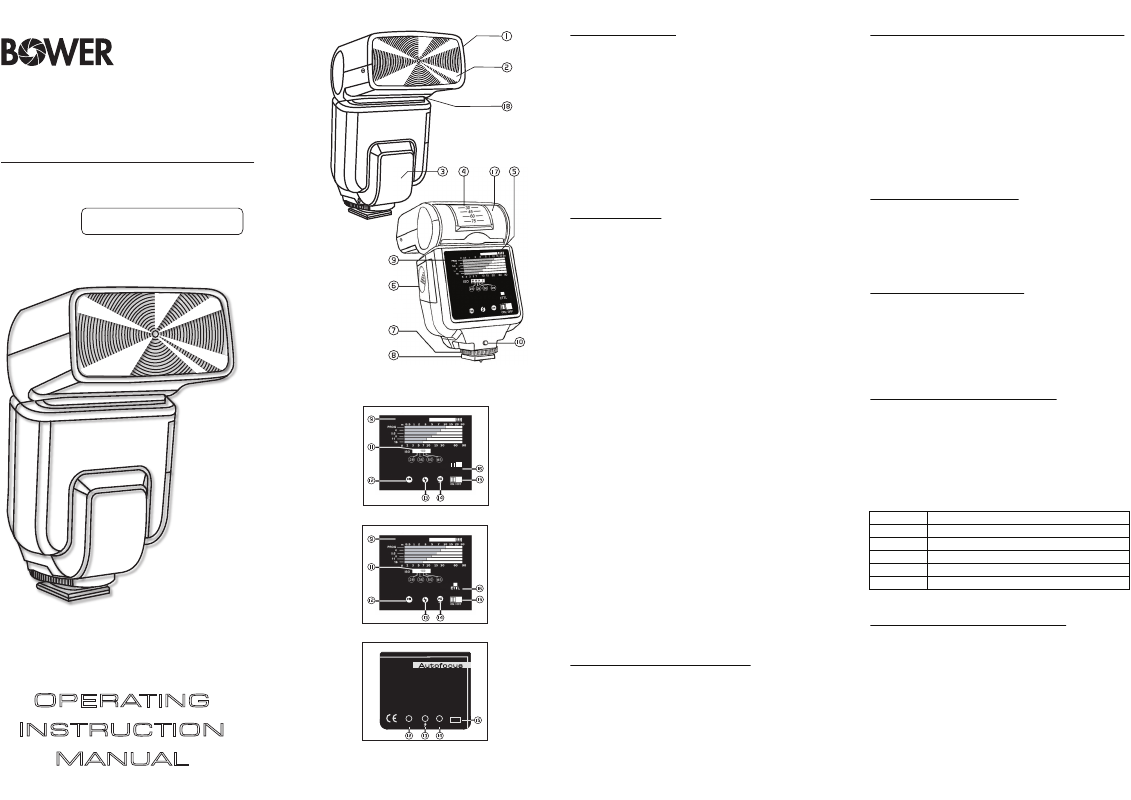
NOMENCLATURE
1. 4 position Zoom Head 10. Flash Test Button
2. Fresnel lens 11. ISO/Zoom Head Setting Window
3. AF illuminator beam 12. Power On Indicator
4. Bounce Head Scale 13. Ready Lamp
5. ISO Setting knob 14. Green Auto Check Lamp
6. Battery Compartment Lid 15. ON/OFF Switch
7. Locking Ring / 16. E-TTL Indicator
(For Canon)
Release Button
(For Sony)
Flash Mode Switch
(for Nikon)
8. Hot Shoe Foot 17. Vertical Bounce Flash Head
9. Exposure/Distance Table 18. Horizontal Swivel Pivot
PRECAUTIONS
Before you start to operate the flash unit, please read the following
caution to prevent possible damages.
1. This flash unit can only be used on the camera brand according
to the dedicated mounting which is designed for.
2. Any attempt to dismantle the flash will result in possible electric
shocks or burns. If the outer casing is cracked or flash unit is
faulty, please return to the authorized dealer for repairs by
authorized personnel.
3. Do not attempt to trigger the flash close to eyes.Keep at least
1m/3.3ft when taking flash photography.
4. When the flash unit is not used for extended period of time (more
than 2 weeks), remove all batteries to prevent battery leakage.
5. Try to charge fully and fire the flash several times in a month to
ensure that the electronic circuitry as well as the capacitor is kept
in a tip-top condition.
6. During battery replacement, replace all 4 batteries of the same
type at the same time.
7. Flash unit s hould be kept dry at all times as it is not either
waterproof or weatherproof. Often it impractical to repair/replace
components damaged by water.
8. Care must be taken as this flash unit is a precise equipment. Any
accident knocks or drop may result in permanent damage to the
circuitry and components which may not be feasible to undergo repairs.
9. Always store the flash unit in a cool dry place, away from heat or
direct sunlight. Never store the flash in a drawer or upboard containing
naphthalene or camphor (moth balls) as these will have a negative
effects on the circuitry of the flash unit.
10. Do not use a thinner, benzene or other cleaning agents to remove
dirt or fingerprint from the unit. Use a soft, moistened cloth instead.
INSTALLING THE BATTERIES
Ensure that the ON/OFF switch (15) is in the OFF position. Slide the
battery compartment Lid (6) toward the front of the flash and flip up
until the battery chamber is fully exposed. Insert 4 AA sized batteries
according to the battery polarity indication as shown inside the battery
chamber. Close the battery compartment lid (6) by pushing it down
while sliding towards the back of the flash.
MOUNTING THE FLASH ON THE CAMERA
Ensure that ON/OFF (15) switch is at the OFF position. Slide
the Hotshoe Foot (8) onto the camera’s hotshoe and fasten the
locking ring (7) in an anti-clockwise motion. To detach the flash
unit, turn the locking ring (7) in a clockwise motion unitl it stops.
For Sony Alpha DSLR, ensure that the camera’s hotshoe is fully
push in until the Release button (7) pop up. To detach the flash
unit, depress the release button (7) and at the same time pull the
flash unit from the camera’s hotshoe.
Note: Ensure camera inbuilt flash is at the ‘close’ position Grasp the bottom of
the flash to prevent damage to the hotshoe foot (8) and camera hotshoe
OPERATING THE FLASH
Slide the ON/OFF switch to the left and wait for a humming sound
to be heard (occur when the flash is switch on). When the ready
lamp(13) located the back of the flash light up, the flash is ready to
fire. Pressing the flash test button (10) will fire the flash to insure
its operation.
AUTO STANDBY SYSTEM
To conserve battery power, the flash unit will automatically turn
to standby mode when the flash is not used for approximate 3
minutes. To on the flash again, either press the flash test button
(10) or switch off and on again using the ON/OFF switch. When
the flash is not in use for extended period of time, slide the
ON/OFF switch to the off position.
EXPOSURE/DISTANCE TABLE*
This is a guide table showing the maximum effective range based
on different combination of ISO, zoom lens and aperture setting.
Base on the ISO window (11), setting the ISO setting knob
(5) according to the ISO and zoom head position will show
the maximum effective TTL range of the flash unit.
For example, at ISO 100 set at zoom position 50mm, the
effective TTL range, according to 5 different F/stop setting is
listed out as follows:
*For Canon and Nikon only
USING THE AUTO CHECK LAMP
The green auto check lamp (14) located at the back of the flash
is used to ensure that your subject is within the effective TTL
range of the flash unit. When the ready lamp (13) is on, press
the camera shutter release button to fire the flash. If your
subject is within the effective TTL range, the green auto check
lamp will illuminate for approximate 2 seconds indicating correct
flash exposure has been obtained. f the green auto check lamp
does not illuminate, it meant that the subject is not within the
effective range. In this situation, move closer to the subject
and try again.
O
PERATING
I
NSTRUCTION
M
ANUAL
On
Ok
ON/OFF
Digital
Autofocus
for Sony
Dedicated System