ATN TITEW1000 Thermal Entry Wizard Access Control Station with Table Stand Mount User Manual
Page 38
74
75
Local Mode: Issue Card by Card Enrollment Station
Connect a card enrollment station to the PC running the client . You can
place the card on the card enrollment station to get the card number .
Card Enrollment Station
Select the model of the connected card enrollment station
NOTE
Currently, the supported card enrollment station models include
DS-K1F100-D8, DS-K1F100-M, DS-K1F100-D8E, and DS-K1F180-D8E.
Card Type
This field is only available when the model is DS-K1F100-D8E or DS-
K1F180-D8E .
Select the card type as EM card or IC card according to the actual card type .
Serial Port
It is only available when the model is DS-K1F100-M .
Select the COM the card enrollment station connects to .
Buzzing
Enable or disable the buzzing when the card number is read successfully .
Card No. Type
Select the type of the card number according to actual needs .
M1 Card Encryption
This field is only available when the model is DS-K1F100-D8, DS-K1F100-
D8E, or DS-K1F180-D8E .
If the card is M1 card, and if you need to enable the M1 Card Encryption
function, you should enable this function and select the sector of the card to
encrypt .
Remote Mode: Issue Card by Card Reader
Select an access control device added in the client and swipe the card on its
card reader to read the card number .
7.5. SET ACCESS GROUP TO ASSIGN ACCESS
AUTHORIZATION TO PERSONS
After adding the person and configuring the person's credentials, you can
create the access groups to define which person(s) can get access to which
door(s) and then apply the access group to the access control device to take
effect .
Steps
When the access group settings are changed, you need to apply the ac-
cess groups to the devices again to take effect . The access group changes in-
clude changes of template, access group settings, person's access group set-
tings, and related person details (including card number, face picture, linkage
between card number and linkage between card number and card password,
card effective period, etc) .
1 . Click Access Control
→
Authorization
→
Access Group to enter the Ac-
cess Group interface .
2 . Click Add to open the Add window .
3 . In the Name text field, create a name for the access group as you want .
4 . Select a template for the access group .
NOTE
You should configure the template before access group settings. Refer
to Configure Schedule and Template for details.
5 . In the left list of the Select Person field, select person(s) to assign access
authority .
6 . In the left list of the Select Access Point field, select door(s), door sta-
tion(s) or floor(s) for the selected persons to access .
7 . Click Save .
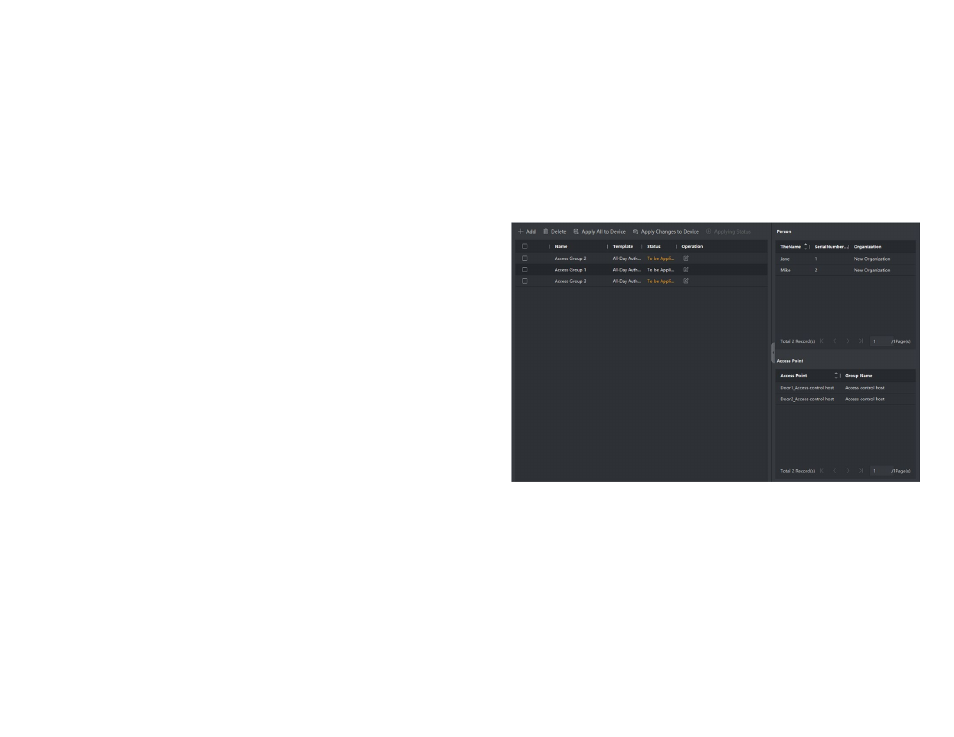
You can view the selected person(s) and the selected access point(s) on the
right side of the interface .
Figure 7-5. Display the Selected Person(s) and Access Point(s)
8 . After adding the access groups, you need to apply them to the access
control device to take effect .
a) Select the access group(s) to apply to the access control device .
b) Click Apply All to Devices start applying all the selected access group(s)
to the access control device or door station .
c) Click Apply All to Devices or Apply Changes to Devices .
Apply All to Devices
This operation will clear all the existed access groups of the selected devic-
es and then apply the new access group to the device .
Apply Changes to Devices
This operation will not clear the existing access groups of the selected de-
vices and only apply the changed part of the selected access group(s) to the
device(s) .