Prepare ceiling, Wire the loudspeakers, Seismic safety – QSC Audio AC-C6T AcousticCoverage Series 6" 2-Way 30W Ceiling Loudspeaker (Pair, White) User Manual
Page 3: Mount the loudspeaker, Specifi cations
3
TD-000473-00-A
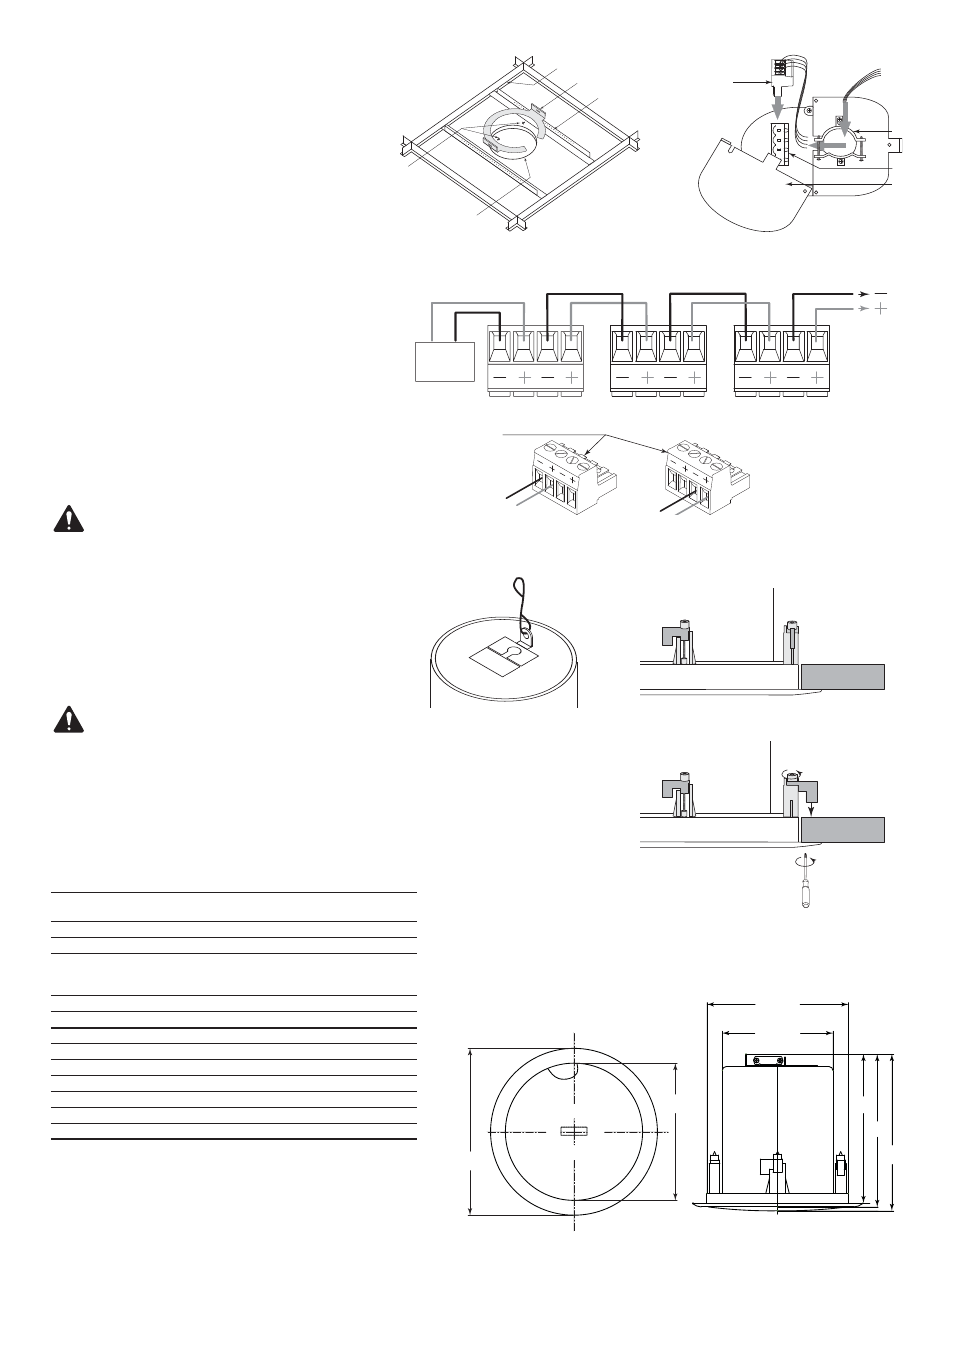
Prepare Ceiling
Refer to
Figure 1.
1. Use the template provided to mark and cut a hole (1) in the ceiling where the
loudspeaker is to be installed. For frame-construction ceiling, skip to "Wire the
Loudspeakers".
2. Install two V-rails (2), one on each side of the hole, and supported by the
suspended-ceiling support rails (3).
3. Install the C-ring (4) over the hole, using the V-rails as support. Make sure the
clips on the C-ring are properly fi tted over the V-rail.
4. Use sheet-metal screws (5) to secure the C-ring to the V-rails.
Wire the Loudspeakers
Refer to
Figure 2.
1. Pass the wires down through the conduit/stress-relief clamp. Leave enough wire for
making connections. Carefully tighten the clamp over the wires, or over the conduit if
it is used.
2. Wire the female Euro-style plug (1) as shown in
Figure 3
.
3. Plug the connector securely into the receptacle.
4. Slide the cover (4) over the connector and secure with the Phillips screw.
Seismic Safety
Refer to
Figure 4
.
1. Attach an appropriate safety line to the safety tab on the back of the connector cover,
and to an appropriate part of the structure.
WARNING!:
Be sure to check and adhere to local building codes for
seismic requirements. If in doubt, consult an appropriate engineer.
Mount the Loudspeaker
Refer to
Figure 5
.
1. Make sure all of the dog-ears are up against the side of the metal loudspeaker housing.
2. Slide the Loudspeaker Housing up through the hole into the ceiling.
3. Use a Phillips screwdriver to tighten each of the four dog-ear screws. As you tighten the
screws, the dog-ears swing away from the housing and over the ceiling. Be sure all dog-
ears are properly positioned over the ceiling.
CAUTION!:
Do not overtighten the dog-ear screws!
4. Use a fl at-tip screwdriver to set the transformer tap based on the requirements of the
installation.
5. Install the loudspeaker grill.
Specifi cations
AC-C6T
Specifi cation
Transducer
152 mm [6 in.] Polypropylene cone with rubber surround
22 mm [0.86 in.] Silk dome tweeter, coaxially mounted
Rated noise power [rms]
(1)
30 W
Nominal Impedance
8
Ω
Transformer Taps
70V: 30, 15, 7.5, 3.75, 1.875 W
100V: 30, 15, 7.5, 3.75 W
8
Ω
Bypass
Effective frequency range
(2)
65 Hz – 20 kHz
Rated coverage
(3)
110
°
conical
Sensitivity
(4)
89 dB
Maximum continuous SPL
(5)
104 dB
Maximum peak SPL
(5)
110 dB
Net weight
3.42 kg [8 lb]
Product dimensions (Diameter x Height)
Ø 260 x 213 mm [Ø 10.24 x 8.4 in.]
Shipping weight
8.85 kg [20 lb] (pair packed)
Shipping dimensions (H x W x D)
305 x 619 x 305 mm [12 x 24.4 x 12 in.]
1 AES2-1984 noise signal for 2 Hrs, 8
Ω
2 Half-space, -10 dB from on-axis sensitivity
3 -6 dB from on-axis, 500 Hz–5 kHz
4 Half-space, on-axis, 2.83V, 1 m
5 Calculated from rated noise voltage and sensitivity
— Figure 1 —
1
2
3
4
5
— Figure 2 —
1
3
4
2
— Figure 3 —
Parallel Wiring Diagram
Amp
To more
speakers
From
Source
To Additional
Loudspeakers
1
— Figure 4 —
— Figure 5 —
Dog-ears against loudspeaker
1
Turn the screw clockwise to engage
the dog-ear with the ceiling.
2
— Figure 6 —
[8.54"]
Ø 217 mm
[10.24"]
Ø 260 mm
[8.78"]
Ø 223 mm
[7.44"]
Ø 189 mm
[8.22"]
209 mm
[8.4"]
213 mm
[8.03"]
204 mm