Marshall Amplification Origin 20 20W 1x10 Combo Amplifier with FX Loop and Boost (Black) User Manual
Origin 20 origin 50, Orig in 20 orig in 50, 0 front panel functions 3.0 rear panel functions
1. PO
WER S
WITCH
Turns
your
amplifi er
on
and off .
2. OUTPUT
LEVEL
Adjusts the output po
wer
level.
At
high
pow
er the
output will be the maximum
available po
wer
level.
At
mid
pow
er the output o
f the
amplifi er
is set for
quieter
performanc
e use and
rec
ording (
ORI20: approx.
3W / ORI50: appr
ox. 10W).
At
low
pow
er the output
will be reduc
ed for
home
practi
ce (
ORI20: approx.
0.5W /
ORI50: appr
ox.
5W).
3. PO
WER LIGHT
When
the unit
is switched
on
this light will illumina
te.
4. PRE
SENCE
Adjusts the r
esponse of the
pow
er amplifi
er
increasing
the higher fr
equencies of
your
sound.
5. MA
STER
VOLUME
Adjusts output
volume.
At
higher se
tti ngs, the po
wer
amplifi er
can be over
driven,
giving a classic over
drive
sound.
6. TREBLE
Con
trols the higher
frequency
of y
our sound.
7. MIDDLE
Con
trols the middle
frequency
of y
our sound.
8. BAS
S
Con
trols the lo
wer
frequency
of y
our sound.
9. TIL
T
Adjusts the
voic
e of y
our
Origin fr
om
normal
to
high
treble
at the
input stage.
10. GAI
N
Con
trols the amoun
t of
pre-amp gain applied t
o
your
sound, the more gain
the more distorti
on. P
ulling
the con
trol knob acti
va
tes
a
gain boost
increasing the
level
of driv
e in
the pr
e-amp.
This
can be
operat
ed using
a
2-way
foo
t switch
(PEDL-90016).
11.
INPUT
Connect
your
guitar to
the amplifi er
using a ¼”
instrument cable.
1. 1
6 OHM
OUTPUT
ORI20 and ORI50 head
Connect a single 16 OHM
speaker
cabinet using this
socket.
ORI20 combo
Your
Celesti
on
V type 10”
speaker
is connected her
e.
ORI50 combo
Your
Celesti
on M
idnight 60
12” speak
er is c
onnected
here.
2 &
3. 8
OHM
OUTPUT
Connect an 8 OHM cabine
t
using socket #2, or
connect
a pair o
f 16 OHM speak
er
cabinets to sockets #2 and
#3.
4. DI
-OUTPUT
Connect
your
amplifi er
to
an ext
ernal rec
ording de
vice
or sound desk using this
output socket
with added
loudspeaker
emulati on.
5. F
OOT S
WITCH
Connect
a 2-w
ay f
oot switch
(PEDL-90016) t
o con
trol
the
gain boost
and turn the
eff e
cts loop
on and off .
6. EFFE
CTS
LOOP SEND
Sends
your
signal to
your
eff ects or
outboard
proc
essor.
7. EFFE
CTS
LOOP RETURN
Returns
your
signal from
your
eff ects or
outboard
proc
essor.
8. MAINS
INLET
Connect
your
amplifi er
to
the supplied mains lead
using this socket.
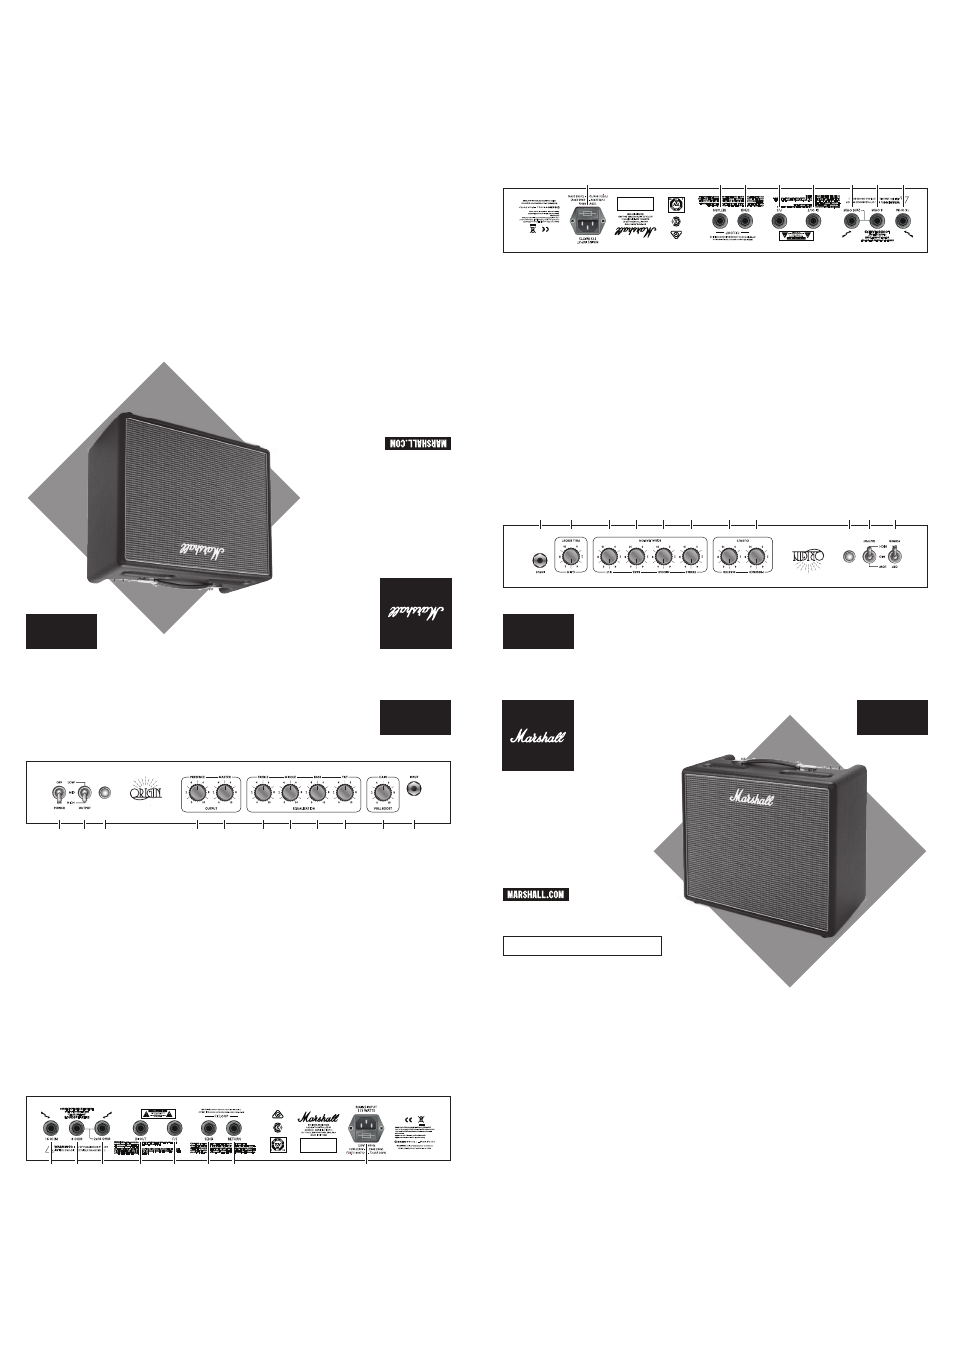
2.0
FRONT
PANEL
FUNCTIONS
3.0
REAR PANEL
FUNCTIONS
ENGLISH
1
4
3
2
5
6
7
8
9
10
11
7
6
5
4
3
2
1
8
EXAMPLE
SHOWN
- OR
IGIN
50
HEAD
ORIGIN 20
ORIGIN 50
QUICK START GUIDE
Never att empt to bypass
the fuse or fi t one of the
incorrect value or type.
IMPORTANT SET UP INFORMATION:
1. When using your Origin
with an extension speaker
cabinet(s), make sure that
the speaker cabinet(s) is
connected to the correct
loudspeaker jack socket(s).
See secti ons 3.1, 3.2 and
3.3 for specifi c informati on.
Warning:
failure to do the
above may damage your
amplifi er. When connecti ng
a speaker cabinet make sure
that you use a proper speaker
cable. Never use a screened
(shielded) guitar cable for
this purpose.
Warning:
Before going any
further, make sure that your
amplifi er is compati ble with
your mains electricity supply.
If you have any doubt, please
seek help from a qualifi ed
technician – your Marshall
dealer can help you with this.
MAINS INPUT & FUSE:
The specifi c mains input
voltage rati ng that
your amplifi er has been
manufactured for is indicated
on the rear panel. Your
amplifi er is provided with a
detachable mains (power)
lead, which should be
connected to the mains input
socket on the rear panel. The
correct value and type of
mains fuse is specifi ed on the
rear panel.
2. Ensure that the power
switch is set to the off
positi on (front panel
functi on 2.1).
3. Connect the supplied mains
(power) lead into the mains
input on the rear panel fi rst
and then into an electricity
outlet.
4. Ensure that the volume
controls on the front panel
are set to zero.
5. Plug your guitar into the
input jack socket on the
front panel.
6. Select either
high, mid
or
low
power (front panel
functi on 2.2).
7. Turn the front panel switch
on and wait a couple of
minutes.
8. Turn the volume up to your
preferred level and your
amplifi er is ready to play.
TRANSPORTING YOUR EQUIPMENT:
Please ensure that your
amplifi er is switched off ,
unplugged from the mains
electricity supply and all
removable cables have been
disconnected from your
equipment before att empti ng
to move it.
1.0
WARNING! SAFETY INSTRUCTIONS
PLEASE READ THIS MANUAL CAREFULLY BEFORE PLUGGING IN. FOLLOW ALL INSTRUCTIONS AND HEED ALL WARNINGS.
ENGLISH
Whilst the informati on contained herein is correct at the ti me of publicati on, due to its policy of constant improvement
and development, Marshall Amplifi cati on Plc reserves the right to alter specifi cati ons without prior noti ce.
Marshall Amplifi cati on Plc, Denbigh Road, Bletchley, Milton Keynes, MK1 1DQ, England.
T: +44 (0) 1908 375411 F: +44 (0) 1908 376118
Marshall Amplifi cati on Plc, Registered in England, Registered Number: 805676
CATS-90270-04 | M3311.408
ORIG
IN 20
ORIG
IN 50
GUIDE DE
DÉMARRAGE
RAP
IDE
Ne jamais t
enter
de dériver
le
fusible ou
d'installer
un fusi
ble
dont le typ
e ou la
valeur
ne
corr
espondent pas.
INFORMA
TIONS IMPORTANTE
S
RELATIVE
S À L'INS
TALLA
TION :
1. En cas d'uti
lisa
ti on de
votr
e modèle ORIGIN a
vec
un caisson haut-p
arleur
supplémen
taire, s'
assurer
que les haut-p
arleurs son
t
connect
és aux jacks haut-
parleurs c
orrects.
Consult
er
les secti ons 3.1,
3.2 et
3.3
pour des in
forma
ti ons
spécifi que
s.
Averti
ssemen
t :
Le non-
respect
des consigne
s
ci-dessus
risque
d'
endommager
votr
e amplifi ca
teur
. Lor
s du
rac
cor
dement d'un
caisson
haut-parleur
, veiller
à uti liser
Averti
ssemen
t :
Avan
t d'
aller
plus loin,
véri
fi er
que v
otr
e
amplifi ca
teur
est compa
ti ble
avec
votr
e alimenta
ti on
électrique
. En cas de dout
e,
s'adr
esser à un
techni
cien
qualifi é
; vo
tre
vendeur
M
arshall
est en
mesure
de vous
conseiller
à ce suj
et.
ENTRÉE SECTEUR ET FUS
IBLE :
La tension nominale d'
entr
ée
spécifi que
corr
espondant à
votr
e amplifi ca
teur
est indiqué
e
sur le panneau
arrièr
e. V
otr
e
amplifi ca
teur
est fourni
avec
un cor
don d'alimen
tati on
détachable
à branche
r dans la
prise
secteur
sur le panneau
arrièr
e. Le typ
e et la
valeur
corr
ecte des f
usibles sect
eur
sont indiqué
s sur le panneau
arrièr
e.
un câble pour
haut-parleur
corr
ect. N
e jamais uti liser
à cet
eff e
t un
câble de guitar
e blindé.
2. S'
assurer
que
le commuta
teur
d'alimen
tati on est r
églé sur
la positi on o
ff (F
oncti ons
panneau avan
t 2.1).
3. Br
ancher le câble
d'alimen
tati on f
ourni à
l'en
trée sect
eur sur
le
panneau arri
ère a
van
t de le
connect
er à la pri
se secteur
.
4. Véri
fi er
que les c
ommandes
du volume
sur le panneau
avan
t son
t réglées sur
zér
o.
5. Br
ancher v
otr
e guitar
e dans
une pri
se jack d'en
trée sur
le
panneau av
ant.
6. Sélecti
onner
la puissanc
e
haute (high
), moyenne (
mid)
ou
basse (low
)
(foncti
on du
panneau av
ant 2.2).
7. Encle
ncher l'i
nterrup
teur
du
panneau av
ant e
t pa
ti en
ter
deux minut
es
8. Augme
nter
le volume
sur le niv
eau souhait
é :
l'amplifi
ca
teur
est pr
êt.
TRANSPOR
T DE VOTRE É
QUIPEMENT :
Véri
fi er
que v
otr
e amplifi ca
teur
est ét
eint e
t débr
anché
de l'alimen
tati on sect
eur
et que
tous
les câbles
pouvan
t êtr
e débranché
s
ont é
té déc
onnectés de
l'équi
pement a
van
t de déplac
er
l'amplifi
ca
teur
.
1.0
AVER
TISSEMENT
!
CONSIGNE
S DE
SÉCURITÉ
LIRE A
TTENTIVEMENT
CE MANUEL
AVANT
DE BR
ANCHER L'
ÉQUIPEMENT
. SUIVRE
TOUTE
S LE
S INS
TRUC
TIONS
ET TENIR
COMPTE
DES A
VERTI
SSEMENTS.
FRANÇ
AIS
Bien que les in
forma
ti ons c
ontenues dans c
e document soien
t corr
ectes au moment de leur
publicati on, en r
aison de sa politi que d'
améliorati
on e
t de développemen
t constan
ts,
Mar
shall Amplifi
ca
ti on P
lc se réserv
e le droit de modifi
er
ces spécifi
ca
ti ons sans a
vis préalable.
Mar
shall Amplifi
ca
ti on P
lc, Denbigh R
oad, Ble
tchle
y, M
ilton K
eynes, MK1 1DQ
, Angle
terr
e.
T : +44 (0) 1908 375411 F
: +44 (0) 1908 376118
Mar
shall Amplifi
ca
ti on P
lc, Compagnie enr
egistrée en
Angle
terr
e, Numér
o d'enr
egistremen
t : 805676
1. COMMUTATEUR D'ALIMENTATION
Allume et éteint votre
amplifi cateur.
2. NIVEAU DE SORTIE
Règle le niveau de puissance
de sorti e. Sur
haute
puissance,
le niveau de sorti e sera à son
niveau de puissance maximum.
Sur
puissance
moyenne, la
sorti e de l'amplifi cateur est
réglée sur une performance
plus douce de jeu et
d'enregistrement (ORI20 : env.
3W / ORI50 : env. 10W). Sur
puissance
basse, la sorti e sera
réduite pour les répéti ti ons
chez soi (ORI20 : env. 0,5W /
ORI50 : env. 5W).
3. VOYANT D'ALIMENTATION
Quand l'appareil est allumé, ce
voyant s'allume.
4. PRESENCE (PRÉSENCE)
Règle la réacti on de
l'amplifi cateur de puissance
en augmentant les fréquences
aiguës dans votre son.
5. MASTER VOLUME (VOLUME MASTER)
Règle le volume de sorti e.
Sur un réglage élevé,
l'amplifi cateur de puissance
peut passer en overdrive et
produire un son d'overdrive
classique.
6. TREBLE (AIGUS)
Contrôle les fréquences aiguës
dans votre son.
7. MIDDLE (MÉDIUMS)
Contrôle la quanti té de
fréquences médium dans
votre son.
8. BASS (GRAVES)
Contrôle les fréquences
basses dans votre son.
9. TILT (INCLINAISON)
Règle la voix de votre Origin
du
normal
à
l'aigu
à l'étage
d'entrée.
10. GAIN (GAIN)
Contrôle la quanti té de gain
de pré-ampli appliquée à votre
son, plus il y a de gain, plus il y
a de distorsion. En ti rant sur
le bouton de commande, on
acti ve un
booster de gain
qui
augmente le niveau e puissance
dans le pré-ampli. On peut
l'acti ver via un pédalier à va-et-
vient (PEDL-90016).
11. INPUT (ENTRÉE)
Raccorder votre guitare à
l'amplifi cateur au moyen d'un
câble d'instrument ¼”.
1. SORTIE 16 OHM
Tête ORI20 et ORI50
Brancher un seul caisson haut-
parleur 16 Ohm à cett e prise.
Combo ORI20
Votre haut-parleur Celesti on
V-type 10” est à brancher ici.
Combo ORI50
Votre haut-parleur Celesti on
Midnight 60 V-type 12” est à
brancher ici.
2 & 3. SORTIE 8 OHM
Raccorder un caisson 8 OHM
à la prise #2, u raccorder une
paire de caissons haut-parleurs
16 OHM aux prises #2 et #3.
4. DI-OUTPUT (SORTIE DI)
Raccorder votre amplifi cateur
à un périphérique
d'enregistrement ou à une
console de mixage via cett e
prise de sorti e avec émulati on
de haut-parleur ajoutée.
5. PÉDALIER
Raccorder un pédalier à va-
et-vient (PEDL-90016) pour
contrôler le
booster de gain
et
acti ver ou désacti ver
la boucle
d'eff ets (FX)
.
6. EFFECTS LOOP SEND (ENVOI DE
BOUCLE D'EFFETS)
Envoie votre signal vers votre
processeur extérieur ou
d'eff ets.
7. EFFECTS LOOP RETURN (RETOUR DE
BOUCLE D'EFFETS)
Renvoie votre signal de votre
processeur extérieur ou
d'eff ets.
8. ENTRÉE D'ALIMENTATION SECTEUR
Raccorder votre amplifi cateur
au câble d'alimentati on secteur
fourni via cett e prise.
2.0
FONCTIONS DU PANNEAU AVANT
3.0
FONCTIONS DU PANNEAU ARRIÈRE
FRANÇAIS
1
4
3
2
5
6
7
8
9
10
11
7
6
5
4
3
2
1
8
EXEMPLE PRÉSENTÉ - TÊTE ORIGIN 50
Informazioni disponibili in Lingua italiana. Visita
marshall.com
per scaricare il manuale completo in Italiano.