ToughTested 10,000mAh Dual Solar Switchback Power Pack with LED Light Panel User Manual
Switchback, User guide
CHECKING THE POWERBANK’S POWER LEVEL
•
When there is no device connected to the powerbank, press the
button once. The LEDs will light up to indicate the charge level.
•
One LED indicates up to 25% charge, two LEDs up to 50%, 3
LEDs up to 75%, 4 LEDs up to 100%.
•
When the last blue LED is blinking on the powerbank, it needs to
be recharged.
•
In 35 seconds the powerbank will automatically turn off to
conserve power.
A note about IP rating: The powerbank is IP44 rated
IP rating stands for Ingress protection. The first digit is for solids
and the second is for liquids.
4 = protects against most wires, screws , etc. > 1mm in size
4 = Water splashing against the enclosure from any direction shall
have no harmful effect.
The protection rating for this product applies only when the ports
are covered with the orange cap. Do not submerge this product in
water or any other liquid.
Note on solar charging: Avoid prolonged exposure to heat as it
may damage the battery, do not place on a car dashboard or
other surfaces that can become hot to the touch.
Need help? We are here to help with any product questions you
may have, please contact customer service at
[email protected] or 1-800-838-3200 from 9AM – 6PM
Mon – Thu, 9AM – 3PM Fri, Eastern time.
©Mizco International, Inc. All rights reserved.
All trade names are registered trademarks of the respective
manufacturers listed.
Mizco International Inc., Cranford, NJ 07016
[email protected] www.mizco.com
www.toughtested.com
LIMITED WARRANTY
Thank you for purchasing a ToughTested® product from Mizco
international, Inc.
We want you to enjoy this product without any problems.
However, in the unlikely event that it malfunctions, we will
either repair or replace it as part of the product’s 5 year limited
warranty.
If the product has malfunctioned during normal use, the
responsibility of ToughTested® is limited solely to the repair or
replacement, at its option, of the product. This warranty does
not extend to damage or failure that results from misuse,
neglect, accidents, alteration, abuse, improper installation or
maintenance.
All brands represented herein are registered trademarks of
their respective manufacturers. Design and specifications are
subject to change without notice.
ENGLISH
ENGLISH
ENGLISH
ENGLISH
ENGLISH
POWER PACK & LED LIGHT PANEL
BLOC D’ALIMENTATION ET PANNEAU LUMINEUX À DEL
USER GUIDE
TT-PBW-SB1
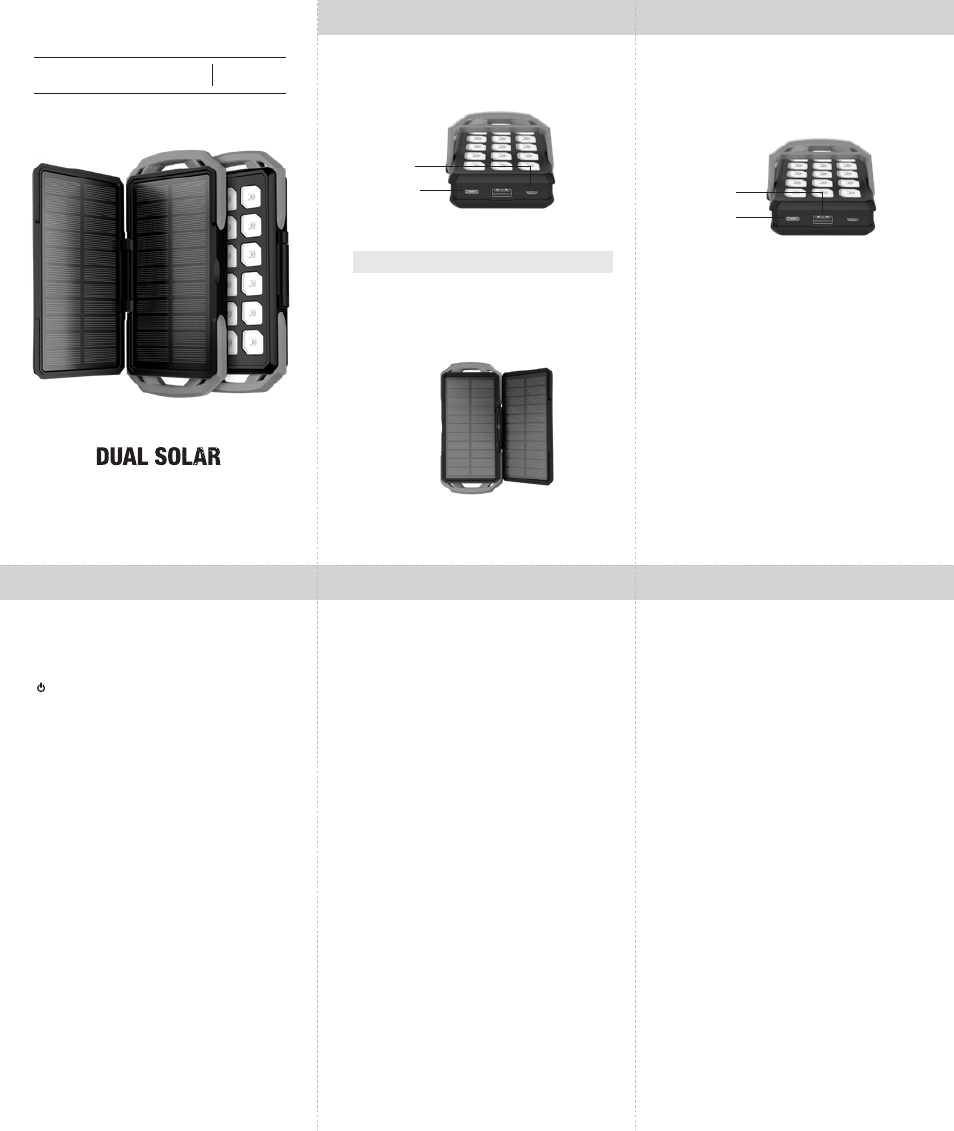
CHARGING THE POWERBANK
•
Connect a cable to either the USB-C in/out port or the Micro
USB Input port.
•
To fully charge the powerbank: Let charge until all 4 blue
LEDs are lit and not blinking.
SOLAR CHARGING
•
For solar charging open the cover as shown.
•
Place the solar panels facing direct sunlight. The green solar
charge light will illuminate.
•
Solar charging is best used for emergency purposes only.
•
5 hours of solar charging will provide enough power to
charge a Smartphone about 60%.
USB-C in/out port
Micro input port
1A
Charger
12 hrs
2A
Charger
6 hrs
PD
Charger
3 hrs
QC2/QC3
Charger
4 hrs
SWITCHBACK
USING THE POWERBANK
•
Connect your device to the QC3.0 port or the PD USB-C port.
•
If your phone supports fast charging it will automatically go
into fast charging mode.
•
You can charge multiple devices at the same time, though
charging may be slower.
OPERATING THE LIGHT PANEL
•
Hold the power button for 3 seconds to turn the light panel
on or off.
•
With the light panel on, short press to change modes
White low --> white high --> flashing white --> SOS --> solid
red --> flashing red
PD In/Out (USB-C)
QC 3.0 Out