Tamko, Tw moisture wrap, Above grade moisture / air barrier membrane – TAMKO TW Moisture Wrap User Manual
Page 4
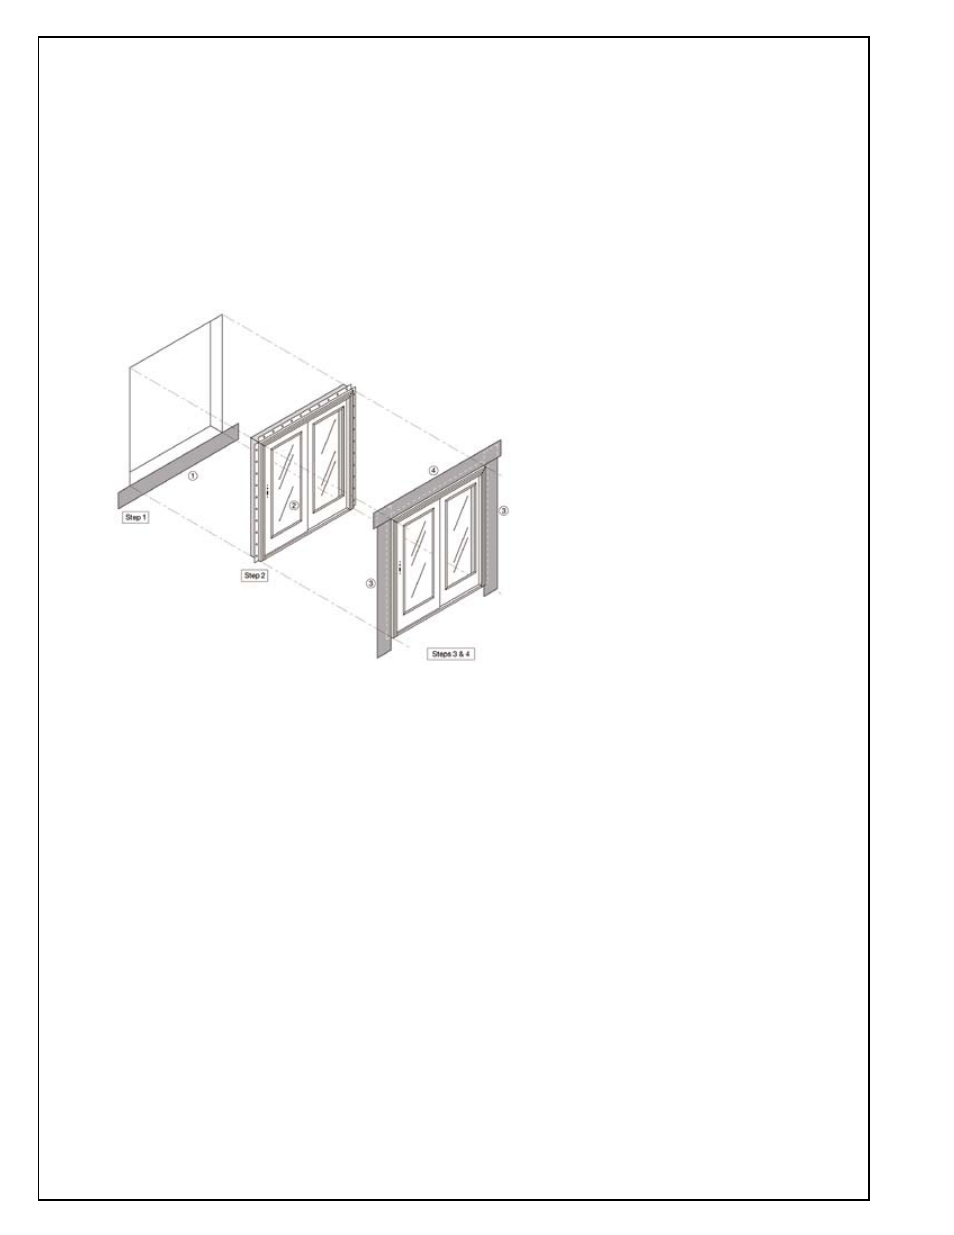
Figure 3: Door installation detail for doors with
integral flanges and flashing installed prior to WRB
dOOR FLAsHIng APPLICAtIOn
This section is for application of TW Moisture Wrap to protect against moisture and air leaks around door perimeters.
Before you begin - Determine if door will be installed prior to or after installation of the Water Resistive Barrier (WRB) and
follow the appropriate Method (Method A or A1) dependant on the WRB installation plan. Be sure to follow all preparation,
priming, fastening, and general application procedures as stated previously in these instructions together with the specific door
installation method.
metHOd A: APPLIed PRIOR tO WAteR ResIstIve BARRIeR (WRB)
(Self-Adhesive Flashing for doors with integral flanges; flashing applied prior to Water Resistive Barrier
)
Tamko
®
TW moisTure Wrap
above Grade moisture / air Barrier membrane
1. Sill Flashing - If the door will be installed without a mounting flange at the sill, prepare the sill to receive the door in ac-
cordance with the door manufacturer's installation instructions and proceed to step 2. If the door will be installed with a sill
mounting flange, flash the bottom of the sill by cutting the flashing the width of the rough opening plus 2 times the flashing
width. Partially remove the release liner so that the release liner remains in place on the lower two inches of the flashing. Cen-
ter the flashing horizontally relative to the rough opening. Align the edge of the flashing with the adhesive exposed with the
bottom of the rough window opening and firmly press the flashing into place. Tape the lower edge of the flashing to prevent
wind damage until WRB installation. Do not adhere the bottom 2" of the flashing at this time (See step 5 below).
2. Install Door - Install the door in the rough opening following the door manufacturer's instructions.
3. Jamb Flashing - Confirm door flange is clean and dirt-free by wiping the flange with a clean rag. If the door is installed
without a mounting flange at the sill, cut two jamb flashings long enough to extend below the rough opening sill up to the full
width of the flashing material and above the rough opening head the width of the flashing minus 1". Align the end of one jamb
flashing so it is positioned 1" below where the top of the head flashing will be located, remove the release liner and press the
flashing firmly into place, fully covering the flange along one side of the door. Repeat procedure for other side of door.
If the door is installed with a sill mounting flange, cut two jamb flashings the length of the rough opening plus 2 times the
width of the flashing minus 1". Align the end of one jamb flashing even with the bottom of the sill flashing. Remove the
release liner and press the flashing firmly into place, fully covering the flange along one side of the door. Repeat procedure for
other side of door. The ends of the sill flashing must not protrude beyond the edges of the jamb flashings. If the sill flashing
protrudes beyond the edges of the overlying jamb flashings, remove and discard the protruding portion of the sill flashing.
4. Head Flashing - Confirm door flange is clean and dirt-free by wiping the flange with a clean rag. Cut the head flashing
the width of the rough opening plus 2 times the width of the flashing plus 2". Center the head flashing over the rough open-
ing. Remove the release liner and press the flashing firmly into place. Flashing must be flush against the top of the door, fully
covering the door flange and extending 1" beyond the jamb flashing on each side.
5.WRB Installation - Install the WRB in accordance with the WRB manufacturer's instructions. If the door is installed with
a sill mounting flange, tuck the WRB under the unadhered portion of the sill flashing, remove the release liner from the sill
flashing, and adhere the sill flashing to the WRB by firmly pressing the flashing into place.