Tamko, Tw moisture wrap, Above grade moisture / air barrier membrane – TAMKO TW Moisture Wrap User Manual
Page 5
Tamko
®
TW moisTure Wrap
above Grade moisture / air Barrier membrane
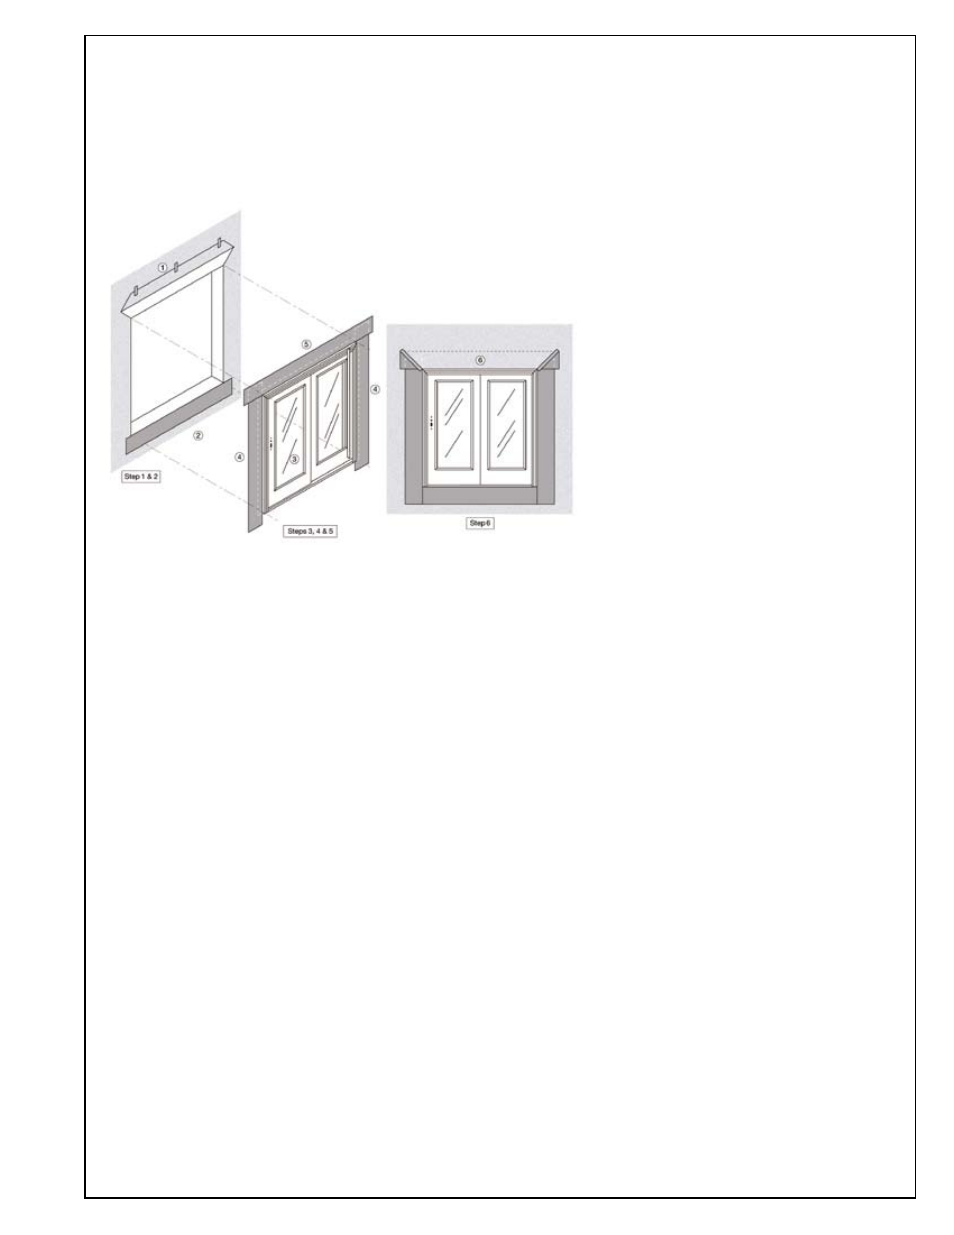
Figure 4: Door installation detail for doors with
integral flanges and flashing installed after WRB
1. Preparation of Installed WRB - If the WRB covers all or part of the rough opening, cut the WRB even with the edge of the
rough opening and discard the portion of the WRB that was removed from the rough opening. At the head of door opening, cut
the WRB at a 45° angle at each corner according to the diagram shown above. Carefully lift and temporarily tape up the corners
to place WRB out of the way for remaining application steps.
2. Sill Flashing - If the door will be installed without a mounting flange at the sill, prepare the sill to receive the door in ac-
cordance with the door manufacturer's installation instructions and proceed to step 3. If the door will be installed with a sill
mounting flange, flash the bottom of the sill by cutting the flashing the width of the rough opening plus 2 times the flashing
width minus 2". Remove the release liner. Center the flashing horizontally relative to the rough opening and align the top edge
of the flashing with the bottom of the rough door opening. Firmly press the flashing into place.
3. Install Door - Install the door in the rough opening following the door manufacturer's instructions.
4. Jamb Flashing - Confirm door flange is clean and dirt-free by wiping the flange with a clean rag. If the door is installed
without a mounting flange at the sill, cut two jamb flashings long enough to extend below the rough opening sill up to the full
width of the flashing material and above the rough opening head the width of the flashing minus 1". Align the end of one jamb
flashing so it is positioned 1" below where the top of the head flashing will be located, remove the release liner and press the
flashing firmly into place, fully covering the flange along one side of the door. Repeat procedure for other side of door.
If the door is installed with a sill mounting flange, cut two jamb flashings the length of the rough opening plus two times the
width of the flashing minus 1". Align the end of one jamb flashing even with the bottom of the sill flashing. Remove the release
liner and press the flashing firmly into place, fully covering the flange along one side of the door. Repeat procedure for other
side of door.
5. Head Flashing - Confirm door flange is clean and dirt-free by wiping the flange with a clean rag. Cut the head flashing the
width of the rough opening plus 2 times the width of the flashing plus 2". Center the head flashing over the rough opening. Re-
move the release liner and press the flashing firmly into place. Flashing must be flush against the top of the door, fully covering
the door flange and extending 1" beyond the jamb flashing on each side.
6. Complete the Head Flashing By Taping the WRB - Untape the WRB and lower over the flashing. Apply new pieces of
sheathing tape diagonally over the cut WRB, adhering it to the flashing. Press firmly into place.
dOOR FLAsHIng APPLICAtIOn (continued)
metHOd A1: APPLIed AFteR WAteR ResIstIve BARRIeR (WRB)
(Self-Adhesive Flashing for doors with integral flanges; flashing applied after Water Resistive Barrier)
Information included in this product data sheet was current at time of printing. To obtain a copy of the most current version of this product data sheet, visit us
online at tamko.com or call us at 800-641-4691.
This product is covered by a 5-year limited warranty. For information regarding or a copy of TAMKO's limited warranty, contact your local TAMKO
representative, visit us online at tamko.com, or call us at 800-641-4691.