Remote control, Back panel – Atlona AT LINE PRO5 GEN2 V3 User Manual
Page 5
5
atlona.com
Toll free: 1-877-536-3976
Local: 1-408-962-0515
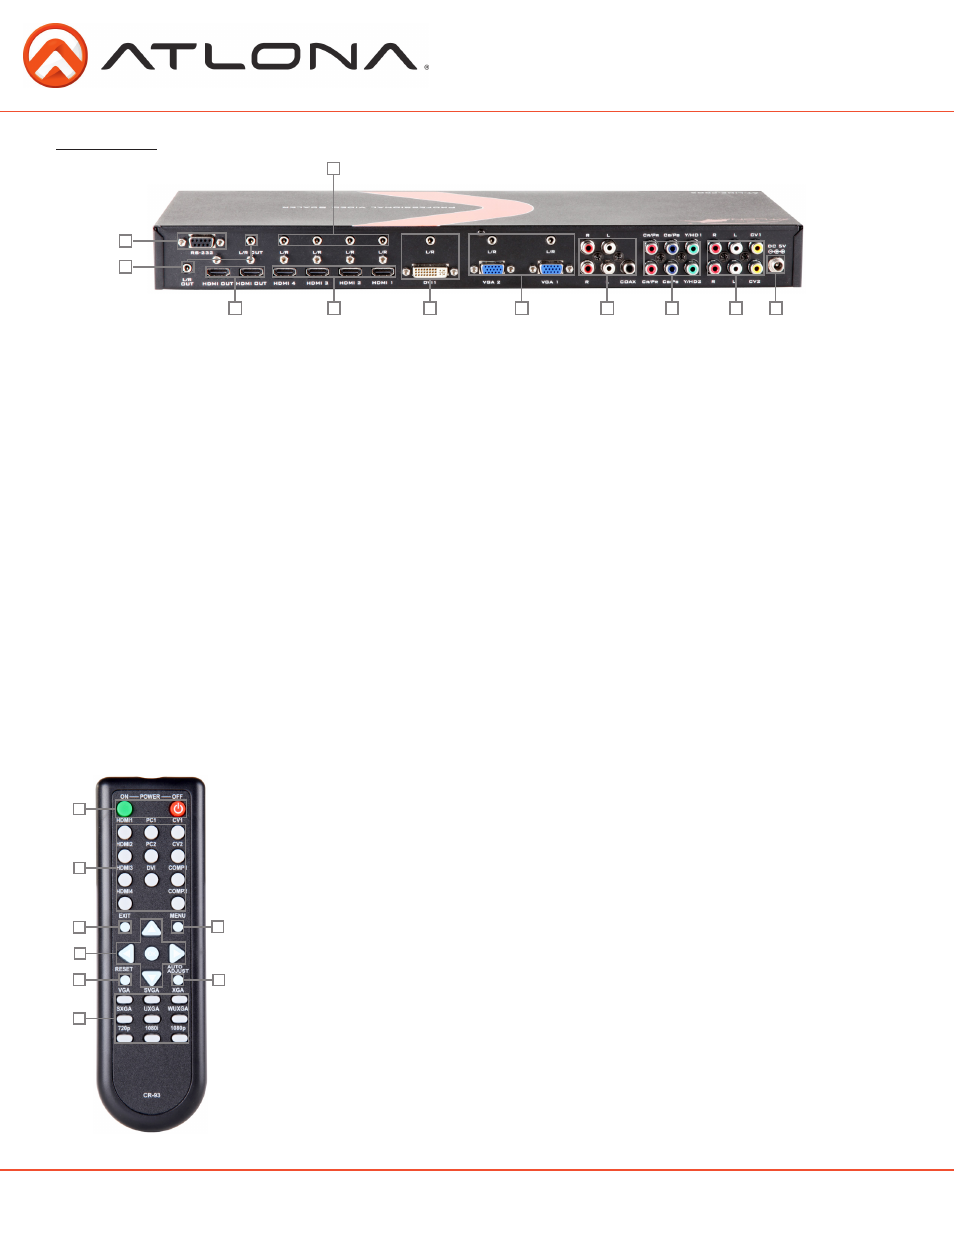
Remote Control
Back Panel
1. POWER ON/OFF: Press these buttons to power on the device or to set it
to standby mode.
2. Input Selection: Press to switch between sources.
3. Exit: Press to exit from a sub menu or main menu.
4. On Screen Display operation. Press to increase/decrease the setting value
of a selected parameter. OK (Enter): Press to confirm your selection.
5. Reset: Press the button to reset the unit’s firmware setting to the factory
default.
6. Output Resolution: Press to directly select output resolution. For other out
put resolutions that are not available on the remote please enter On
Screen Display Menu to select them.
7. MENU: Press to bring up On Screen Display.
8. Auto Adjust: Press to optimize the position of the picture (picture
centering) on the screen.
1. RS-232: Connect to a 3rd party control system or a computer with this port.
2. 3.5mm Stereo audio out - send stereo audio through to an amp (i.e. AT-PA100-G2)
3. HDMI Out - Mirrored outputs, connect to a display with HDMI or an HDMI to DVI connector (such
as AT14048 which has a compatible locking connector to secure the connection).
4. HDMI In - Connect the HDMI sources here or DVI sources with an HDMI to DVI adapter (
i.e.
AT-14050
)
5. 3.5mm Stereo In - Audio in port used for audio when using an HDMI to DVI adapted source.
6. DVI In & Stereo In: Connect to computer video sources. Use the 3.5mm stereo audio input to
transfer audio through as well.
7. VGA In & Stereo In: These slots are for input sources such as Laptops, Desktop Computers,
Document Cameras or any other VGA source. Each VGA input is accompanied with a 3.5mm
stereo audio input.
8. COAX and RCA R/L ports: These ports are to embed analog (RCA R/L) and digital (coaxil) audio
signals from any source.
9. Y/PB/PR : These ports are to connect input sources such as DVD players, Cables Boxes or HD
Cameras.
10. CV & Stereo In: These ports are to connect to input sources such as VCRs or Security Cameras.
11. DC 5V: This port is to connect to the supplied power supply.
1
2
3
4
5
6
8
7
11
10
9
8
7
6
4
5
3
2
1