D9250_en tc jan_p15_p16_v01_070507.pdf – Aavara D9250+EF6540*2 User Manual
Page 10
2
Installation of the Ceiling Mount Bracket
䉴䊥䊷䊑䈱䊊䊮䉧䊷ᧄ䈻䈱ขઃ
䉴䊥䊷䊑䈱䊊䊮䉧䊷ᧄ䈻䈱ขઃ
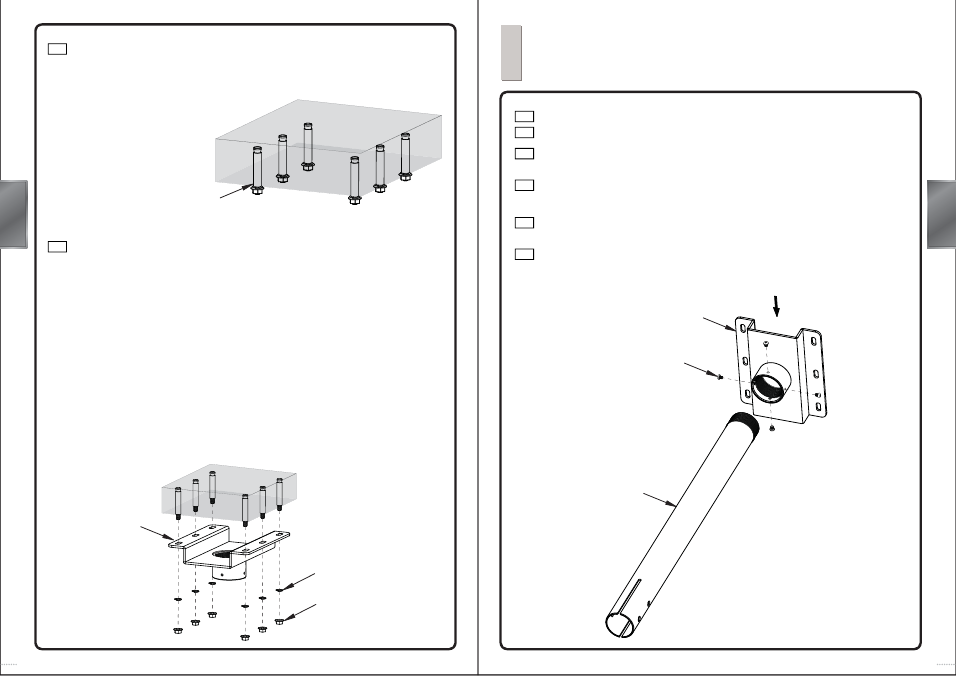
Fix the Outer Sleeve (C) [Height adjust outside tube] to the Ceiling Mount
Bracket (A): Use Screws (D) to tighten the Outer Sleeve to the Bracket.
Insert the power cable, signal cable and other wires through the iron pipe via
the recess of the Ceiling Mount Bracket (indicated by the arrow).
ᄖ䉴䊥䊷䊑
(C)䉕ᣓ࿁䈚䈩䊊䊮䉧䊷ᧄ(A)䈮✦ઃ䈔䇮䊈䉳(D)䉕↪䈚䈩ᄖ䉴䊥䊷
䊑䉕䊊䊮䉧䊷ᧄ䈮࿕ቯ䈚䈩䈒䈣䈘䈇䇯
㔚Ḯ䉮䊷䊄䊶ାภ䉮䊷䊄䈶䈠䈱ઁ䈱䉮䊷䊄䉕ᄤ᧼䊊䊮䉧䊷ᧄ䈱ญ䈱㐿䈇䈩䈇
䉎䉬ᚲ䋨⍫ශ䋩䈎䉌㋕▤ౝ䈮ᝌ䈚䈩䈒䈣䈘䈇䇯
Use a hammer to drive the Inflate Screws (B) into the holes on the ceiling,
tighten the nut upon the Inflate Screw.
䊊䊮䊙䊷䈪⤘ᒛ䊈䉳
(B)䉕ᄤ᧼
䈱ሹౝ䈮ณ䈐ㄟ䉂䇮⤘ᒛ䊈䉳
䈱䊅䉾䊃䉕✦ઃ䈔䈩䈒䈣䈘䈇䇯
ĺ
ĺ
Loosen and remove the nut and spring washer from the Inflate Screw. Fix the
Ceiling Mount Bracket (A) to the ceiling.
Note: When fixing Ceiling Mount Bracket (A) onto the ceiling, pay attention to the
following assembly sequence:
Bracket ĺ Spring washer ĺ Nut
⤘ᒛ䊈䉳䈱䉴䊒䊥䊮䉫䊪䉾䉲䊞䊷䈫䊅䉾䊃䉕✭䉄䈩ขᄖ䈚䇮䊊䊮䉧䊷ᧄ㩿㪘㪀䉕ᄤ
᧼䈮࿕ቯ䈚䈩䈒䈣䈘䈇䇯
ᵈᗧ
ᵈᗧ
䊊䊮䉧䊷ᧄ
(A)䉕ᄤ᧼䈮ขઃ䈔䉎ᤨ䈲⤘ᒛ䊈䉳䈱䊪䉾䉲䊞䊷ឃ㗅ᐨ䈮ᵈᗧ䈚
䈩䈒䈣䈘䈇䇯
䊊䊮䉧䊷
䊊䊮䉧䊷
㩷㸢㩷䉴䊒䊥䊮䉫䊪䉾䉲䊞䊷
䉴䊒䊥䊮䉫䊪䉾䉲䊞䊷
ĺ
䊅䉾䊃
䊅䉾䊃
㩷
1-4
2-1
2-2
2-1
2-2
2-1
2-2
1-5
A
D
C
SPRING WASHER
NUT
A
B
16
15
ENG
ᣣᧄ⺆
ᣣᧄ⺆
ENG
ᣣᧄ⺆
ᣣᧄ⺆