Cirdns system, Cirdns - host, Cirdns - password – CIRCUTOR EDS-3G Series User Manual
Page 2: Cirdns - server, Cirdns - port, Ip - ( dhcp no ), Netmask - ( dhcp no ), Other configurations - ( dhcp no ), Manual date and time configuration, Ping system
EDS-3G
M98240601-03-13B
2.2.11.2.- CirDNS System
CirDNS is a proprietary system that has been designed to invert
the role of the remote device connection process. The devices
start the communication process with the remote connections
server, by creating a transparent communications tunnel
between the device and connection server. Therefore, the
user avoids having to hire and maintain a fixed IP system or
DynDNS in its remote control locations.
Once the connections have been received by a central
computer, said connections are shared by a local DNS name
server, hosted in a machine with the software supplied with
the EDS device.
2.2.11.2.1. CirDNS - host
Enter the name with which the local DNS name server will be
identified when it is connected to the central server. For
example, when configuring
EDS001 when it is connected to the
main server, the server will identify it with the local DNS name
(after the name server has been installed - refer to the CirDNS
user manual).
The cursor is enabled with the
Scroll RIGHT key, and the Scroll
up and Scroll down buttons can be used to establish the
parameters of an alphanumeric data entry. Validate the data
by pressing the
Scroll down key.
2.2.11.2.2. CirDNS - password
An authentication password can be activated in the CirDNS
system installed on the server to provide access to the remote
devices machine. In this case, the EDS-3G units that wish to
connect to the machine must have an access password
established for such purposes.
The cursor is enabled with the
Scroll RIGHT key, and the Scroll
up and Scroll down buttons can be used to establish the
parameters of an alphanumeric data entry. Validate the data
with the
Scroll down key.
2.2.11.2.3. CirDNS - server
Enter the destination IP or DNS name where the device will
be actively connected. This is an alphanumeric field.
The cursor is enabled with the
Scroll RIGHT key, and the Scroll
up and Scroll down buttons can be used to establish the
parameters of an alphanumeric data entry. Validate the data
with the
Scroll down key.
2.2.11.2.4. CirDNS - port
Enter the port used to access the central server, where the
CirDNS connections software was installed. This computer
must have an access port used to connect all remote devices,
in order to establish a transparent communications tunnel.
In this case, access to the Internet connection from the central
location will require the use of a connection router, which will
establish a NAT access rule to activate a UDP connection port
in the connection server (connection path).
An access port must be activated in the Internet access
router, which will internally transfer the public communication
frames to the CirDNS internal connection server and to a port
specified by and known to the user.
2.2.12.- Enable Security
A user and edition password can be activated in the device,
thus avoiding modification of the configuration parameters.
The device displays
NO by default. It should be pointed out that
if the password is activated, it will be present in all the
device's configuration and display accesses (keyboard, Web
configuration and internal applications).
To modify the option displayed on screen,
Scroll RIGHT until
the option
YES appears. Do this twice and the device cyclically
displays both options until one of them is validated. Establish
the parameters for the alphanumeric data entry with the
Scroll
up and down buttons, up to 20 digits corresponding to the user,
and when the data is validated, repeat the operation with the
password. Validate the data (Scroll right and scroll down).
2.2.13.- Confirm Changes -
( DHCP YES )
The information must be validated to save the configuration.
The device displays
yes by default. When the completed
configuration is validated, press the
scroll down key and the
device saves the data and leaves configuration.
If the configuration is not saved,
Scroll RIGHT until the no option
appears. Do this twice and the device cyclically displays both
options until one of them is validated with the
scroll down key
2.2.14.- Client ID -
( DHCP NO )*
If the DHCP server is not activated, shown in section 2.2.2.-
DHCP assignment, validate the
NO option using the Scroll
down key and go to the next screen.
2.2.14.1.- IP -
( DHCP no )*
The user configures an IP address for the EDS-3G device
using this configuration option. To configure them, press the
Scroll RIGHT key, enabling the edit cursor on the first digit.
Press the
Scroll up and down buttons to establish the
parameters of a
000.000.000.000 type numeric data entry. After
establishing the parameters, press the
Scroll RIGHT key
repeatedly until the edit cursor disappears, and validate the
data with the
Scroll down key, opening the next screen.
2.2.14.2.- NetMask -
( DHCP no )*
To configure the (NetMask) configuration, press the
Scroll
RIGHT key, activating the edit cursor on the first digit. Press the
Scroll up and down buttons to establish the parameters of a
000.000.000.000 type numeric data entry. After establishing the
parameters, press the
Scroll RIGHT key repeatedly until the edit
cursor disappears, and validate the data with the
Scroll down
key, opening the next screen.
2.2.14.3.- Other configurations -
( DHCP no )*
After configuring the secondary DNS, the other setup screens
correspond to the same ones as in the activated DHCP mode;
consequently the configuration procedure will be the same as
the one for sections:
-
-
-
-
-
-
-
-
-
-
-
2.2.14.4.- Manual Date and Time Configuration
If there is no authentication configuration by the DHCP
system, and if there is no Primary and Secondary NTP server
available, EDS-3G allows the time and date to be configured
manually when validating the changes by displaying the
caption
adjust clock. The date and time are displayed on
screen with the following format:
YYYY-MM-DD HH:MM. To
configure them, press the
Scroll RIGHT key, enabling the edit
cursor on the first digit. Use the
Scroll up and Scroll down
buttons to establish the parameters of the numeric data entry.
After establishing the parameters, press the
Scroll RIGHT key
twice until the edit key disappears, and then validate the data
with the
Scroll down key, leaving setup and validating the
configuration.
When the configuration is validated, the
DONE caption appears,
returning to the main screen.
2.2.15.- Display of configuration parameters
To display the configuration parameters, the user must enter
the setup menu by simultaneously pressing the
SCROLL RIGHT,
SCROLL UP and Scroll down keys. The user must Press the Scroll
down key twice for complete visualisation of the device
configuration.
If a user and password are available even when the user does
not have one, all the configuration parameters can be
visualised without being able to change them (asterisk in top
left hand corner).
2.2.15.1.- Ping system
To confirm IP connectivity via a Local Area Network (LAN) or
the Internet using a DSL or 3G router, the user sometimes has
to know if the EDS-3G device has this IP access or if the unit
has particular access to a certain host.
To do so, EDS-3G has a
PING, section, from which the user
can carry out an IP connectivity test with an IP address or
name, emulating the ping command of a conventional
operating system.
The device displays the physical address within the setup
menu, as shown in section 2.2.1.- MAC address. Press the
SCROLL RIGHT key to go to the on-screen caption HOST PING. To
enter the name or IP address to carry out the ping test, press
the
Scroll RIGHT key to enable the edit cursor on the first digit.
Press this key and the
Scroll down and Scroll up buttons to
establish the parameters of an alphanumeric data entry of up
to 20 digits. After the data is entered, press the
Scroll RIGHT
key twice until the edit key disappears, and then validate the
data with the
Scroll down key.
When the data is validated, the screen displays the
DOING PING
caption and will then show the results:
-
PING RESULT: OK - a response was obtained from the host
-
PING RESULT: time out - no response was obtained from
the host
When a result is obtained by the device, press the
Scroll down
key and the device goes back to the by default display
screens.
2.2.16.- Acquired IP and coverage
Once the unit has been connected to the Internet, two
sensitive variables must be known by the user or integrator,
which are the IP acquired by the mobile phone telephony
provider and the coverage signal the unit is connected to.
Press the
Scroll right and Scroll left keys at the same time
and the unit will display on the screen the IP acquired by the
operator and the connection coverage. Said coverage can
oscillate from -113 dBm to -51 dBm. The latter is considered
as the value with the highest coverage.
These values may be known by accessing the following
website:
-
-
Where xxx.xxx.xxx.xxx is the IP address assigned by the user
Where dhcp_name is the name assigned and authenticated
by the name server of the local area network (LAN) or a DNS
server in case of using a DynDNS system to connect to the
Internet.
2.2.17.- Internal configuration web site
After establishing the parameters with the keyboard and
connecting to the Ethernet, or even from the unit's Internet
connection, the device has a configuration web site where the
user can fully modify the data entered with the keyboard. The
configuration web site is at the http address below:
-
-
Where xxx.xxx.xxx.xxx is the IP address assigned by the user
Where dhcp_name is the name assigned and authenticated
by the name server of the local area network (LAN) or a DNS
server in case of using a DynDNS system to connect to the
Internet.
2.3.- Network parameters configuration
(Software)
Configuration of addressing can be done in the same way as
using the keyboard via the IPSetup.exe file, available on a
CD supplied with the device.
2.3.1.- Fixed IP assignment
To assign a fixed IP address, enter the MAC address
displayed on the device screen as shown in section 2.2.1.-
MAC address address, the format of which is
00:26:45:XX:XX:XX.
In the Address field, enter the IP address being configured;
performs the same operation with the Netmask. After entering
the device configuration, press “Configure” to send the
configuration to the unit.
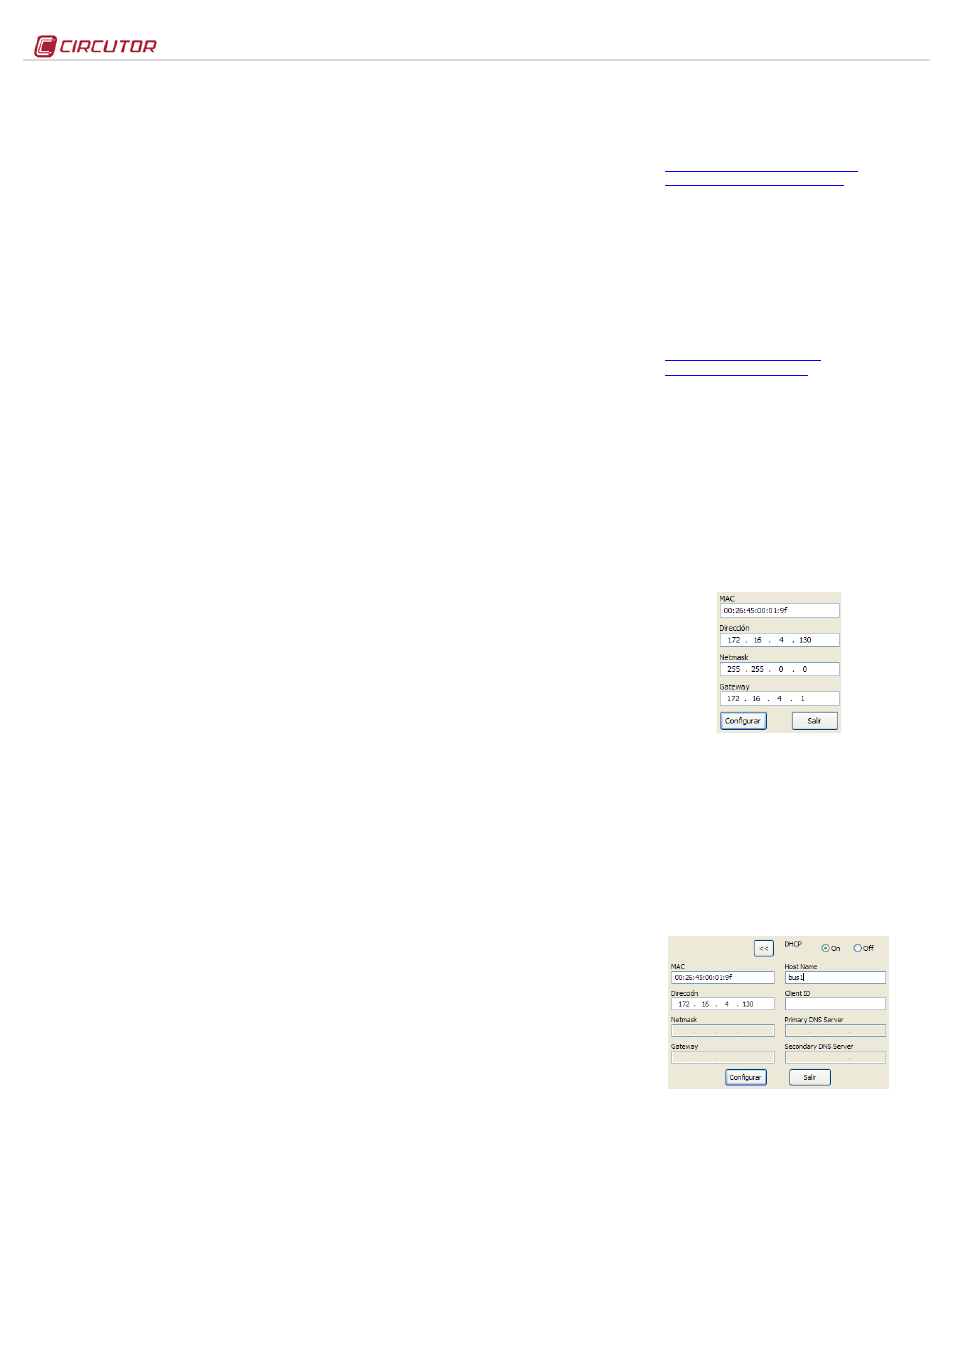
2.3.2.- DHCP IP assignment
To assign the DHCP name, activate the option using the
upper right hand arrow and select On. Once the configuration
fields have been enabled, enter the MAC address.
In the Address field, enter an unused, temporary IP address,
which is within the working range of your computer. In the
Host Name field, enter the DHCP name to be assigned to the
equipment. Optionally, the user can configure the parameters
of the ClientID field. The default VendorID of the device is
CIRCUTOR.
2.3.3.- Configuration web site
Once connection to the Local Area Network (LAN) is
established and the IP address or DHCP name is configured,
the device has an internal web site where the user can fully
modify all the network configuration parameters (0 Where
xxx.xxx.xxx.xxx is the IP address assigned by the user
Internal configuration web site), and even the time and date
data.