Ölens Technology MiCorder User Manual
Page 2
Button Functions:
To Delete:
Getting Started:
To Record:
Menu Functions:
o
SDHC cards, version 2.0, require
FAT 32 format
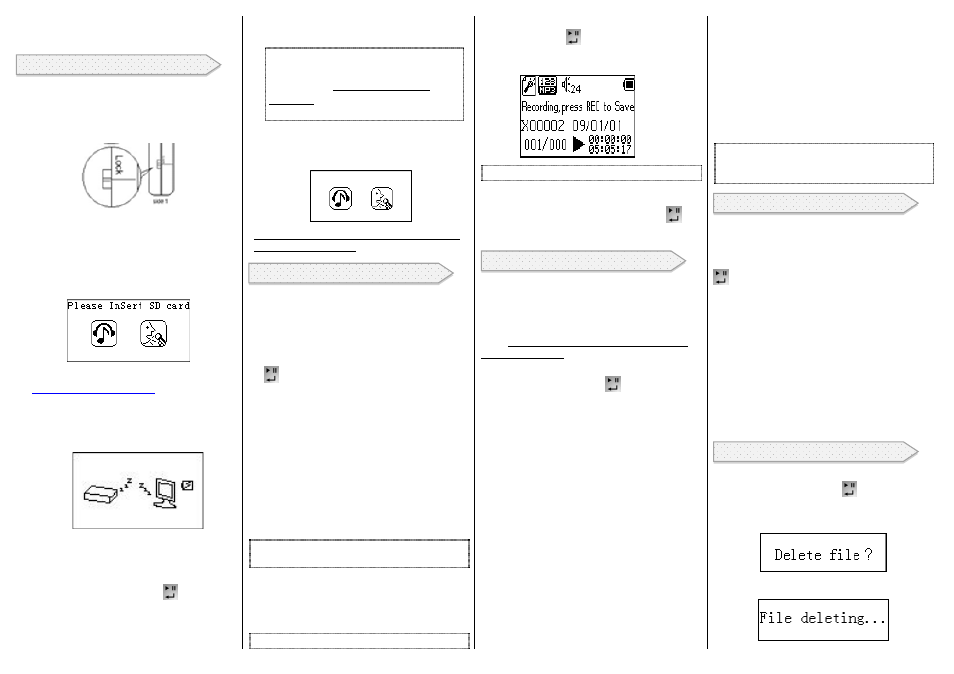
Locate the LOCK switch on the side of the
MiCorder, and slide it up (towards the USB
plug) to unlock the MiCorder (no red will
show when unlocked).
Insert the SD card into the MiCorder and
charge the MiCorder for 2 hours by plugging
the USB cable into a computer. Windows
Vista® and above will automatically detect
the MiCorder. If the SD card is not inserted
properly the following icon will appear:
Optional wall chargers are available at
www.olenstechnology.com
. When charging,
the battery appears on the screen behind the
monitor. When a lightning bolt is displayed
in the battery, it is charging. When the
battery is solid dark, it is fully charged.
All buttons are disabled when charging. To
operate when charging, wait until the
arrows disappear and the zzzz’s are
displayed. Then press and hold the PLAY
button (large middle button
) for 3
seconds and release. The buttons will now
function.
When fully charged, unplug the MiCorder
from the PC. All buttons now function.
Note
: After approximately 20
seconds the backlight turns off to
save power, and all buttons are
disabled.
Press any button to turn on
the backlight and reactivate the buttons.
When the MiCorder is new, there is no data
on the SD card. “Empty Card!” will be
displayed followed by this icon:
Note that the Menu button will not function
until data is recorded!
Voice Record: Press REC (twice if backlight
is off), “Initializing” is displayed. Press REC
again, “Recording, Press REC to Save” is
displayed. Hold near mouth and say
“Testing, 1, 2, 3”. Press REC again, “Saving
File, Please Wait” is displayed. Press PLAY
and listen to your recording.
Data Record: Insert one end of the stereo
“Copy cable” into Pink Line-in jack, and the
other end into the earphone jack of the radio,
tape player, computer or other source.
Confirm the source’s volume level is 35~70%
of maximum level. Sound can become
distorted if it is too loud. Recordings may be
monitored by plugging the earbuds into the
MiCorder green Line-out jack.
Press REC button once (twice if the backlight
has turned off).
Note:
If there is no Stereo Cable connected the
Built-In Microphone will take priority
Wait until “Initializing” screen is complete.
Press REC button again when prompted to
begin recording.
Note:
Green LED should change to Red
Press PAUSE/PLAY/RETURN (large
middle button
) to pause recording, or
the red REC button to finish and save the
file.
Note:
Recorded files will be saved under My Files
After recording you will be directed to My
Files. Press PAUSE/PLAY/RETURN
to
play the last file recorded.
To Access and Exit the Menu
: Press the MENU
button to access menu functions, press it again
to exit. The menu functions include My Files,
Repeat, Shuffle, Equalizer and Set Time and
Date. The MENU button will not work if the
SD Card is empty!
My Files: Press Menu, select My Files, and
press the Return button
. The last song
played, or the folder for the last song
played, will appear. To see a list of all
folders, press the Vol+ or Vol- buttons. To
access the root menu, press the Vol+ button
until the ‘ \ ‘ symbol appears and press the
Return button. The first folder will appear
and pressing Vol+ or Vol- will list all folders
stored in the SD Card.
Repeat: Press Menu, select Repeat, and
press the Return button. Select Repeat Song,
Repeat Folder or Repeat all. Repeat all will
play all songs stored on the SD Card and
restart from the beginning after the last song
is played.
Shuffle: Press Menu, select Shuffle, and
press the Return button. Select ON or OFF.
If ON is selected, the songs in a folder will
be played in a random order. If OFF is
selected, the songs in a folder will be played
alphabetically as stored on the SD Card.
Equalizer: Press Menu, select Equalizer, and
press the Return button. Select Normal,
Rock, Pop, Classic, Soft, Jazz or DBB.
Set Time and Date: Press Menu, select Set
Time and Date, and press the Return button.
Use Vol+ and Vol- to navigate through the
date, hours and minutes. Use the
Next/Forward Button and Previous/Back to
change the values in each category.
Note
: When you turn your MiCorder on it will
automatically start playing the last song that was
played
VOL +/-
: Navigates Menu functions and adjusts
volume.
PAUSE/PLAY/RETURN (
large middle button
: Confirms selection, pause, play functions.
MENU
: Enters menu list when playing a song,
pressing again returns to song.
REC
: Records music/sounds into files.
DELETE
: Deletes recorded files (file must be
paused to delete).
◄◄ - ►►
Press to play the previous or next
files and navigate Menu functions. Press and
hold to fast-forward or fast-reverse.
POWER
: Turns MiCorder on and off.
Press MENU, select My Files and press
PAUSE/PLAY/RETURN
Select file to delete (must be in Pause mode)
Press DELETE button once to select the file
Press DELETE once more to delete the file