Saturn ST-CC7108 Pompo User Manual
Page 3
4
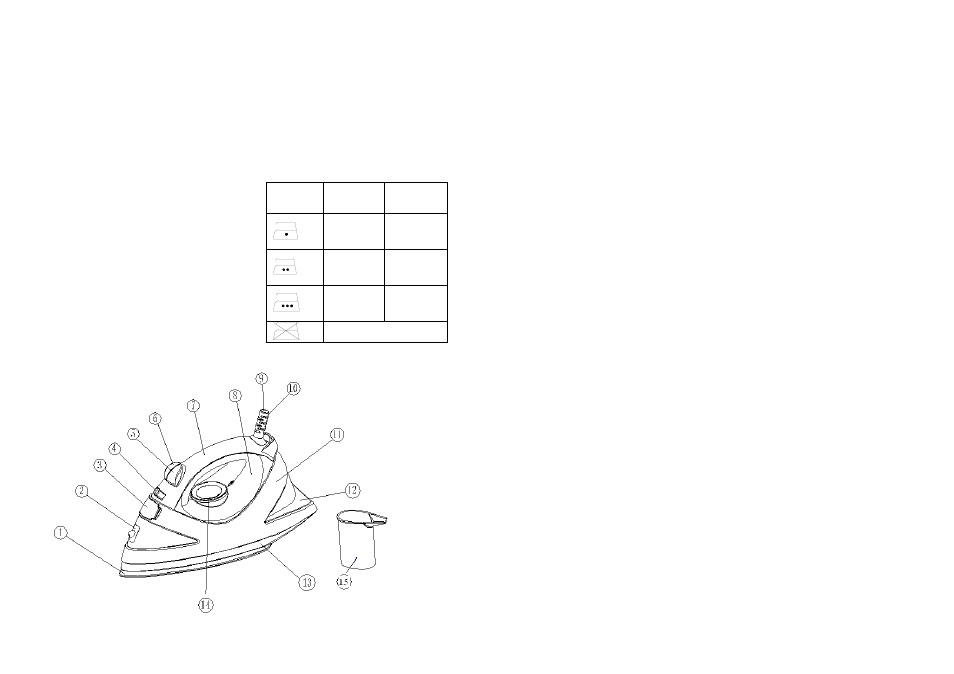
DESCRIPTION OF DEVICE
1. Sole plate
2. Spray organ
3. Filler door
4. Steam dial
5. Spray button
6. Shot steam button
7. Top cover
8. Water tank
9. Power supply cord
10. Protect wire cover
11. Body of iron
12. Back cover
13. Heat isolating
14. Temperature control knob
15. Water Cup
ANTI-CALC SYSTEM
A special resin filter inside the water
reservoir softens the water and
prevents scale build-up in the plate.
The resin filter is permanent and does
not need replacing.
ANTI-DRIP SYSTEM
With the anti-drip system, you can
perfectly iron even the most delicate
fabrics.
Always iron these fabrics at low
temperatures. The plate may cool
down to the point where no more
steam comes out, but rather drops of
boiling water that can leave marks or
stains. In these cases, the Anti-drip
system automatically activates to
prevent vaporization, so that you can
iron the most delicate fabrics without
risk of spoiling or staining them.
GENERAL INSTRUCTIONS
When using the iron for the first time,
you may notice a slight emission of
smoke and hear some sounds made
by the expanding plastics. This is quite
normal and it stops after a short time.
We also recommend passing the iron
over an ordinary cloth before using it
for the first time.
PREPARATIONS
Soft the laundry to be ironed
according to the international symbols
on the garment label, or if this is
missing, according to the type of
fabric.
GARMENT
LABEL
FABRIC
TYPE
THERMO-
STAT
REGULA-
TION
synthetic
·
low
temperat
ure
silk -
wool
··
medium
temperat
ure
cotton -
linen
···
high
temperat
ure
Fabric not to be
ironed
5
Start ironing the garments requiring a
low temperature.
This reduces the waiting times (the
iron takes less time to heat up than to
cool down) and eliminates the risk of
scorching the fabric.
STEAM IRONING
Filling the reservoir
- Check that the plug is disconnected
from the socket.
- Move the steam selector (4) to “0”
[Fig. 1].
- Open the lid (2).
- Raise the tip of the iron to help the
water enter the opening without
overflowing.
- Slowly pour the water into the
reservoir using the special measure
and taking care not to go over the
maximum
level
(about
180ml)
indicated by “MAX” on the reservoir
[Fig. 2].
- Close the lid (2).
SELECTING THE TEMPERATURE
- Put the iron in a vertical position.
- Put the plug in the socket.
- Adjust the thermostat knob (14)
according to the international symbol
on the garment label [Fig. 3]. The
plate
temperature
control
light
indicates that the iron is heating up.
Wait until the plate temperature
control light goes off before ironing.
Warning: during ironing, the plate
temperature control light comes on at
intervals, indicating that the selected
temperature is maintained. If you
lower the thermostat temperature
after ironing at a high temperature, do
not start ironing until the plate
temperature control light comes on
again.
SELECTING THE STEAM.
The quantity of steam is regulated by
the steam selector (4).
- Move the steam selector to a
position
between
minimum
and
maximum depending on the quantity
of
steam
required
and
the
temperature selected [Fig. 1].
Warning: the iron gives off steam
continuously only if you hold the iron
horizontally. You can stop the
continuous steam by placing the iron
in a vertical position or by moving the
steam selector to “0”. As indicated on
the thermostat knob (14) and in the
initial table, you can only use steam at
the highest temperatures. If the
selected temperature is too low, water
may drip onto the plate.
SELECTING SHOT-STEAM AND
STEAM WHEN IRONING
VERTICALLY
Press the shot-steam button (6) to
generate a powerful burst of steam
that can penetrate the fabrics and
smooth the most difficult and tough
creases. Wait for a few seconds before
pressing again [Fig. 4].
By pressing the shot-steam button at
intervals you can also iron vertically
(curtains, hung garments, etc.) [Fig.
5].
Warning: the shot-steam function
can
only
be
used
at
high
temperatures. Stop the emission when
the plate temperature control light
comes on, than start ironing again
only after the light has gone off.
DRY IRONING
To iron without steam, follow the
instructions in section “steam ironing”,
leaving the steam selector (4) on
position “0”.
Spray Function
Make sure that there is water in the
reservoir. Press the spray button (5)
slowly (for a dense spray) or quickly
(for a vaporized spray) [Fig. 6].
Warning: for delicate fabrics, we
recommend moistening the fabric
beforehand using the spray function
(5), or putting a damp cloth between
the iron and the fabric. To avoid
staining, do not use the spray on silk
or synthetic fabrics.
CLEANING
Please note: before cleaning the iron
in any way, make sure that the
appliance plug is not connected to the
socket.
Any deposits, starch residue or size
left on the plate can be removed using
a damp cloth or an unabrasive liquid
detergent.
Avoid scratching the plate with steel
wool or metallic objects.
The plastic parts can be cleaned with a
damp cloth then wiped over with a dry
cloth.
HOW TO PUT IT AWAY
- Disconnect the plug of the iron from
the socket.
- Empty the reservoir by turning the
iron upside down and gently shaking
it.
- Leave the iron to cool down
completely.
- Roll up the power cord with the
rewinder [Fig. 8].
- Always put the iron away in a
vertical position.