Aervoe Emergency Alert Radio User Manual
Soladyne® emergency alert radio & flashlight #7415
SolaDyne® Emergency Alert Radio & Flashlight
#7415
IMPORTANT SAFEGUARDS
•
Read all instructions before operating
•
Do not look directly at the light; may cause injury
•
Do not use in flammable or explosive environments
•
Do not operate at temperatures above 120°F
•
Avoid placing siren near the ears when using the siren
•
To reduce the risk of electric shock, do not submerge the unit or its accessories in any
liquid. Unit is water resistant but not waterproof.
•
Turn off all lights and radio features before charging
•
For maximum battery efficiency, never completely deplete stored power
•
Store in a clean dry place when not in use
•
Administer close supervision when using around children
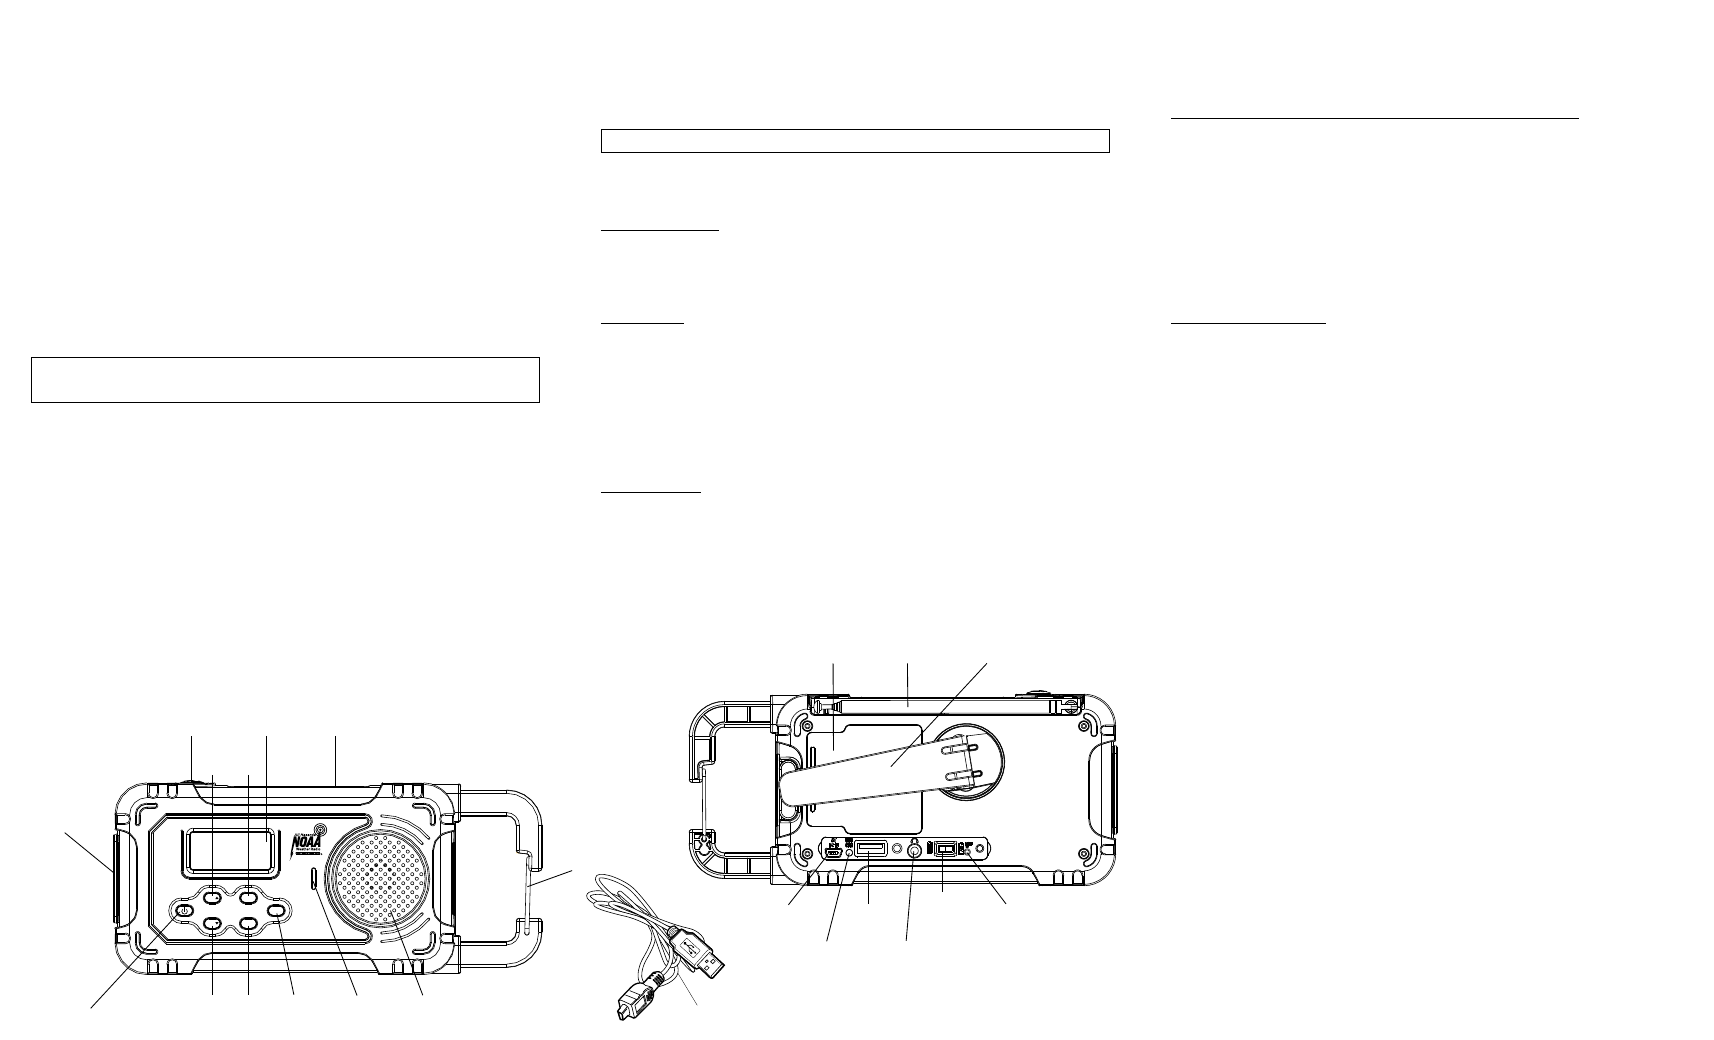
PARTS IDENTIFICATION
CHARGING THE RECHARGEABLE BATTERY
Before charging, turn off the light and radio functions. The CHARGING INDICATOR will
illuminate during charging.
Low Battery Indicator:
The LOw BATTeRy INDICATOR will appear and flash in the LCD DISpLAy if the battery
level becomes low. At that point it is time to recharge the internal rechargeable lithium
ion battery or replace the AAA alkaline batteries.
Solar Charging:
1.
Set the BATTeRy SeLeCTION SwITCH to the LI-ION BATTeRy position.
2.
place the unit in direct sunlight with the SOLAR pANeL facing the sun. The CHARGING
INDICATOR will illuminate green to show that it is strong enough to charge the battery.
Occasionally adjusting the unit to keep it in direct sun may be needed when charging for
an extended period of time.
3.
Charging will be most effective on a bright sunny day. It will take longer to charge on a
cloudy day.
Dynamo Charging:
1.
place the BATTeRy SeLeCTION SwITCH in the LI-ION position (to the left)
2.
Open the HAND CRANk and rotate clockwise at approximately 120 cycles/minute for a
minimum of 2-3 minutes. winding for a longer period of time will yield longer power
durations.
3.
The CHARGING INDICATOR will illuminate red during charging.
4.
Close the Hand Crank.
5V USB, 120V AC, or 12V DC Charging (12V & 120V adapters not included):
The USB adapter may be used to charge the unit directly from any USB power source. An
optional method requires a USB compatible 120V AC or 12V DC adapter available from your
local electronics store.
1.
plug the mini USB tip on the USB CHARGe CABLe into the MINI USB INpUT port of the
unit and then plug the adapter into a USB port.
2.
If using the optional 120V or 12V adapters, connect either one to the USB end of the USB
CHARGe CABLe and into any electrical outlet or vehicle power receptacle.
3.
Charging will begin when connected. The CHARGING INDICATOR will illuminate red
during charging and change to green once charging is complete.
AAA Batteries (not included):
1.
Non-rechargeable AAA batteries, or rechargeable AAA batteries may also be installed.
Note, that if rechargeable batteries are used, they cannot be recharged using any of
the charging methods listed above. Visit your local retailer or www.aervoe.com for
rechargeable batteries and battery recharging devices.
2.
Open the BATTeRy COVeR DOOR and follow the polarity diagram shown inside to install
the batteries, and replace the door.
3.
Open the RUBBeR DUST COVeR on the back and change the BATTeRy SeLeCTOR
SwITCH to the AAA BATTeRy position. Note: when in this position the rechargeable
lithium will not be in use.
Caution
•
when using AAA batteries, make sure they are installed correctly. The unit may be
damaged if the polarity is switched.
•
Do not mix old and new batteries
•
Do not mix Alkaline and rechargeable batteries
•
Remove batteries when stored for an extended period of time
OPERATING THE AM/FM/NOAA WEATHER BAND RADIO
4.
press the pOweR BUTTON on the front to turn on and off.
5.
Select either the AM, FM or weather band pressing the MODe button. The radio station
and radio band will appear on the LCD SCReeN. when choosing the weatherband mode
you will need to identify which frequency receives your local weather report.
6.
Adjust the volume by pressing the VOL+/VOL- buttons.
7.
Tune to the desired station using the TUNe ▼ / ▲ tuning buttons. Cycle through the
frequencies by pressing repeatedly.
8.
To scan for the next station with a strong signal, press and hold the TUNe ▲/▼ button.
The tuner will stop on the first strong signal. Adjustments to the frequency can be made
using by manual tuning. Repeat to hear the next audible station. NOAA weatherband
information is listed on the back page. press the pOweR button. The LCD DISpLAy will
illuminate.
9.
To maximize FM reception, adjust the telescoping antenna. The AM antenna is located
within the radio case so reposition the unit for the best reception.
10. To turn off, press the pOweR button. The LCD display will turn off after 20 seconds.
BATTERY
COMPARTMENT
ANTENNA
DYNAMO
HAND CRANK
MINI USB
INPUT
CHARGING
INDICATOR
USB
OUTPUT
RESET
BUTTON
BATTERY
SELECTION
SWITCH
HEADPHONE
JACK
ALERT
VOL.
MODE
+
-
VOL.
TUNE
TUNE
AM / FM / WEATHER BAND RECEIVER
FLASHLIGHT
BUTTON
FLASHLIGHT
VOL
-
POWER
BUTTON
TUNE
▼
TUNE
▲
VOL
+
MODE
SOLAR
PANEL
ALERT
INDICATOR
SPEAKER
CLIP
LCD
DISPLAY
Before first use, open the battery compartment cover and remove the battery pull tab.
USB CHARGE
CABLE
FCC REQUIREMENTS
warning: Changes or modifications to this unit not expressly approved by the party
responsible for compliance could void the user’s authority to operate the equipment
NOTE: Note: This equipment has been tested and found to comply with the limits for a Class
B digital device, pursuant to part 15 of the FCC Rules. These limits are designed to provide
reasonable protection against harmful interference in a residential installation. This equipment
generates, uses, and can radiate radio frequency energy and, if not installed and used in
accordance with the instructions, may cause harmful interference to radio communications.
However, there is no guarantee that interference will not occur in a particular installation. If
this equipment does cause harmful interference to radio or television reception, which can be
determined by turning the equipment off and on, the user is encouraged to try to correct the
interference by one of more of the following measures:
•
Reorient or relocate the receiving antenna
•
Increase the separation between the equipment and receiver
•
Connect the equipment into an outlet on a circuit different from that to which the receiver
is connected
•
Consult the dealer or an experienced radio/TV technician for help
Operation is subject to the following two conditions: (1) this device may not cause harmful
interference, and (2) this device must accept any interference received, including interference
that may cause undesired operation.