Watt solar collector, Operating instructions – Aervoe 80-Watt Solar Collector User Manual
Page 2
OPERATING INSTRUCTIONS
80-Watt Solar
Collector
AERVOE INDUSTRIES, INC.
Gardnerville, NV 89410 • 1-800-227-0196
www.aervoe.com • [email protected]
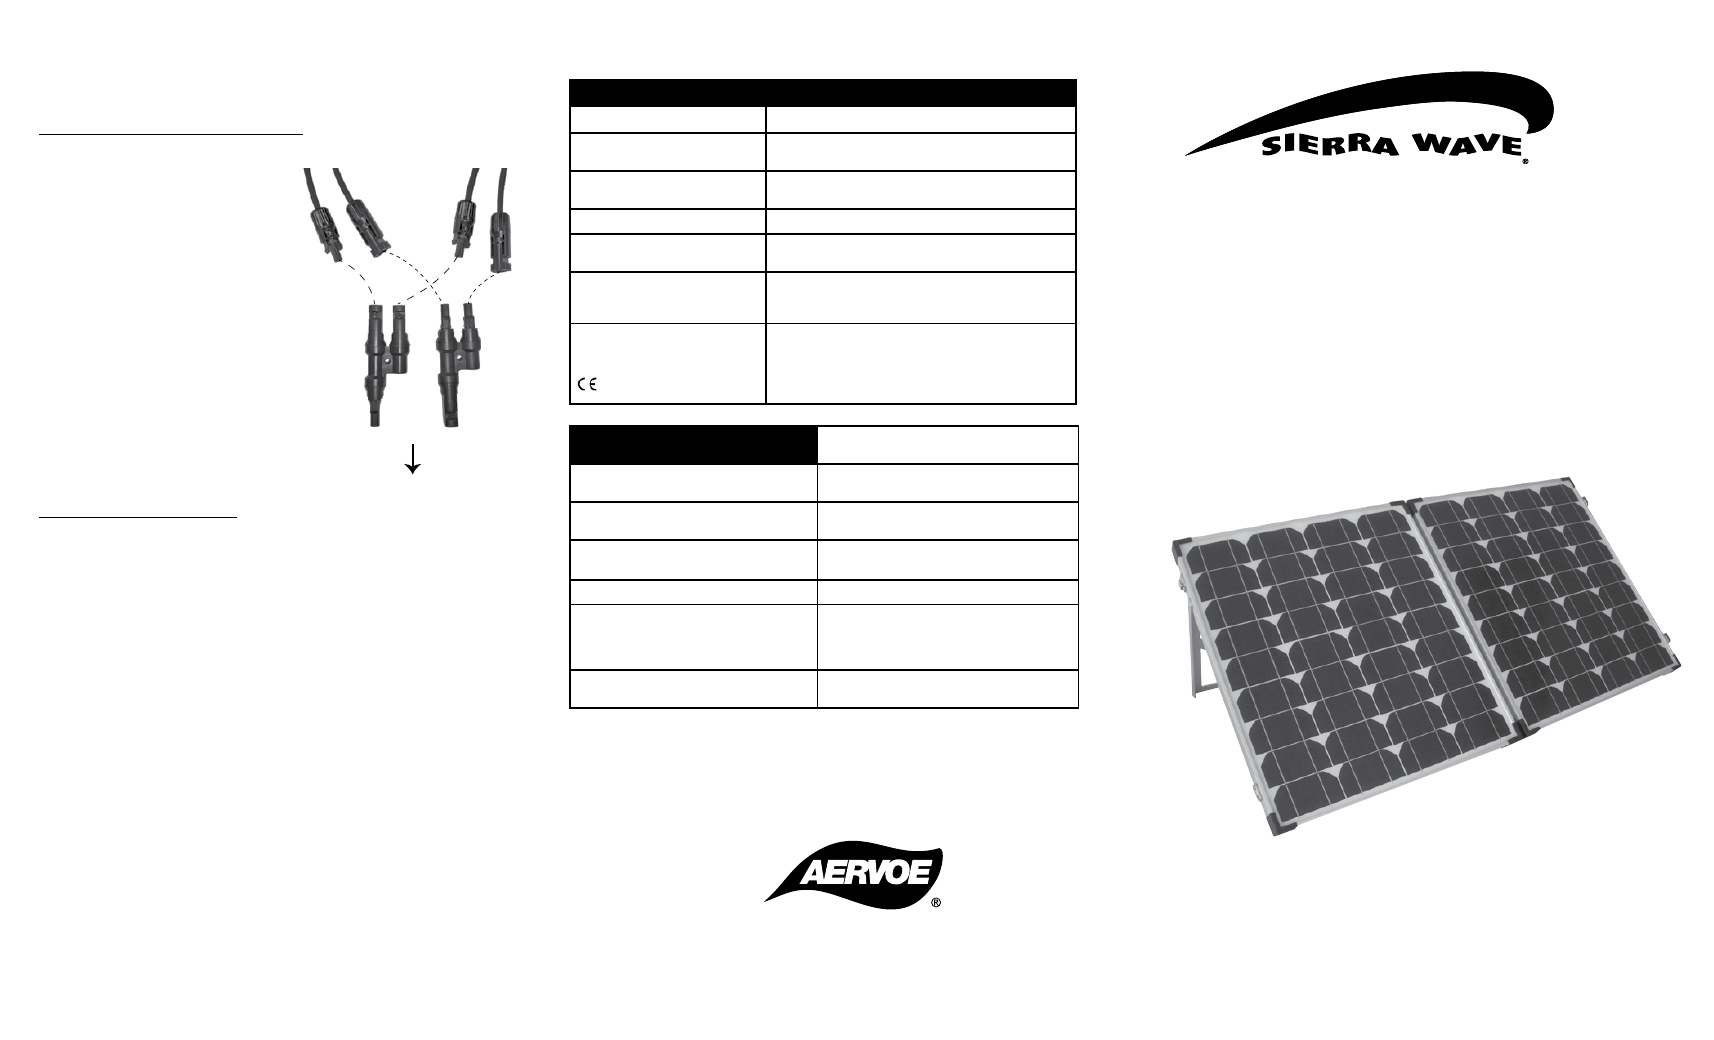
Pairing Two Solar Collectors:
Allows two 80-Watt Solar Collectors to be connected in parallel to increase charge rate. Verify
your Power Center or 12V auxiliary battery can accommodate these power ratings.
OPTION #1: Charging Accessory Power Centers
(Requires #9502 Chainable Connectors - 2-piece set sold separately)
1.
Set up both SOLAR COLLECTORS as outlined
previously. They should be close together
but not obstructing sunlight to each
other.
2.
From each SOLAR COLLECTOR, select
a female MC4 POWER CABLE and
connect them to the #9502 CHAINABLE
CONNECTOR with 2 male ends.
3.
Repeat with the remaining male MC4
POWER CABLES connecting them to the
CHAINABLE CONNECTOR with 2 female
ends.
4.
Connect the SOLAR CHARGE CABLE
included with the Power Center to the
CHAINABLE CONNECTORS matching
male to female connectors. NOTE: Sierra
Wave Power Centers come with the Solar
Charge Cable. Other devices may not.
5.
Connect the other end to any storage
device such as the Solar Link 240 Power
Center or other device.
TECHNICAL INFORMATION
SPECIFICATIONS
SOLAR COLLECTOR
80-watt monocrystalline CE, FCC approved
POWER OUTPUT
15-18V DC/5.5A max (working)
19-21.5V DC max (no load)
OPERATING TEMPERATURE
32º - 120ºF (use in colder temperatures will result in
ineffective charging)
WEIGHT
24 lbs. (11 kg)
DIMENSIONS
Unfolded: 41.5” x 24” x 1.38” (105 x 61 x 3.5 cm)
Folded: 21.34” x 24” x 2.95” (54 x 61 x 7.5 cm)
ACCESSORIES
1 - Battery clamps (36”)
1 - Barrel power adapter (36”)
1 - Carrying case
7A CHARGE CONTROLLER
(MOUNTED)
Maximum Input: 20V DC ~ 7A/100 watts
Operating Temperature: 32º-120ºF
Over Charge Protection: 14V DC (+0.5V)
Over Discharge Protection: 11.0V DC (+/-0.3V)
DC Output (load): 7A max
CHARGING DATA
Actual results will vary depending on available
sunlight and the device being charged
#9690 Sierra Wave 1500W Incremental
Energy Center (500Wh configuration)
1 panel: 10-12 hours for a full charge
#9675 Sierra Wave Solar Link 1000 Power
Center
1 panel: 10-12 hours for a full charge
2 panels: 6-8 hours for a full charge
#9695 Sierra Wave PowerPro 200 Power
Center
3-4 hours for a full charge
#6994 Max Burton Power Center
100
3-4 hours for a full charge
12V Vehicle batteries
Reference the battery manufacturer’s
specifications. Example: 40 amp/hour
battery at 5.5 amps charge rate = 8-10 hours.
Chaining 2 panels together = 4-6 hours.
Portable electronic devices (12V DC or
lower)
Reference your device’s operating
specifications.
MC4 from
Collector #1
MC4 from
Collector #2
#9502 Chainable
Connectors
To Power Storage Device
OPTION #2: Charging 12V Batteries
(Requires a standard 24-36” SAE x SAE extension cable available at your local electronics
retailer)
1.
Set up both SOLAR COLLECTORS as outlined previously. They should be close
together but not obstructing sunlight to each other.
2.
Connect the SAE EXTENSION CABLE to the port labeled BATTERY on the CHARGE
CONTROLLER.
3.
Connect the included BATTERY CLAMP to the SAE EXTENSION CABLE.
4.
Securely attach the red (+) and black (-) BATTERY CLAMPS to the corresponding 12V
battery matching terminal posts.
DANGER: Use caution when connecting the battery clamps to the terminal posts. Do
not cross connect. The Charge Controller must be used for this operation. Risk of fire,
explosion, and injury may result if all components are not connected correctly.
Sierra Wave is a registered trademark of Aervoe Industries, Inc.
9580inst; cs6/15