Quick start installation guide sitesync iq, Remote transmitter, Unpack the box – American Time Remote Transmitter 5 Watt User Manual
Page 2: Check the components, Choose your location, Connect cables to the remote transmitter, Setup the remote transmitter, Continued
QUICK START INSTALLATION GUIDE
SITESYNC IQ
®
REMOTE TRANSMITTER
abcdefghijklmn
1
4
Unpack the box
1. Remove the components and Remote Transmitter from the
box. Save the packing materials in case you need them later.
Check the components
Your system kit comes with:
• Remote Transmitter
• Power cord
(B)
• Magnetic mount TX antenna with 12' cable
(C)
• Installation & Operation Manual
Choose your location
• Locate the Remote Transmitter in an area with a network drop,
or run an Ethernet data cable to the unit from a network
switch or hub.
• Choose a location for your magnetic mount TX antenna either
outside or inside at the highest central location in your facility.
The TX antenna must be located at least 4' away from
the Remote Transmitter and must always point up or down,
never horizontal! The cable length cannot be extended.
2
3
4 ft
minimum
TX Ant signal
out to clocks
Remote Transmitter
located high & central
with Ethernet drop for
time reference
Back - UPS ES 550
Surge Pr
otection
Power O
n
Repla
ce Battery
Battery Backup+
Surge Protection
C
A
B
To local
power
(120vac)
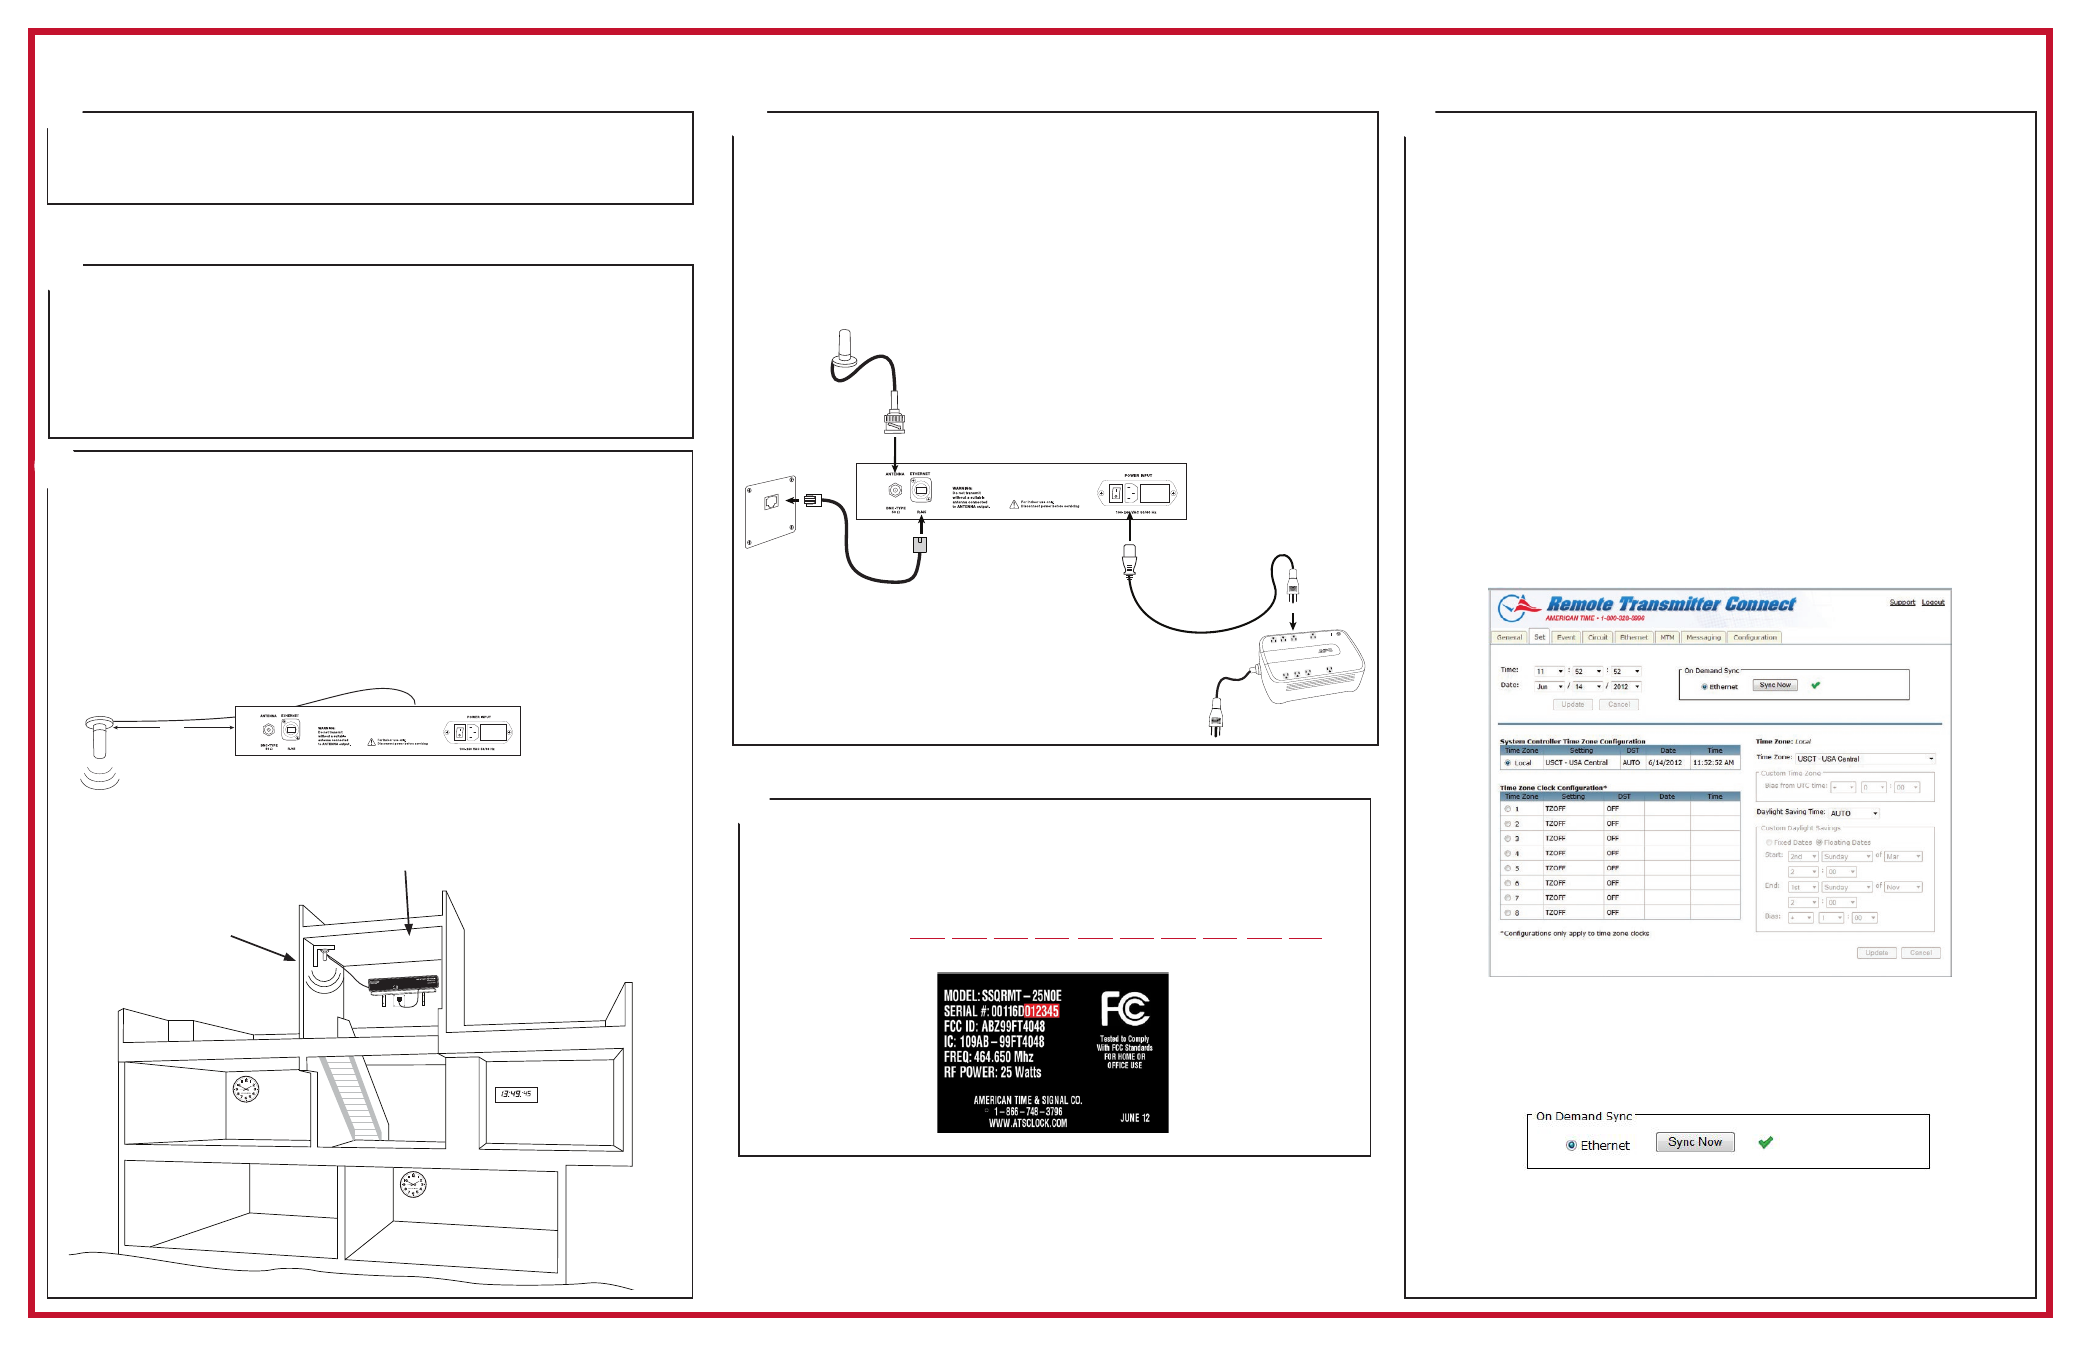
Connect cables to the Remote Transmitter
A.
Connect a CAT 5 or higher Ethernet patch cable (not included)
to the ETHERNET RJ45 port.
B.
Connect the power cord to the Remote Transmitter.
C.
Connect mag mount antenna to the Antenna port. *Lightning
arrestor must be grounded per local electrical code.
Plug 110v cord into power source. Turn the POWER SWITCH on
the back of the Remote Transmitter to the on position.
Setup the Remote Transmitter
1. Record the last 6 digits of the Serial Number in the empty spaces
below. The Serial Number is located on the product label on the
bottom of the Remote Transmitter.
Host Name: s q r t
The Host Name is used to identify the Remote Transmitter on the network.
5
Example Product Label
continued
2. The default Ethernet setting has DHCP enabled to automatically
obtain its TCP/IP network setting from a DHCP server. Launch your
web browser, and enter the above recorded host name
http://sqrtxxxxxx/ into the URL field of the web browser. Press the
Enter key. This will connect to the Remote Transmitter’s
configuration utility Remote Transmitter Connect.
Note: If the Remote Transmitter is on a network without a DHCP
server the default address of the Remote Transmitter
will be 192.168.10.10.
Note: If a static IP is required for your network, reference the Remote
Transmitter Installation and Operation Manual.
3. Once you are connected to the Remote Transmitter a User Login
window will appear. Enter sclock in lowercase letters in the User
Name field and sclock in the Password field. This is the default
service login which will allow access to all menus. Then, click the
Login button.
Note: Passwords may be changed in the Configuration Tab.
4. Click on the Set tab menu and verify the appropriate local time zone
from the drop down menu.
5. Daylight Saving Time default is set to AUTO. If your location doesn’t
observe DST select drop down menu to OFF.
6. To confirm proper setup, enable the On Demand Sync Ethernet
button and press Sync Now. If successful a green check-mark will
appear next to the Sync Now button.
7. Verify the unit is transmitting. The PTT and Data LED’s on the front
of the Remote Transmitter should flash every 30 seconds unless in
Quiet Mode.
5