Baby Lock Momentum Quilting Frame (BLQM) Instruction and Reference Guide User Manual
Page 7
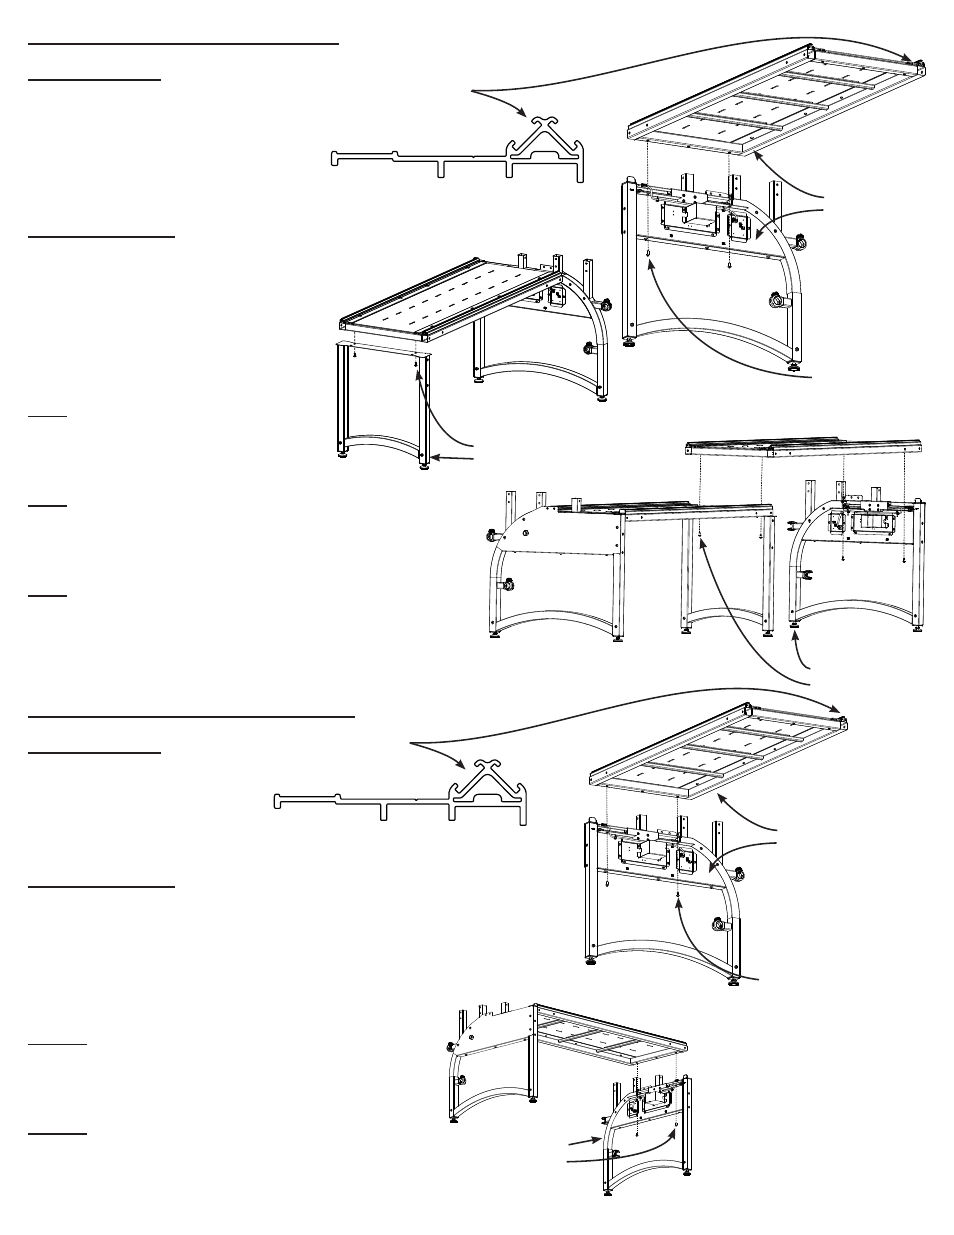
Fig. 3-1
M8 x 16mm SBHCS
Table Assembly
Right Frame End
Table Assembly Front
Track Profile
Note: The Table Assemblies have
a Pro-Stitcher Compatible Track
which is wider than the rear track.
Fig. 3-2
Fig. 3-3
M8 x 16mm SBHCS
Middle Leg
Left Frame End
M8 x 16mm SBHCS
Fig. 3-1-C
M8 x 16mm SBHCS
Fig. 3-2-C
Left Frame End
M8 x 16mm SBHCS
Table Assembly
Right Frame End
Table Assembly Front
Track Profile
Note: The Table Assemblies have
a Pro-Stitcher Compatible Track
which is wider than the rear track.
Page. 6
Parts Needed:
1- Right Frame End
1- Left Frame End
1- Middle Leg
2- Table Assembly
8- M8 x 16mm SBHCS
Tools Required:
5mm Allen Wrench
Note: Using two people is recom-
mended for this step. Loosely fasten
the M8 x 16mm SBHCS to allow for
adjustment in step 4.
3-1: Attach the Table Assembly to
the frame ends using M8 x 16mm
SBHCS. (Fig. 3-1)
3-2: Fasten the Middle Leg to Table
Structure using M8 x 16mm SBHCS.
(Fig. 3-2)
3-3: Bolt the second Table Assembly
to the Middle Leg and Right Frame
End. (Fig. 3-3)
Parts Needed:
1- Right Frame End
1- Left Frame End
1- Table Assembly
4- M8 x 16mm SBHCS
Tools Required:
5mm Allen Wrench
Note: Using two people is recommended for this
step. Loosely fasten the M8 x 16mm SBHCS to
allow for adjustment in step 4-C.
3-1-C: Attach the Table Assembly to the bracket
of the frame ends using M8 x 16mm SBHCS.
(Fig. 3-1-C)
3-2-C: Bolt the other end of the Table Assembly
to the remaining frame end to complete the crib
size frame assembly. (Fig. 3-2-C)
Step 3: King Table to Frame Ends
Step 3-C: Crib Table to Frame Ends