Campomatic FRF254SS User Manual
Page 6
4
Start to Use
You ought to get a good knowledge of all safety precautions and make sure that your
refrigerator has been placed properly in its final position before using.
1.
Unpacking
Please install the decorative cover for bottom beam onto your refrigerator after unpacking and
adjust the front leveling legs to level your refrigerator.
2.
Connecting Your Refrigerator to the Power Supply
Your refrigerator will enter the ex-factory default state after connecting to the power supply
and it will display target temperature for the refrigerator compartment and freezer
compartment.
3.
Work Modes of Your Refrigerator
You can set your refrigerator in either of the following two ways:
(1)
Smart mode: we suggest you choosing this mode if you have no special requirements.
Your refrigerator will work automatically after you chose this mode.
(2)
Manual mode: You can set the temperature by pressing the temperature adjustment key.
4.
Put Food into Your Refrigerator
You can put your food into the refrigerator after a period of time (abouthours
in summer) when the refrigerator has already fully refrigerated its interior
compartments.
Tips: The interior temperature may require a certain period of time to reach balance if
the setting temperature is changed or other food is put into the refrigerator. Such a
period of time depends on the change to the setting temperature, the surrounding
Refrigerator compartment
Though the temperature-adjustable device could keep most of
the refrigerator compartment at an average temperature around
2~8?, it fails to preserve the freshness of food for long. As a
result, the refrigerator compartment can be used only for short-
term storage.
l
Use of turnover beam
Please keep strictly to the warnings on the label of the turnover
beam. It is a normal phenomenon that the surface of the
turnover beam is hot. Dews on the surface are also normal in
summer or when the surrounding environment is wet. What you
need to do is to clean them away with cloth.
l
Use of water tank
Add pure water or mineral water into the tank other than tap
water (don't put juice, milk or other drinks into the water tank;
otherwise, the pipe may be blocked). Please fill water as soon
as possible if the water level in the tank is low. Generally, the
water filter blocks in the tank shall be changed annually, as the
case may be.
l
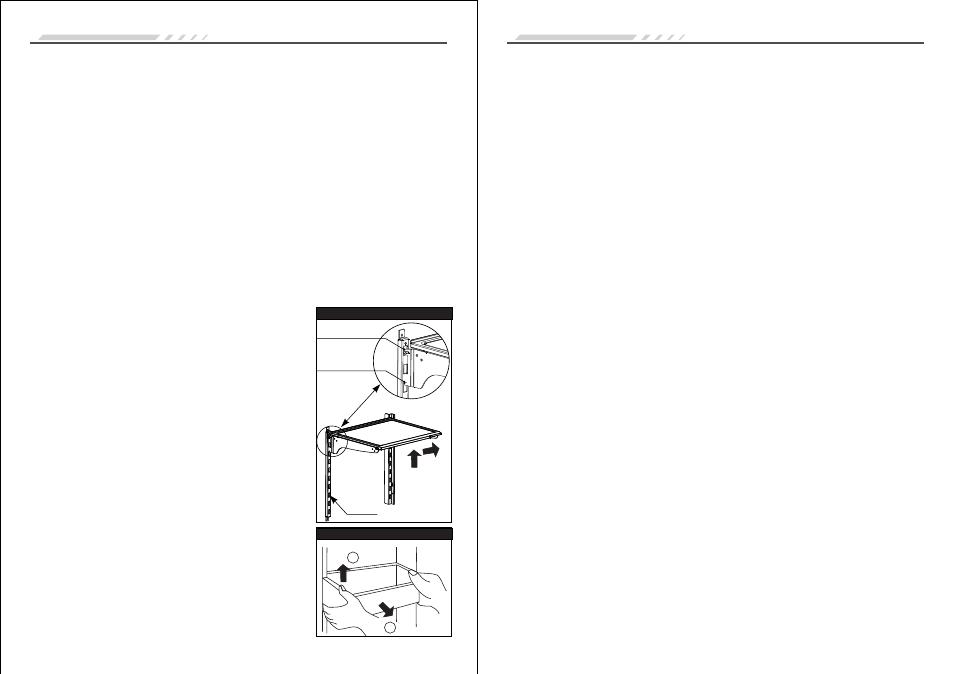
Adjustment of cantilever rack
The cantilever rack could be adjusted to the proper height as
required by food. Please adjust the cantilever rack by following
the arrows as shown in the diagram. Raise it upward first and
then take it out by tilting it upward. During installation, put the
upper end of the fixed leg into one of the upper slots on the
supporting iron first and then put the lower end of the fixed leg
into the third slot on the lower part of the supporting iron.
l
Height adjustment and cleaning of door-mounted bottle
rack
Raise the bottle rack in the direction ?, hold it with both hands
and take it out in the direction ?. After cleaning, you can install
the rack in the reverse order and you can also adjust the height
of the rack.
1
2
Upper end of fixed leg
Lower end of fixed leg
Slot
13
Technical parameters and electric diagram
We will not provide further notice after parameters are changed due to product
improvement or technical update. Please refer to the nameplate on back of the
refrigerator as final parameters.
Adjustment of door-mounted bottle rack
Adjustment of cantilever rack
Correct Use for Your Refrigerator
Climate Class
Pretection Against
Electric Shock
Rated Voltage/Frequency
Rated Power
Defrost Power
Lamp Rated Power
Rated Current
Foaming Agent
Energy Comsumption
Energy Efficiency Class
Total Gross Volume
Total Storage Volume
Refrigerator Storage Volume
Freezer Storage Volume
Variable Temperature Volume
Refrigerant,Amount
Freezing Capacity
Net Weight
Noise
Dimensions
Compressor
T
Ⅰ
AC220-240V/50Hz
110W
370W
3.3W
1.5A
Cyclopentane
1.18kW·h/24h
A+
570L
540L
420L
120L
/
R134a,180g
10kg/24h
137kg
45dB(A)
W911xD728.5xH1775(without handle)
VEG Z7H