Loading the dishwasher starting the appliance – Caple Di454 User Manual
Page 4
Loading the Dishwasher
Starting the Appliance
Starting a wash cycle
After having completed all of the installation steps in the preced-
ing paragraphs, turn on the water to the unit, partially open the
door of the dishwasher, and press the ON-OFF button "C" lo-
cated on the control panel. The "D" indicator light will come on.
At this point, the appliance is on and ready to be programmed.
Setting and Starting a wash Cycle
Choose the desired cycle by pressing the cycle selection button
"E". Each time it is pressed, one of the cycle indicator lights "A"
will come on in succession.
Choose the wash cycle you feel is most appropriate for the type
of dishes that need washing (consult the wash cycle table con-
tained in this manual, especially when first using the appliance).
Close the door and after a few seconds, a short acoustic signal
will sound indicating that the wash cycle has begun and cannot
be modified. If necessary, read the paragraph entitled, "Cancel-
ling or modifying a cycle while underway. "The end of the cycle
will be signalled by a double acoustic sound, and the indicator
light "A" will begin to blink.
Cancelling or modifying a cycle while underway...
A cycle that is underway can only be modified if it has only been
running for a short time, otherwise, the detergent may have al-
ready been used, and the appliance may have already drained
the wash water. If this is the case, the detergent dispenser must
be refilled (see the paragraph entitled, "Loading the Detergent").
To change the cycle currently underway, open the door and press
the ON-OFF button “C”,follow the instructions contained in the
paragraph entitled, "Setting and Starting a Wash Cycle."
If you forget to load some of the dishes...
The wash cycle can be interrupted by opening the door carefully
(in order to avoid being sprayed by hot water). When the door is
closed again, the cycle will automatically restart at the point where
it left off.
At the end of the wash cycle...
The end of the cycle will be indicated by a double acoustical
signal and the blinking of the "A" indicator light. Open the door,
turn off the appliance using the ON-OFF switch and turn off the
water supply to the unit. Wait a few minutes before removing the
dishes so as to avoid handling them while still hot (when they
are more susceptible to breakage) and to get better drying results.
Setting The Start Delay Time
Open the door of the dishwasher partially. If the "I" button is
pressed (see, Close-up View" Control Panel"). The start time for
the wash cycle can be delayed for 2,4 or 6 hours.
Each time the button is pressed, the "H" light will come on indi-
cating the length of the delay.
After selecting the delay time, the wash cycle can be set, as
explained in "Starting a wash cycle..." There will be a short acous-
tic signal, and at this point the delay period will begin to count
down. During this period the delay indicator light “H”will blink. At
the end of the delay time, the indicator will stop blinking and the
cycle will start.
NOTE:
a) During the delay period, none of the settings can be modified.
If necessary, they can be cancelled by pressing cycle selector
"E" for about 5 seconds.
b) If the power to the appliance goes off or the door is opened
during the delay period, the clock will stop the countdown. It will
start again when the power has come back on, or when the door
has been closed.
Wash Cycle Adjustment Buttons
1/2 Load Button
This button (see" Close-up View-Control Panel", letter "B") makes
it possible to wash dishes using only the upper rack if there are
not enough dishes for a full load, This will allow you to save on
water and electrical energy.
It cannot be used with the heavy duty wash cycles.
.6.
.5.
GB
GB
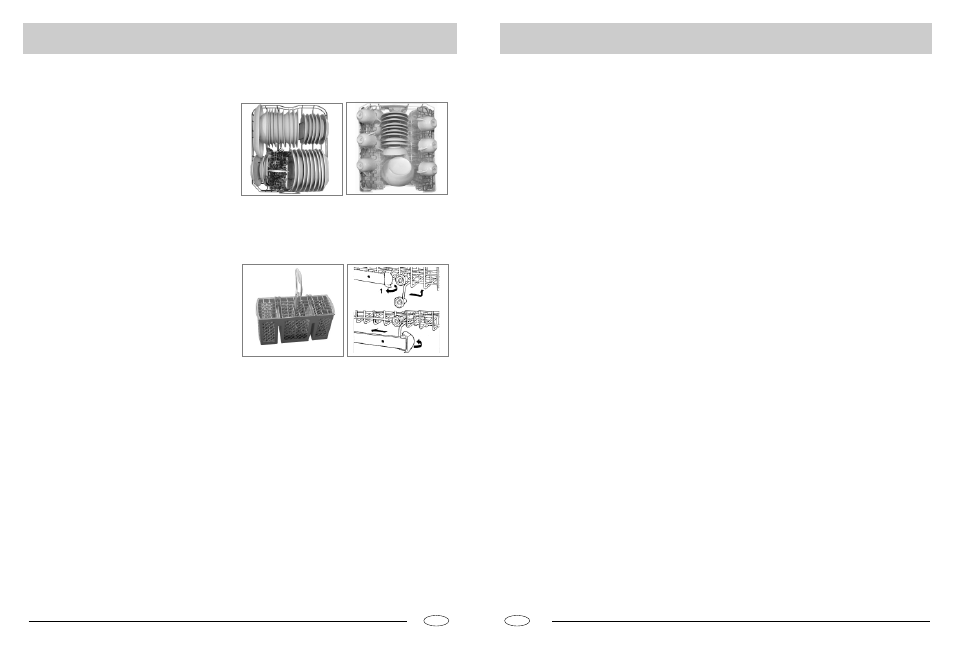
Lower Rack
Upper Rack
Load for 9 Standard Settings
Before placing the dishes in the dishwasher, remove the large food
particle to prevent the filter from becoming clogged, which results
in reduced performance.
If the pots and pans have baked-on food that is extremely hard to
remove, we recommend that they be allowed to soak before they
are washed. This will eliminate the need for extra wash cycle.
Pull out the rack to facilitate loading the dishwasher.
How to use the lower rack
We recommend that you place the most difficult to clean items on
the bottom rack: pots, pans, lids, serving dishes and bowls, as
shown in the figure to the right.
It is preferable to place serving dishes and lids on the sides of the
racks in order to avoid blocking the rotation of the top spray arm.
- Pots, serving bowls, etc. must always be placed face down.
- Deep pots should be slanted to allow the water to flow out.
- The silverware basket can not be doubled (see fig.A) .
- Silverware should be placed in the silverware basket with the
handles at the bottom; if the rack has side baskets, the spoons
should be located individually into the appropriate slots. Espe-
cially long utensils should be placed in the horizontal position at
the front of the upper rack.
How to Use the Upper Rack
The upper rack is designed to hold more delicate and lighter
dishware, such as glasses, coffee and tea cups and saucers, as
well as plates, small bowls and shallow pans (as long as they are
not too dirty).
Position the dishes and cookware so that they do not get moved
by the spray of water.
The upper rack can be adjusted for height. (See fig.B)
fig.B
2
1
3
4
fig.A