Mount the astronaut speaker, Connect power & audio sources – Cetacea Sound Astronaut CL Quick Start Guide User Manual
Page 4
H
I
E
F
G
D
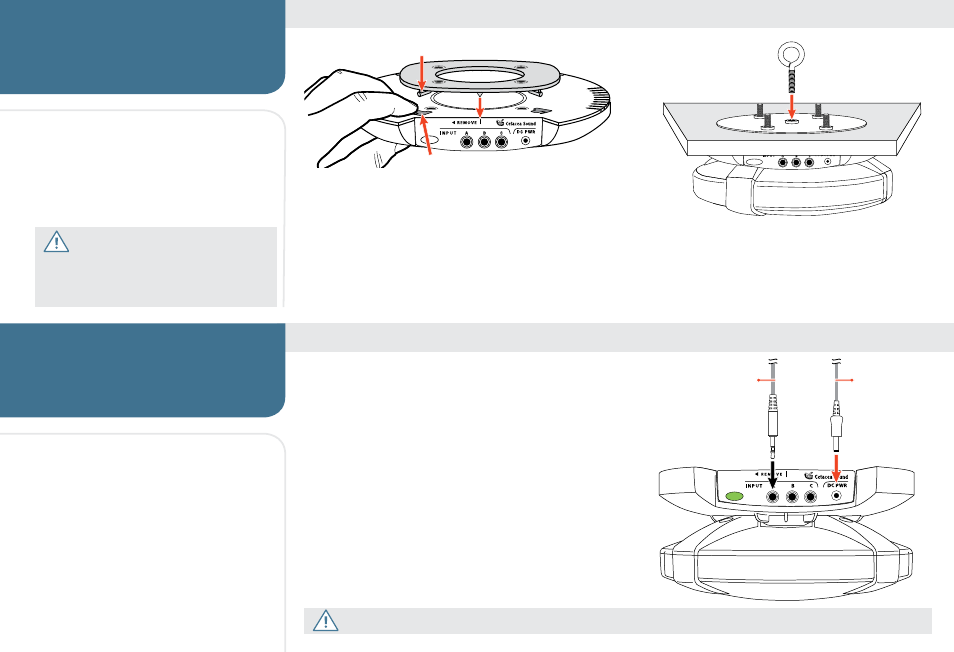
1. Mount the Astronaut speaker to the ceiling bracket
D
. Use a
fi nger to locate the fi rst peg
E
. Align this peg with one of the
four holes
F
on the speaker base. All other pegs will fall into
place accordingly. Speaker will be fl ush to the ceiling.
2. Twist the speaker slightly to the right until you hear it lock.
Once locked, the ceiling bracket pointer
G
will line up with
the line-guide on the speaker lens.
3. Once the speaker is attached to the ceiling
bracket, screw the eyebolt
H
through the
top of the ceiling plate
I
and into the
Astronaut base.
MOUNT THE
ASTRONAUT SPEAKER
Volume Control
When using a variable output source like
a projector, control the volume level at the
source. When using a fi xed audio output,
adjust the volume with an in-line volume
control or mixer (sold separately).
Speaker Location
The Astronaut is very forgiving and does not
need to be in the center of the room for the
best sound quality. Typically, installers choose
a location near a power outlet in the ceiling.
CONNECT POWER &
AUDIO SOURCES
FIRST — CONNECT A/V EQUIPMENT
The Astronaut has a built-in 3-channel mixer that accepts up to
3 simultaneous devices (A, B, C).
Common Sources
Projector Microphone DVD
/
VHS
CD / iPod
®
/ iPad
®
Interactive
Whiteboard Computer
SECOND — CONNECT POWER
Connect the power supply, low-power barrel connector
J
into
the speaker. Plugging / unplugging this connector will turn the
speaker on and off.
CAUTION
Do not connect speaker to power until ceiling installation is completed and at least one source cable is connected.
J
Source Cable
(Stereo/Mono
3.5 mm)
Power Supply
CAUTION
Install the Astronaut speaker
away from direct heat, high humidity, and
physical obstructions. Do not install the Astronaut
speaker near a projector exhaust port or fan.