Gladiator GAWT08BTTM GearWall Panel Base Board (4 pack) User Manual
Base trim installation instructions, Tools and parts, Base trim requirements
BASE TRIM INSTALLATION INSTRUCTIONS
Tools and Parts
Gather the required tools and parts before starting installation. Read
and follow the instructions provided with any tools listed here.
Tools and Parts Needed:
Additional Tools and Parts Needed for Masonry Block/Poured
Concrete Wall Installation:
NOTE: Gladiator
®
Base Trim can be cut and drilled with ordinary
woodworking equipment.
Base Trim Requirements
■
Gladiator
®
Base Trim can be mounted directly to masonry wall,
over drywall to wooden studs, or to bare wooden studs.
■
Intended for use in a garage or basement.
NOTE: Before installing GearWall
®
Panels to basement walls, you
must waterproof the basement to prevent mildew and foundation
damage. Walls that appear dry may actually become damp when
enclosed by paneling. Install the panels in accordance with all
local codes and ordinances.
Screw Requirements
IMPORTANT: Use correct screw length for your wall type. See chart
following.
IMPORTANT: Compare screw length to electrical wire locations. Be
sure the screw will not pierce electrical wiring.
Install the Base Trim
To achieve a more finished appearance at the seams and corners,
cut the ends of each piece of base trim at a 45° angle to create a
miter joint.
Masonry Block/Poured Concrete Wall
1.
Use a level to position the Base Trim at the desired height on the
wall.
2.
Drill a hole through the Base Trim and into the wall surface.
3.
Attach the Base Trim to the wall by placing
³⁄₁₆
" x 1
³⁄₄
" Flat-head
masonry screws every 48" (121.92 cm).
NOTE: For extra hold, you may apply construction adhesive to
the Base Trim before attaching it to the wall.
4.
Repeat this process for the next section of base trim.
Drywall over Wooden Studs or Bare Wooden Studs
1.
Locate all wooden studs and electrical wiring. Mark the wall(s).
IMPORTANT: Compare screw length to electrical wire locations.
Be sure the screw will not pierce electrical wiring.
2.
Base Trim should be mounted to the wall so that it begins and
ends at wooden studs. Measure from the edge of the stud at the
beginning of the desired coverage area to the center of the last
wooden stud that is within 4 ft (1.22 m).
3.
If necessary, cut the first section to this length.
4.
Check that the Base Trim is level. Then place a screw every 48"
(121.92 cm).
NOTE: Drive the screws through the base trim until the heads are
flush. If splitting occurs, predrill and countersink the screw holes
near section ends.
5.
Repeat this process for the next section of base trim.
Warranty
In U.S.A. visit our website at www.GladiatorGW.com or call
1-866-342-4089.
In Canada visit our website at www.gladiatorgarageworks.ca or
call 1-800-807-6777.
■
Level
■
Tape measure
■
Drill
■
Saw
■
Screws (galvanized or all-weather)
■
Stud finder
■
AC finder
■
Square
■
Pencil
■
³⁄₁₆
" x 1
³⁄₄
" Flat-head masonry
screws
■
Hammer drill
■
Caulk gun
■
Construction adhesive
■
⁵⁄₃₂
" Masonry drill bit
Screw Length for Wall Type
Screw
length*
Masonry
Wall
Bare
Wooden
Studs
Drywall over Wooden Studs
¹⁄₂"
(1.27 cm)
⁵⁄₈"
(1.6 cm)
³⁄₄"
(1.9 cm)
#8 X 1
¹⁄₄"
#8 X 2"
³⁄₁₆" X 1³⁄₄"
* For bare wooden studs and covered wall, use an all weather flat-head
deck screw. For concrete block and poured masonry, use a flat-head
masonry screw.
W10141328A
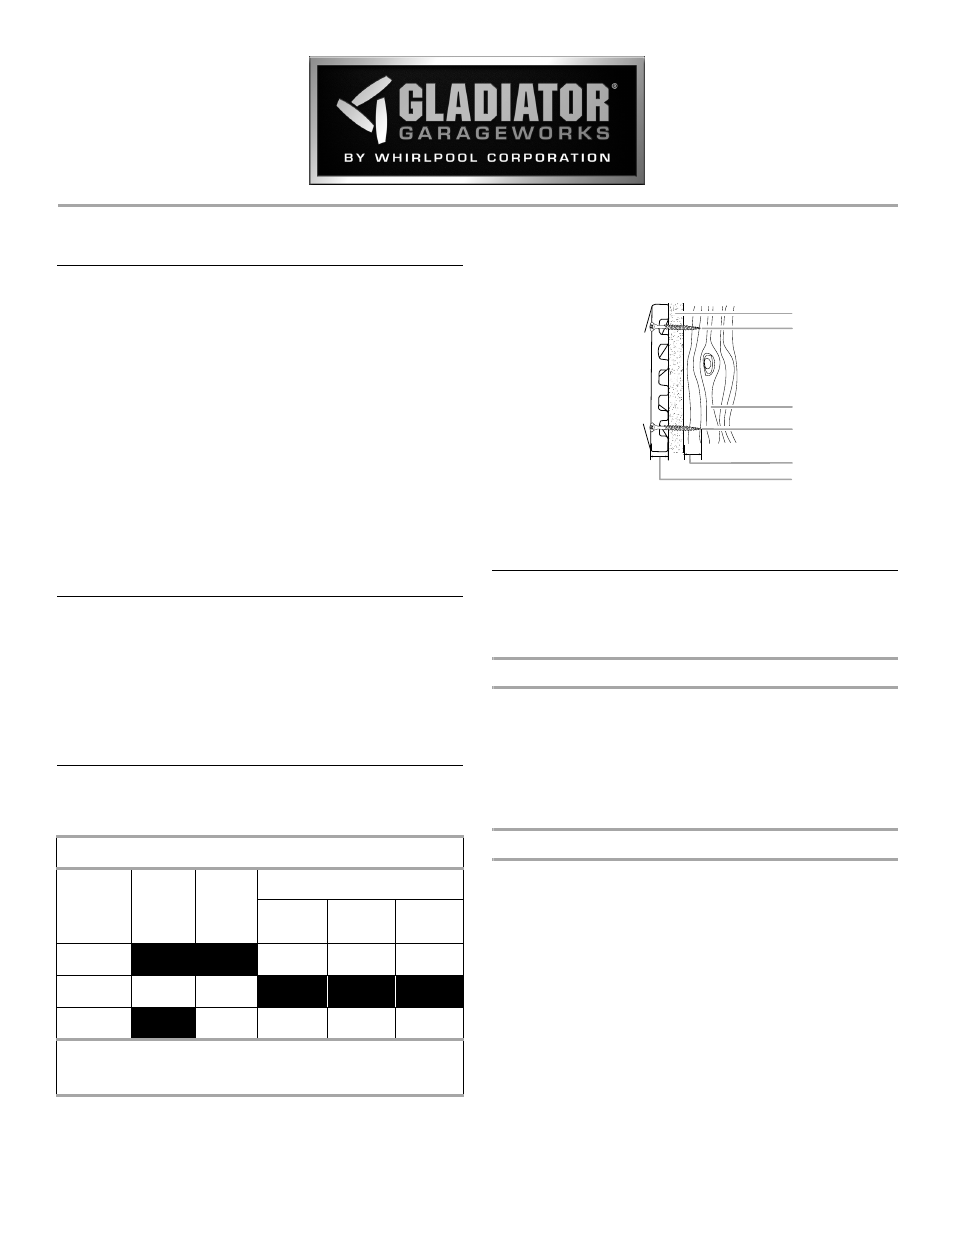
A. Drywall
B. Flat-head screw
C. Wooden stud
D. 1" (2.54 cm) min. to
1
¹⁄₄" (3.17 cm) max. if
near wiring
E.
⁵⁄₈" (1.6 cm)
A
C
B
B
D
E