Commissioning – Harken 882 MKIII Jib Reefing & Furling User Manual
Page 56
Commissioning
Leading the Furling Line to the Cockpit
October 2001
Unit 1 MKIII
28
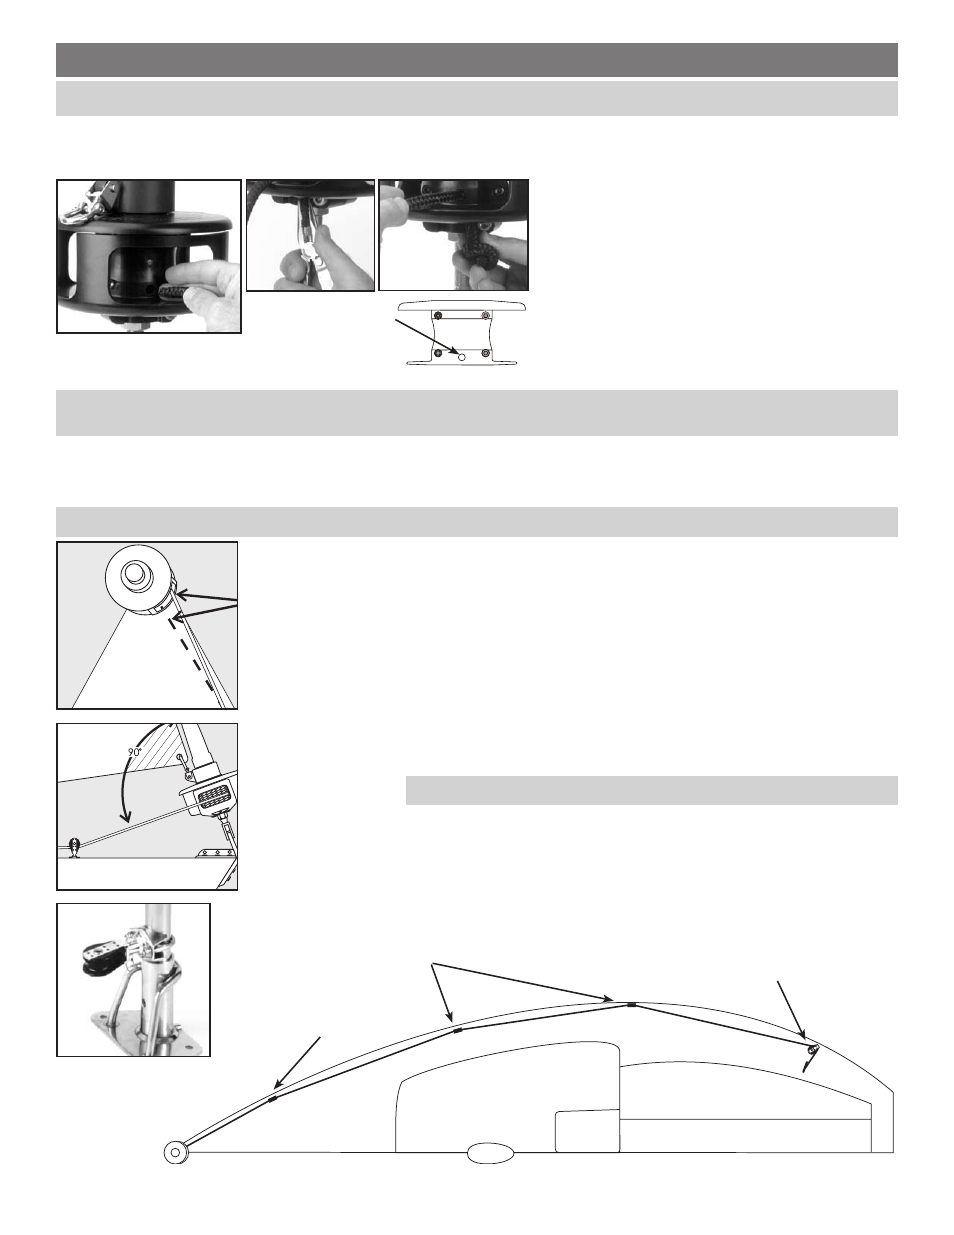
The furling line is attached to the drum and led to the cockpit in five steps.
Use Harken bullet blocks for the forward and intermediate lead blocks. Use a 019 little Hexaratchet
®
or other ratchet for the
aftermost lead block. Harken part 266 is a lead block kit with three 166 bullet blocks; four 061 stanchion mount bases; one
019 ratchet block; and a 3" (75 mm) cleat. Use the lead block kit or choose the best configuration of blocks for your needs.
Tip: The position of the suncover on the sail determines the direction of rotation: Suncover to starboard - "charge" by turning clockwise. Suncover to
port - "charge" by turning counter-clockwise. Keep tension on the line while "charging".
2
Loosen the line guard assembly screws and align the opening in the basket so the furling line leads properly at all
times. The angle at which the line exits the basket changes as the amount of line on the drum changes. Check for
chafe with varying amounts of line on the drum before locking the unit.
Tip: When line is "charged" by turning drum counter-clockwise, the opening will look "off center" to starboard and vice versa.
The furling line may be led down either side of the boat.
3
Position the forward block so that the line enters the drum at right
angles to the headstay and is centered vertically in the opening.
Move the block fore or aft to adjust the line vertically in the opening.
Improper positioning will result in chafe or cause line to wrap
unevenly on the drum. In many cases, proper placement cannot be
achieved by using a stanchion mount lead base and the forward lead
block must be attached to a padeye mounted on the deck.
4
Mount a 019 little Hexaratchet (or other configuration of ratchet
block) as the after lead block to insure proper drag on the furling
line to prevent line overrides in the drum.
Tip: Position the ratchet block so the line turns at least 90°.
Position a standard horn cleat in a convenient location in the cockpit.
5
Lead the line through the forward and after lead blocks. The after
block should be a little Hexaratchet. If the line has been led cor-
rectly you should hear a clicking sound. Then, position the intermedi-
ate blocks to keep the line clear of the side decks to insure a fair lead.
B Position of forward lead block
(Harken 082 or 166) is critical
as a proper lead prevents line chafe.
C Intermediate lead blocks hold the line near the gun-
wale. The number and placement of these leads depends
on your boat length and configuration.
D Aft-most lead block must be a Harken little Hexaratchet to provide the proper
line drag while furling. This block should be placed to lead the line to a cleat in
the cockpit. If the line has been led correctly you should hear clicking when you
pull the line. If not, the ratchet switch may not be engaged or you must relead
the line through the block in the opposite direction.
The furling line lead changes as the
amount of furling line on the drum
changes.
L'angle de sortie de la drosse
de varie en fonction du nombre
de spires emmagasinées sur le
tambour.
Der Eintrittswinkel der Reffleine
ändert sich mit der Menge der auf-
gewickelten Reffleine.
La direzione con cui la cima di
avvolgimento entra nel tamburo
cammbia ini funzione della quantità
di scotta avvolta.
Furling line must enter drum at
right angles to headstay.
La drosse doit entrer dans le tam-
bour perpendiculairement à l'étai.
Die Reffleine sollte im 90° Winkel
zum Vorstag auf die Trommel
laufen.
La cima di avvolgimento deve
entrare nel tamburo formando
con lo strallo l'angolo giusto.
A 061 stanchion mount bases
provide an ideal attachment method
for furling line lead blocks. The ball
joint socket accepts most small
boat swivel blocks, including ratchet
blocks.
1
Pass the line through one of the two enclosed
windows in the guard. Push the end through
the hole in the hub of the drum and use a screw-
driver or pliers to pull the line out the bottom. Tie a
small overhand knot and pull it up under the drum
assembly. To prevent binding, make the knot
as small as possible and push the knot securely
up into the drum assembly.
“Charge” the system by turning the foils to
wrap line on the drum.
Line Stop Hole/Trou/Loch/
Foro bloccaggio scotta
Pass line through enclosed window.
Tirer la drosse à travers la fenêtre du guide anti usure.
Leine neu durch Fenster fädel.
Passare la cima in una delle due aperture della guida.