Warning, 33b. 3a. 4 – Keekaroo Height Right High Chair + Tray User Manual
Page 3
c
5
6
7
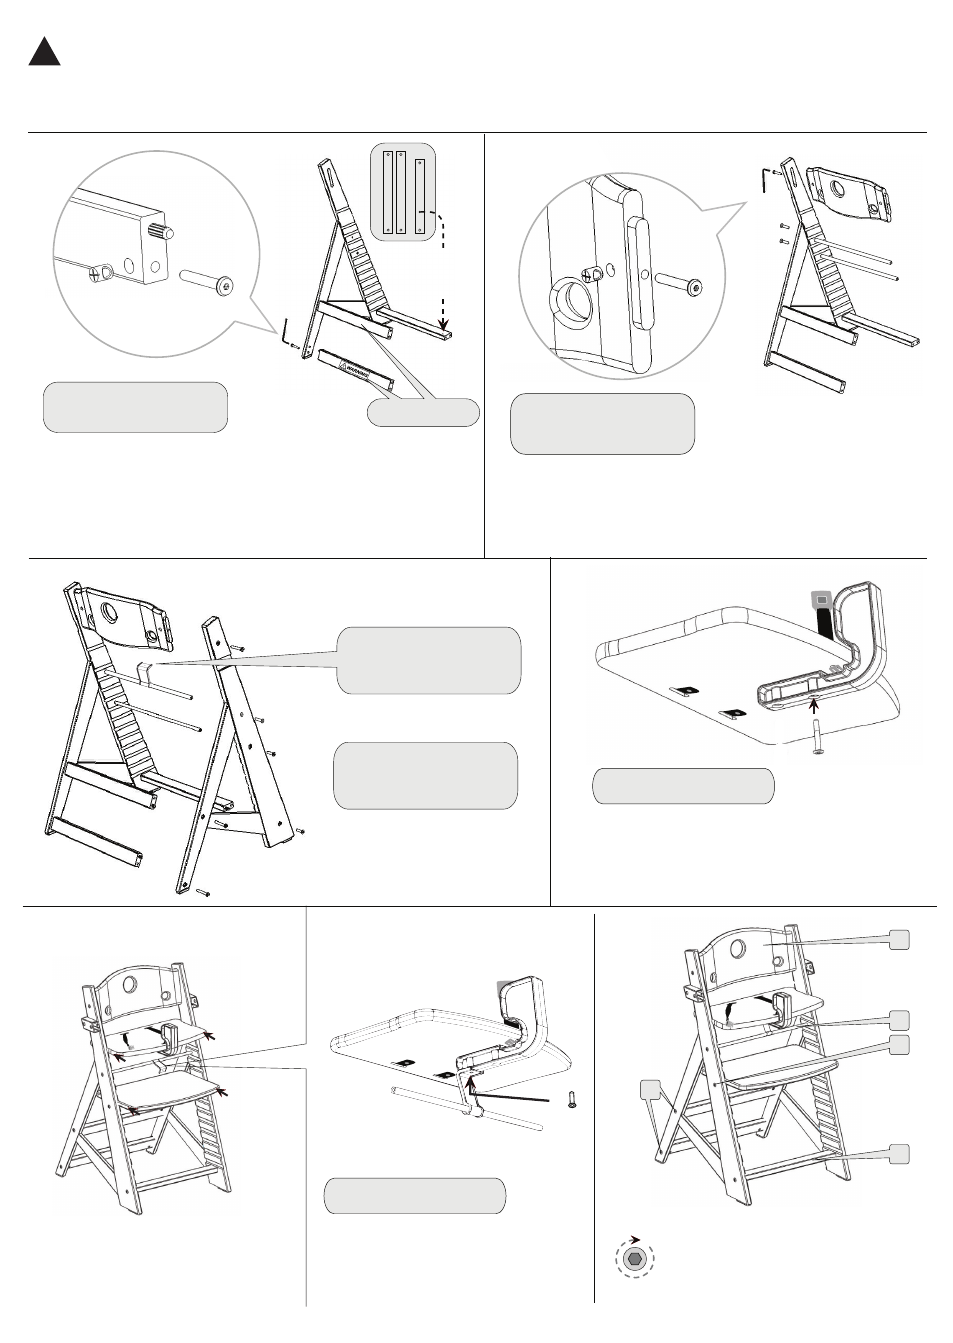
Install Seat Plate in top slot and Foot Rest just
below top metal cross bar. (See Seat & Footrest
Adjustment section)
Align J-Bracket with Plastic Crotch Restraint
rear bolt hole and insert Screw (f).
Tighten both Screws (c) & (f) with
the Allen Key.
TIGHTEN ALL SCREWS (BOTH SIDES) IN
ORDER 1-5 _DO NOT OVER TIGHTEN!
!
WARNING
:
The J-Bracket and Plastic Crotch
Bar are ALWAYS required when using the Tray.
Seat Plate must
be installed in the top slot while using Tray.
3
3b.
3a.
4
a
e
d
Insert a Wooden Dowel (e) into the larger hole in each of the Back Supports
and Front Support. Insert a Wood Nut (a), as shown into the inner holes of
the 3 Supports. Attach the 3 Wooden Supports as shown and insert Long
Screws (d). Loosely tighten the Long Screws into Wood Nuts through the
Left Side with the Allen Key. Labeling on the Rear Supports should be
visible.
Repeat steps 1 & 2 for Right Side.
Insert the rest of the Dowels,
Wood Nuts, and Screws as shown
to attach the Right Side of the chair.
Do Not fully tighten screws.
Slide J-Bracket onto upper
metal cross bar.
(J-Bracket facing forward
as shown)
Insert a Wood Nut (a), as shown into the inner holes of the Back.
Attach the Seat Back to left leg as shown and insert a Long Screw (d).
Attach the 2 Metal Cross Bars as shown and insert Screws (c).
Loosely tighten all screws with Allen Key.
FRONT
SUPPORT IS
SHORTER
HARDWARE
a (3pcs.)
d (3pcs.)
e (3pcs.)
HARDWARE
a (4pcs.)
d (4pcs.)
c (2pcs.)
e (3pcs.)
HARDWARE
a (1pcs.)
d (1pcs.)
c (2pcs.)
a
d
d
d
d
c
c
c
c
d
Logos this side
1
2
Install the Plastic Crotch Bar as shown to bottom
of Seat Plate and insert Screw (c).
HARDWARE
c (1pcs.)
HARDWARE
f (1pcs.)
3
f
Top Metal
Cross Bar
Bottom
Metal
Cross Bar
Front
Support
Back Rest
Back Leg
Supports
5
4
3
2
1