Template instructions, Option a: drilling from inside cabinet, Option b: drilling from the bottom of the cabinet – Maytag MMC5086AAQ Installation User Manual
Page 2
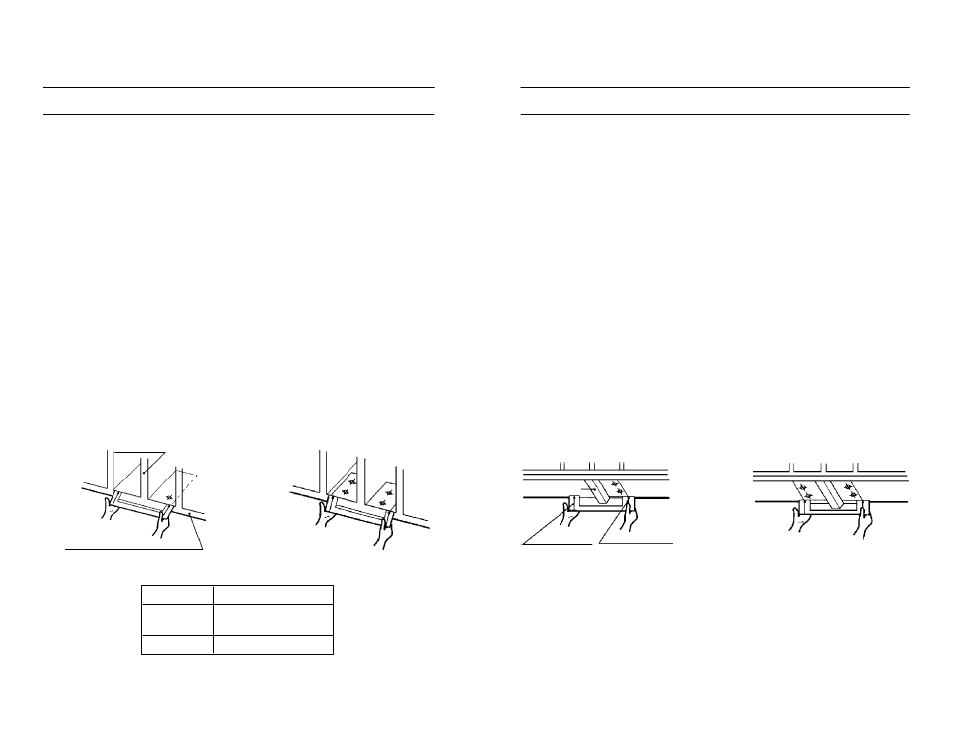
Option A: Drilling from Inside Cabinet
If you can not drill from the inside of your cabinet, see Option B for
drilling instructions.
1. Place the Template inside the cabinet so that the front line of the
Template will be aligned with the front edge of the cabinet. If
necessary, cut some areas of the Template in order to make it fit
properly within your cabinet.
2. If the cabinet has a partition, please do the following:
a. Cut Template B from Template A along the dotted line.
b. Cut Template A into two pieces to fit each side of the partition.
c. Position one piece of Template A inside the cabinet making certain
the front line of Template A is aligned with the front edge of the
cabinet.
d. Position Template B in front of the cabinet so that the arrow, on
Template B, is aligned with the hole center line in Template A (See
figure A).
e. Position the other part of Template A inside the cabinet so that the
hole center line aligns with the arrow on Template B (See figure B).
If you have followed the instructions properly, the distance between
the right and left hole center lines can be determined from figure E.
TEMPLATE INSTRUCTIONS
CENTER LINE
(Figure A)
(Figure D)
Option B: Drilling from the Bottom of the Cabinet
1. Tape the Template to the bottom of the cabinet so that the front line
of the Template will be aligned with the front edge of the cabinet, If
necessary, cut some areas of the Template in order to make it fit
properly underneath your cabinet.
2. If the cabinet has a fascia board, measure the thickness of the board
and select a line that indicates the thickness (See Guide Lines on
Template). Fold Template along that line. Then place the folded edge
of the Template against the back side of the fascia board and position
it flat against the cabinet bottom.
3. If the cabinet has a partition, please do the following:
a. Cut Template as in Option A, NUMBER 2, parts a and B.
b. Position one piece of Template A under the cabinet making certain
the front line of Template A is placed against the back side of the
fascia board.
c. Position Template B towards the rear of the cabinet so that the
arrow, on Template B, is aligned with the hole center line on
Template A (See figure C).
d. Position the other part of Template A under the cabinet so that the
hole center line aligns with the arrow on Template B (See figure
D).If you have followed the instructions properly, the distance
between the right and left hole center lines can be determined from
figure E.
(Figure B)
(Figure E)
(Figure C)
8101P458-60
(03-02-00)
P/NO.: 3828W5U0181
CENTER LINE
PARTITION
PARTITION
FRONT EDGE OF THE CABINET
Models
Center to Center
MMC5086
14
²
ACM0860
UMC1061
12-7/8
²