Methven Kiri User Manual
Page 3
6
Maintenance
It is strongly recommended that you perform regular maintenance of your Thermostatic mixing valve to
ensure continued good performance. Failure to regularly maintain the Thermostatic mixing valve may lead
to poor flow , fluctuations in temperature and in some cases complete failure.
To maintain the Thermostatic Mixing valve :-
1. Isolate both Hot and Cold water supplies.
2. Taking note of the Knob positions, Remove both the Diverter knob and Thermostatic mixing valve knob.
3. Remove the Concealing plate.
4. Remove the Plastic temperature stop ring (12) ensuring to note the position on the spindle. This will be
required to be refitted in this position when re-assembling the valve assembly.
5. Remove Shroud (26).
6. Unscrew the Thermostatic mixing valve cartridge anti-clockwise and remove from the valve assembly.
7. Taking care not to alter or damage the cartridge , Soak the cartridge in a suitable descalent and rinse
with warm water.
8. Re-grease any visible seals and refit the Thermostatic mixing valve cartridge to the valve assembly.
9. Refit Shroud (26).
10. Refit Plastic temperature stop ring (12) onto the Thermostatic Mixing valve cartridge spindle in the
position noted in step 4.
11. To ensure the joints are watertight and the valve is re-commissioned correctly , please refer to the
section ‘Installing the product’ , item 5 and follow the sequence through.
Filter Seal Cleaning
Over a period of time the Filter washers (6) located in both the Hot and Cold inlet housings of the
thermostatic mixing valve may become blocked with dirt and debris from your system which could result
in the poor performance of your thermostatic mixing valve. Therefore these filters will periodically require
cleaning. To clean the filters :-
1. Isolate both Hot and Cold Mains supplies.
2. Taking note of the knob positions, Remove bath fill on/off , diverter and thermostatic mixing valve knobs.
3. Remove the Concealing plate.
4. Undo Nuts(s) (19) on both Hot and Cold inlets and remove Filter washers (6).
5. Rinse Filter washers (6) clean and refit into Hot and Cold inlets.
6. Refit Nuts(s) (19) and tighten.
7. Please refer to ‘Installing the Product’ and carry out all steps from items 5.to reassemble the
shower valve and obtain the correct temperature setting.
3
Operating Requirements
Minimum operating pressure 1 bar *
Maximum operating pressure 5 bar
Maximum Static Pressure 10 bar
*
Note : For Gravity systems a minimum distance of 10 metres is required between the bottom of the storage tank
and the showerhead. Failure to ensure this criteria being met may cause the Thermostatic mixing valve to
work incorrectly.
Cold water supply Temperature - Minimum 5°C to Maximum 25°C
Hot water supply Temperature - Maximum 80°C (Recommended Hot water supply temperature 60 - 65°C)
Note: - The minimum temperature differential between the hot and cold water supply should be 50°C. I.e. when
the cold inlet water supply temperature is
the hot inlet water supply temperature should be
.
10°C
60°C
Important Note : To ensure the Thermostatic mixing valve works correctly . The inlet hot water temperature must
be a minimum 10°C above the outlet mixed water temperature of the Thermostatic mixing valve
This product is factory set to an outlet temperature of 38ºC at equal inlet water pressures , but by
using the temperature over ride button the temperature will increase to a maximum of 46ºC.
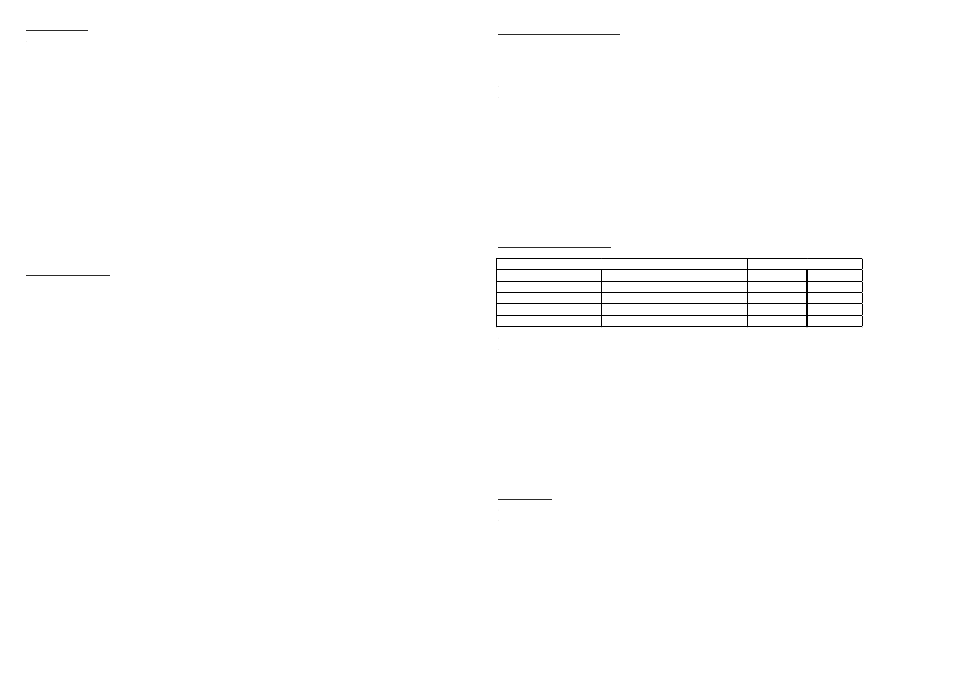
Fitting Flow Regulators
Important points to note before commencing Installation of your concealed shower mixer.
You should have :-
a. Checked the contents of the box and all parts are present and correct.
b Checked to ensure the minimum site operating conditions can be met.
c. The correct tools to perform a trouble free installation.
d. Considered the surrounding environment where the installation is to take place and any potential hidden
dangers.
e. Isolated both the hot and cold water supplies.
Note : If not already present , you may wish to consider installing isolation valves for ease of future maintenance.
Isolation valves can be fitted anywhere prior to connecting the thermostatic mixer assembly to the water
supply pipes. However , they should always be installed in a safe and convenient place for ease of future
access.
Installation
Before securing the Thermostatic valve assembly into the wall cavity. You will need to :-
1. Ensure that both Hot and Cold Supply pipes have been flushed to ensure there is no residual debris within
the supply pipes that may effect the performance of your product. Extreme care should be taken when
carrying out this procedure.
2. Ensure that the Filter washers (6) have been fitted in both inlet ports of the thermostatic mixing valve.
Filter seals are used to protect the delicate thermostatic valve mechanism. Failure to use the
Filter washers (6) provided could damage your thermostatic valve mechanism and will invalidate your
warranty.
3. Decide whether you need to fit the Flow regulators (14) provided into the inlet assembly as shown in the
exploded assembly diagram. In cases where you do need to fit the Flow regulators (14) , please ensure
they are fitted the correct way round as per the diagram. DO NOT INSTALL THESE IF NOT REQUIRED
Cold Supply Pressure (bar)
Hot Supply Pressure (bar)
Cold Inlet Port Hot Inlet Port
1 to 5 bar (or Pumped)
1 to 5 bar (or Pumped)
Yes
Yes
Mains 1.5 to 10 bar
Unvented Mains / Mains Pressurised
Yes
Yes
Mains 1.5 to 10 bar
Instantaneous Gas Water Heater
Yes
Yes
Mains 1.5 to 10 bar
Instantaneous Electric Water Heater
Yes
No
System Configuration
Fit Flow Regulator