Montigo 36SR User Manual
Page 4
10/92
Page # 4 of 6
M36SR
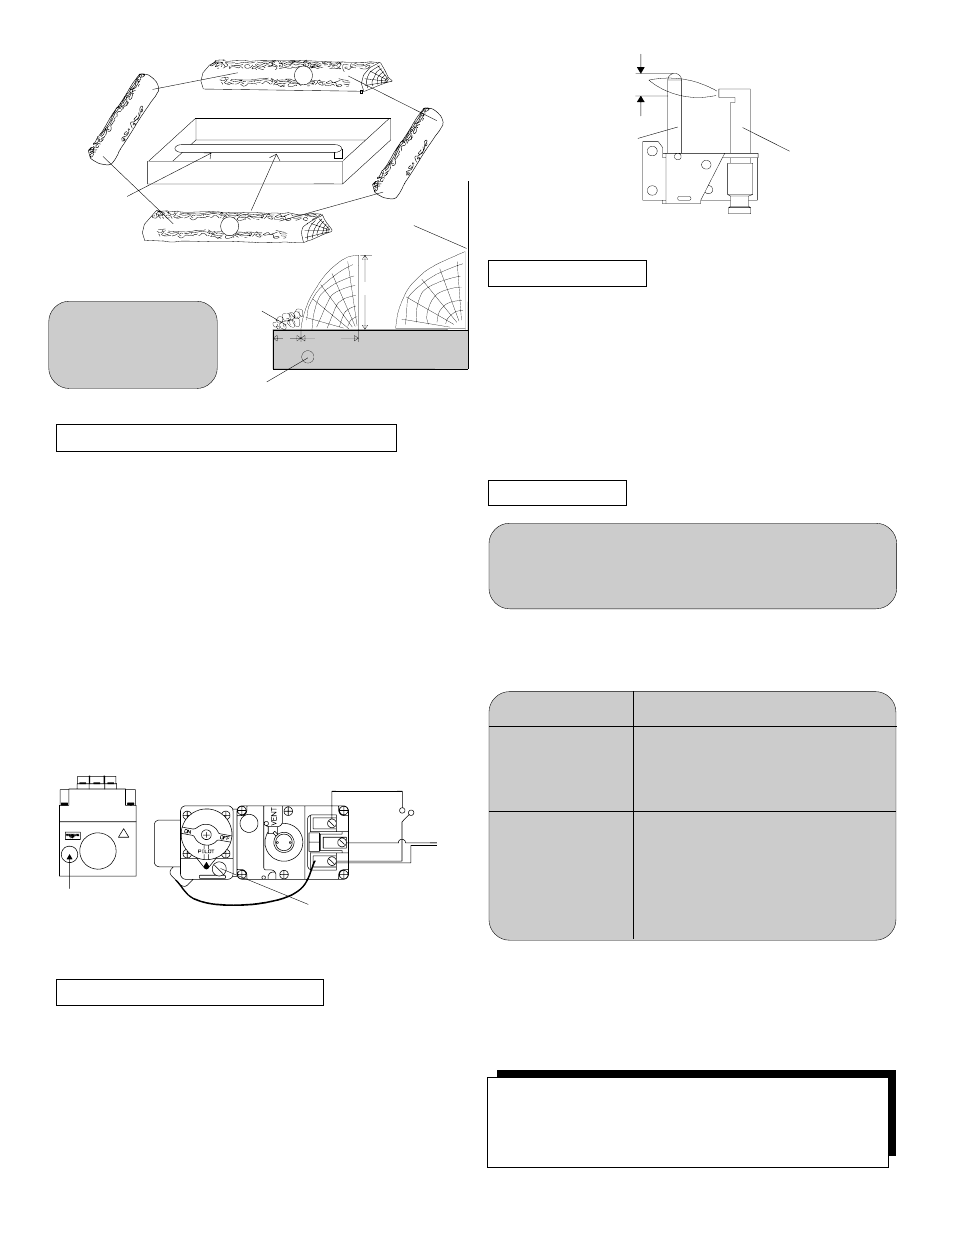
3/8 to 1/2 Inch
Power Generator
Pilot
Burner
FIGURE 6. PILOT BURNER ADJUSTMENT
WARNING
Failure to install logs
and sand as per
instructions may result
in excessive sooting.
Embers
3 1/2
Side View
Burner
2
2 1/4
Shaded area
represents sand
filled to top of pan
Back wall of fireplace
Place sand in
pan level to
top of pan
A
B
FIGURE 5. GAS CONTROL VALVE
PILOT BURNER ADJUSTMENT
1. Remove Pilot Adjustment Cap (see figure 5).
2. Adjust pilot key to provide properly sized flame. See Figure 6
for properly sized flame.
3. Replace pilot adjustment cap.
4. Leak test with a soap solution after installing or servicing with
main burner on. Coat pipe and tubing joints, gasket etc. with
soap solution. Bubbles indicate leaks. Tighten any areas where
the bubbles appear until the bubbling stops completely.
The Montigo 36SR has a ten-year unlimited warranty on
the firebox, a five-year warranty on the main burner,
pilot burner and cultured oak logs. Also a one-year
warranty on the gas control valve, and a 90 day warranty
on the bifold glass doors.
LIGHTING PILOT AND MAIN BURNER
The gas control valve is located behind the grille in the centre of the
fireplace (see Figure 5 below). Before lighting the pilot, make sure
that the gas line is connected and the gas shut-off valve is turned to
the ON position.
To light the pilot we recommend the use of a long match or removal
of log“C”, “F”, “G”:
a) Partially depress and turn dial on gas control valve to “OFF”
position and wait 5 minutes.
b) Turn dial to pilot position, depress dial and light pilot burner,
hold for 1 minute, then release. If pilot does not remain ignited,
repeat, allowing a longer time to elapse before releasing dial.
d) To light the main burner, turn dial to “ON”, then turn on
remote switch.
e) Turn off flame with remote switch. For complete shut down,
slightly depress gas control valve dial and turn to “OFF”
position.
To Power
Pile
To Switch
Pilot Adjustment Cap
1/8 N.P.T.
Pressure Tap
MAINTENANCE
Have the fireplace installation inspected yearly, including a visual
check of the vent system, the burner and the pilot flame. For your
convenience a 1/8" pressure tap is supplied on the gas valve for a
test gauge connection. See Figure 5. This appliance requires a
minimum gas pressure of 7" W.C. for natural gas . Always keep the
fireplace area clear and free of combustible materials, as well as
gasoline and other flammable vapours and liquids. Use a vacuum
cleaner or whisk broom to keep the control compartment, burner,
and firebox free from dust and lint. Logs maybe cleaned periodically
with a vacuum to remove soot and other contamination.
CAUTIONS
*Fireplace gas control must be in the “OFF” position and pilot
and main burners extinguished when cleaning appliance with a
vacuum.
*Logs can get very hot, handle only when logs are cool.
The following is a troubleshooting chart of possible problems:
PROBLEM
CORRECTIVE ACTION
Noisy Pilot Flame
Turn pilot adjustor screw, located
next to gas shut off valve. Flame is
decreased by turning screw clock
wise
Pilot won’t ignite
Disconnect remote wires and try to
light pilot. If pilot now works, re
mote connections are faulty. If pilot
still won’t ignite, problem is in the
control valve area, probably a
faulty wire connection.
If your Montigo 36SR still does not operate correctly, consult your
dealer or the manufacturer.
All service and repairs should be performed by a qualified
agency
All spare parts are available from Canadian Heating Products Inc.
or your local dealer.