Function setting, Installation, Camera osd menu – OpenEye CM-P307 User Manual
Page 2
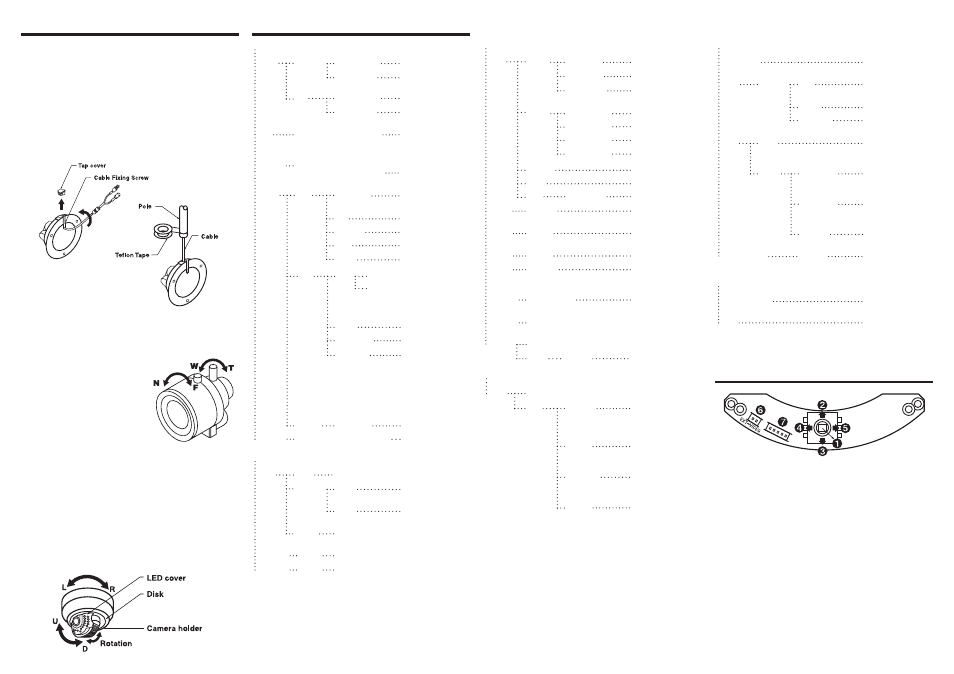
Function Setting
1.
Push the lever to access the menu and confirm selec-
tion. Push the lever for one second to open or close the
menu. Use the lever to return to the previous menu from
motion detection or privacy mask setting sections.
2.
Push the lever up to move the cursor up.
3.
Push the lever down to move the cursor down.
4.
Push the lever left to move the cursor left.
5.
Push the lever right to move the cursor right.
6.
Plug a test monitor into the optional EXT-VIDEO termi-
nal to view menu screens during installation.
7.
Adjust the LED light level with the screw.
Camera Installation
1.
Use the supplied screws to mount the camera on a wall
or ceiling.
Installation
Adjusting the Camera Angle
1.
To adjust the pan, the camera fixture left or right within a
range of -160º ~ 190º.
2.
To adjust the tilt, grasp the LED cover and adjust the
direction up or down within a range of 6º ~ 90º.
3.
To adjust the vertical orientation, rotate the camera
holder within a range of -178º ~ 178º.
2.
If your camera uses a varifo-
cal lense, adjust the lens
by opening the LED cover.
Turn the Tele-Wide knob to
adjust the field of view. Turn
the Near-Far knob to set the
focus.
3.
Once the camera is mounted
to the desired surface and is
focused correctly, re-assemble
the camera housing.
Using a Pole Mount
1.
Remove the screw on the bottom of the camera hous-
ing.
2.
Open the dome cover.
3.
Remove the tap cover and insert cables.
4.
Apply teflon tape to the threaded portion of the pole
mount. (Use of teflon tape is necessary for water resis-
tence in outdoor applications).
5.
Screw the pole mount into the base of the camera.
Camera OSD Menu
EXPOSURE
LENS
SELECT
MANUAL
BRIGHTNESS
0 ~ 99
E. SHUTTER
AUTO, 1/60 ~
1/100000
DC
BRIGHTNESS
0 ~ 99
E. SHUTTER
AUTO, 1/60 ~
1/100000
AGC
OFF, LOW, MIDDLE, HIGH
Auto Day/Night is
disabled if AGC is
OFF
SENSE-
UP
AUTO, OFF, X2, X4, X8, X16,
X32, X64, X128, X256, X512,
X1024
Use sense-up in low
light environments
BACK-
LIGHT
BLC
BLC LEVEL
OFF, LOW, MID,
HIGH
TOP
0 ~ 15:
BOTTOM
0 ~ 16
LEFT
0 ~ 15
RIGHT
0 ~ 16
HLC
HBLC
OFF
MANUAL HBLC LEVEL:
OFF,LOW, MID, HIGH
TOP, BOTTOM, LEFT, RIGHT
same as BLC
MODE
ALL DAY, NIGHT
HLC LEVEL
1 ~ 100
MASK 1-4
ON
TOP: 0 ~ 33
BOTTOM: 1 ~ 34
LEFT: 0 ~ 44
RIGHT 1 ~ 45
OFF: HLC MASK
OFF
D-WDR
SET LEVEL
0 ~ 20
3D-DNR
OFF, LOW, MID, HIGH, AUTO
Reduce noise in low
light environments
WHITE BALANCE
AWB
MODE
ATW
Color temp. 2500 ~ 9500 K
MANUAL
M-WR
0 ~ 128: Adjust the
red value
M-WB
0 ~ 128: Adjust the
blue value
PUSH
Optimize white balance for current condi-
tions
R-Y GAIN
0 ~ 255
Adjust red tone of image
B-Y GAIN 0 ~ 255
Adjust blue tone of image
DAY & NIGHT
D&N
MODE
AUTO
DAY-NIGHT
7 ~ 30
NIGHT-DAY
6 ~ 29
DELAY TIME
0 ~ 15: Set the
duration
AUTO-
CDS
A. DAY-NIGHT
6 ~ 36
A. NIGHT-DAY
6 ~ 36
C. DAY-NIGHT
0 ~ 255
C. NIGHT-DAY
0 ~ 255
COLOR
Fixed at Color
B&W
Fixed at B&W
EXT
DELAY TIME
0 ~ 15
BURST
ON, OFF
Enable/disable burst
signal in BW mode
C-SUP
0 ~ 100
Color suppress
control
A-SUP
0 ~ 100
Iris suppress control
SMART
IR
ON, OFF
Decreases screen
saturation of objects
within a short range
MIRROR
MIRROR, OFF
Vertical image
inversion
SHARP-
NESS
0 ~ 30
GAMMA
0.45, 0.55, 0.65
USER
GAMMA
.20 ~ 1.00 by incre-
ments of .05
PRIVACY
MASK
1 ~ 8
OFF
ON
DOT SEL
L_TOP, L_BOT,
R_BOT, R_TOP:
Determines location
for Motion Detection
DOT XY
ENTER SETTING:
Determines coor-
dinates
MOVE XY
ENTER SETTING:
Determines coor-
dinates
COLOR
Select mask color
SPECIAL
LANGUAGE
Select language (9
available)
TITLE
OFF-ON
EDIT
Display the camera
name on screen
RESET
Camera name reset
POSITION
Camera name
position
DPC
OFF
Deactivates Detect
Pixel Correction in
low illumination
AUTO
WHITE THR
0 ~ 255: Set the
limited value of white
pixel correction
LUMA THR
0 ~ 255: Set the
limited value of white
pixel correction
RETURN
Move back to previ-
ous menu.
FACTORY SET
YES, NO
Reset your camera
to factory default
conditon
EXIT
SAVE AND EXIT
Save the value and
exit the menu
EXIT
Escape the menu
without saving