SILVA ex10 Distance White User Manual
Page 2
Paslengte instellen (30-240 cm)
De standaardinstelling is 75 cm (3 ft).
Druk op MODE tot de tekst KM in het display verschijnt.
Houdt SET ingedrukt; de huidige paslengte begint te knipperen.
Druk herhaaldelijk op MODE om de paslengte te verhogen tot de gewenste waarde
(bij elke druk verhoogt de waarde met 1 cm, of 0,1 ft indien MIL is geselecteerd).
Houdt MODE ingedrukt om de waarde van de paslengte sneller te verhogen.
Nadat de paslengte is ingesteld, keert de stappenteller automatisch terug naar de
afstandsmodus na 5 seconden of door te drukken op SET.
Instructie voor stappenteller ex
10
plus
Art.nr. 56087, 56089
Dit model is ontworpen om het aantal genomen stappen te tellen, de afstand weer te
geven, de verbruikte calorieën te berekenen en de effectieve staptijd te tonen. Om de
afstand te tonen en calorieën te berekenen, moeten de paslengte en het
lichaamsgewicht ingevoerd worden.
Hoofdfuncties
Druk op de knop MODE om door de volgende functies te bladeren
• Stappen tellen, STEP wordt getoond op de display
• Afstand meten, KM of MIL wordt getoond op de display
• Calorieën berekenen, CAL wordt getoond op de display
• Activiteitstimer, TMR wordt getoond op de display. De timer begint te tellen
wanneer er beweging geregistreerd wordt.
De stappenteller resetten
Houdt de knoppen MODE en SET tegelijk ingedrukt om de teller te resetten.
Persoonlijke instelling
Afstand- en gewichtseenheden instellen
De standaardinstelling van de stappenteller is metrisch (km voor afstand, cm voor
paslengte en kg voor lichaamsgewicht). Dit kan worden gewijzigd naar het
imperiale stelsel (mijl, ft en lb.).
Druk tegelijk op de knoppen SET en MODE om de gegevens te resetten, en houdt
de knoppen vervolgens 5 seconden ingedrukt om te wisselen tussen het
metrische en imperiale stelsel.
Paslengte berekenen
De eenvoudigste manier om de paslengte te vinden is door bijvoorbeeld 10
stappen te zetten en vervolgens deze afstand te meten. Deel de afstand door 10
om de paslengte te vinden.
Paslengte instellen (30-240 cm)
De standaardinstelling is 75 cm (3 ft).
Druk op MODE tot de tekst KM in het display verschijnt.
Houdt SET ingedrukt; de huidige paslengte begint te knipperen.
Druk herhaaldelijk op MODE om de paslengte te verhogen tot de gewenste
waarde (bij elke druk verhoogt de waarde met 1 cm, of 0,1 ft indien MIL is
geselecteerd).
Houdt MODE ingedrukt om de waarde van de paslengte sneller te verhogen.
Nadat de paslengte is ingesteld, keert de stappenteller na 5 seconden
automatisch terug naar de afstandsmodus. U kan ook drukken op SET.
Lichaamsgewicht instellen (30-135 kg)
De standaardinstelling is 45 kg (100 lb.).
Druk herhaaldelijk op MODE tot CAL in het display getoond wordt.
Houdt SET ingedrukt om het huidige lichaamsgewicht weer te geven.
Druk herhaaldelijk op SET om het lichaamsgewicht te verhogen tot de gewenste
waarde (bij elke druk verhoogt de waarde met 1 kg, of 1 lb. indien MIL is
geselecteerd).
Houdt SET ingedrukt om de waarde van het lichaamsgewicht sneller te verhogen.
Nadat het lichaamsgewicht is ingesteld, keert de stappenteller na 5 se con den
automatisch terug naar de caloriemodus. U kan ook drukken op SET.
Specificaties
De stappenteller werkt bij temperaturen van 0 °C tot +50 °C.
Stappenteller bewaren bij -10 °C tot +60 °C.
Batterijtype LR44/L1154.
Levensduur van de batterij ca. 6 maanden bij 10.000 stappen/dag.
Bescherm het milieu
Alle onderdelen in dit product, inclusief batterijen, moeten worden gerecycled en
mogen niet worden weggegooid met het gewone huisvuil. Sorteer deze
onderdelen in overeenstemming met de geldende lokale regelgeving.
GARANTIE
Silva garandeert dat voor een periode van twee (2) uw Silva-product jaar geheel vrij
zal zijn van materiaal- en productiefouten bij normaal gebruik. Silva’s verplichting
bij deze garantie is beperkt tot het herstellen of vervangen van het product. Deze
beperkte garantie geldt alleen voor de oorspronkelijke koper. Neem contact op met
het oorspronkelijke ver kooppunt indien het product defect geraakt tijdens de
garantie periode. Retouren kunnen niet afgehandeld worden zonder origineel
aankoop bewijs. De garantie geldt niet als het product werd gewijzigd, niet werd
geïnstalleerd, gebruikt, hersteld of onderhouden volgens de instructies van Silva.
Blootstelling aan abnormale fysieke of elektrische spanning, misbruik,
onachtzaamheid of ongevallen vallen eveneens niet onder garantie. De garantie
dekt evenmin normale slijtage. Silva is niet verant woordelijk voor gevolgschade,
direct of indirect, die voortvloeit uit het gebruik van dit product. In geen geval kan
Silva aansprakelijk worden gesteld voor een bedrag groter dan de door u voor het
product betaalde som. In bepaalde rechtsgebieden is uitsluiting of beperking van
inci dentele schade of gevolgschade niet toegestaan, zodat de boven staande
beperking of uitsluiting voor u mogelijk niet van toepassing is. Deze garantie is
geldig en wordt alleen afgehandeld in het land van aankoop.
Voor meer informatie kunt u terecht op www.silva.se
Pedómetros ex
10
Guia do utilizador
Conteúdo da embalagem
Pedómetro
Fio de pescoço
Clipe de cinto
Baterias LR44/L1154
Guia do utilizador
Informação geral
O pedómetro ex
10
usa um sensor incorporado que sente a aceleração. O ângulo
máximo de inclinação é de 45° medido a partir de uma linha vertical, ver a
imagem 1, portanto a localização/direcção das unidades é importante.
.
1
Para ser possível contar os passos é importante que o pedómetro não balance.
O pedómetro não é à prova de água – portanto trate-o com cuidado.
O pedómetro não tem um botão de ligar/desligar, dado que, quando não
estiver em uso, o consumo de energia é extrema mente baixo.
Usar o Pedómetro
O pedómetro ex
10
está concebido para ser usado à volta do pescoço utilizando o fio
de pescoço incluído ou anexado a uma peça de roupa em posição vertical, usando
o clipe de cinto. O fio de pescoço dispõe de uma abertura rápida que evita o
estrangulamento no caso de o pedómetro ser usado à volta do pescoço.
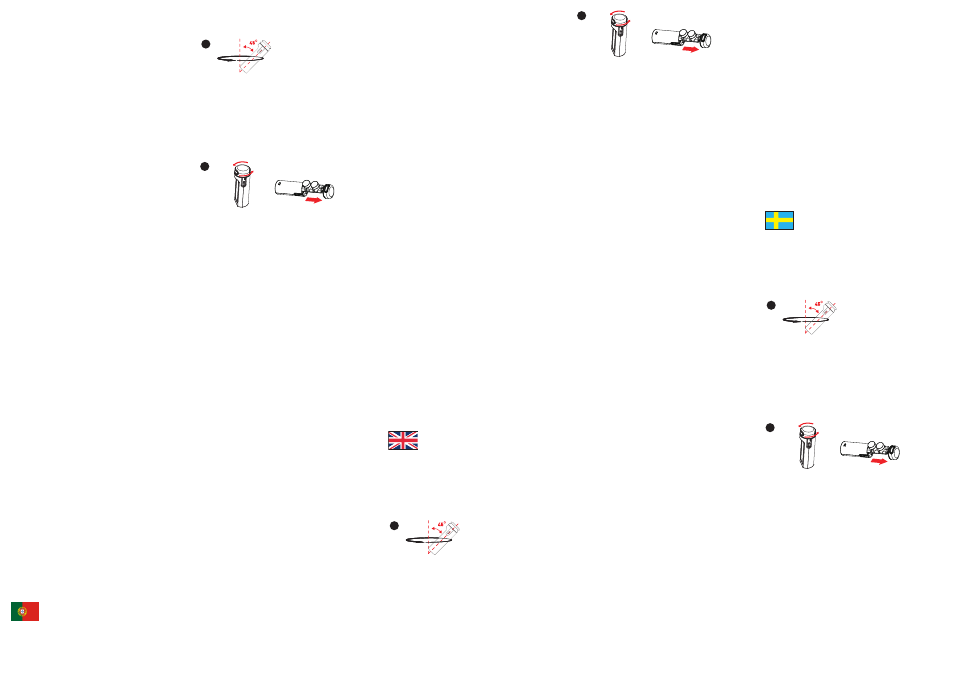
Mudança da bateria
Mude as baterias quando o mostrador desvanecer. Torça a parte superior do
pedómetro e puxe para fora o suporte das baterias para aceder à bateria. Ver a
imagem 2. Mude as baterias (tipo LR44/L1154).
2
Economia de energia
Para economizar energia o LCD do pedómetro passará a modo espera depois de
ficar inactivo durante 80 segundos. O LCD despertará novamente premindo
qualquer botão ou quando for registado movimento.
Função de filtro de passos
O pedómetro tem uma função de filtro, que impede o registo acidental de passos
quando parado ou quando houver pequenos movimentos acidentais que não sejam
parte da caminhada/corrida. Para uma contagem correcta de passos o pedómetro
usa um filtro de 10 segundos. Isto significa que será necessário caminhar durante
dez segundos até que o número de passos seja actualizado no mostrador.
Instruções para o Pedómetro ex
10
step
Art. nº 56085
Este modelo é concebido para contar o número de passos dados.
Reiniciar o pedómetro
Prima e mantenha simultaneamente os botões SET e MODE para reiniciar o
contador.
Instruções para o Pedómetro ex
10
distance
Art. nº 56086, 56088
Este modelo é concebido para contar o número de passos dados e para
apresentar a distância caminhada. Para ser possível apresentar a distância é
necessário introduzir a dimensão da passada.
Funções principais
Prima o botão MODE para passar pelas seguintes funções
• Contagem de passos, apresentado STEP no mostrador
• Medição da distância, KM ou MIL apresentados no mostrador
Reiniciar o pedómetro
Prima e mantenha simultaneamente o botão MODE e SET para reiniciar o contador.
Regulação personalizada
Mudança da unidade de distância
A definição por omissão do pedómetro é métrica (km para distância e cm para
comprimento da passada). Isto pode ser alterado para o sistema imperial (milhas
e pés).
Prima simultaneamente os botões SET e MODE para reiniciar os dados, e
continue a premir os botões durante 5 segundos para mudar entre o sistema
métrico e imperial.
Calcular o comprimento da passada
A forma mais simples de definir o comprimento da passada é caminhar por
exemplo 10 passos e depois medir a distância caminhada. Divida a distância por
10 para determinar o comprimento da passada.
Definição do comprimento da passada (30 a 240 cm)
A definição por omissão é 75 cm (3 pés).
Prima MODE até aparecer o texto KM no mostrador.
Prima e mantenha SET e o comprimento actual da passada começa a piscar.
Prima repetidamente MODE para aumentar o comprimento da passada para o valor
desejado (aumenta 1 cm por cada pressão, ou 0,1 pés se estiver selecionado MIL).
Prima e mantenha MODE e o comprimento da passada aumentará mais
rapidamente.
Logo que o comprimento da passada estiver definido, o pedómetro volta
automaticamente ao modo distância ao fim de 5 segundos ou premindo SET.
Instruções para o Pedómetro ex
10
plus
Art. nº 56087, 56089
Este modelo é concebido para contar o número de passos dados, apresentar a
distância, calcular as calorias consumidas e apresentar o tempo de caminhada
efetivo. Para ser possível apresentar a distância e calcular as calorias, é
necessário introduzir o comprimento da passada e o peso corporal.
Funções principais
Prima o botão MODE para passar pelas seguintes funções
• Contagem de passos, STEP apresentado no mostrador
• Medição da distância, KM ou MIL apresentados no mostrador
• Medição de calorias, CAL apresentado no mostrador
• Temporizador de actividade, TMR apresentado no mostrador.
O temporizador inicia a contagem quando for registado movimento.
2
Power savings
To save power, the pedometer’s LCD will go to standby mode after having been
idle for 80 seconds. The LCD will come to life again by pressing any button or
when movement is detected.
Step filter function
The Pedometer has a filter function, which prevents the accidental registration of
steps when standing still or when making short accidental movements that are not
part of the walk/jog. For correct step counting, the pedometer uses a 10 second
filter. This means that the pedometer needs to be used for 10 seconds before the
number of steps is updated on the display.
Instructions for the ex
10
step Pedometer
Art.no. 56085
This model is designed to count the number of steps taken.
Resetting the pedometer
Press and hold the SET and MODE button simultaneously to reset the counter.
Instructions for the ex
10
distance Pedometer
Art.nr. 56086, 56088
This model is designed to count the number of steps taken and to show the
distance walked. To be able to show distance, the stride length has to be entered.
Main Functions
Press the MODE button to browse through the following functions:
• Step counting, STEP shown on the display
• Distance measurement, KM or MIL shown on the display
Resetting the pedometer
Press and hold the MODE and SET buttons simultaneously to reset the counter.
Personal setting
Changing of distance unit
The Pedometer’s default setting is metric (Km for distance and cm for stride
length). This can be changed to Imperial (miles and ft).
Press the SET and MODE button simultaneously to reset data, and then continue
pressing the buttons for 5 seconds to change between metric and imperial.
Calculating stride length
The easiest way to calculate the length of your stride is to walk 10 steps and then
measure the distance travelled. Divide the distance by 10 to find the stride length.
Setting stride length (30-240cm)
The default setting is 75cm (3 ft).
Press MODE until the text KM appears in the display.
Press and hold SET until the current stride length begins flashing.
Press MODE repeatedly to increase the stride length to the desired value
(increases by 1 cm per press, or 0,1 ft if MIL is selected).
Press and hold MODE and the stride length value will increase faster.
Once the stride length is set, the pedometer automatically returns to the distance
mode after 5 seconds or by pressing SET.
Instructions for the ex
10
plus Pedometer
Art.nr. 56087, 56089
This model is designed to count the number of steps taken, show distance, calculate
consumed calories and show the effective walking time. To be able to show distance
and calculate calories, the stride length and body weight has to be entered.
Main Functions
Press the MODE button to browse through the following functions:
• Step counting, STEP shown in the display
• Distance measurement, KM or MIL shown in the display
• Calories measurement, CAL shown in the display
• Activity timer, TMR shown in the display. The timer starts counting when
movement is registered.
Resetting the pedometer
Press and hold MODE and SET buttons simultaneously to reset the counter.
Personal setting
Setting distance and weight units
The Pedometer’s default setting is metric (Km for distance, cm for stride length and
Kg for body weight). This can be changed to Imperial (miles, ft and lb).
Press the SET and MODE button simultaneously to reset data, and then continue
pressing the buttons for 5 seconds to change between metric and imperial.
Calculating stride length
The easiest way to calculate the stride length is to walk 10 steps and then measure
the distance travelled. Divide the distance by 10 to find the stride length.
Setting stride length (30-240cm)
Default setting is 75cm (3 ft).
Press MODE until the text KM appears in the display.
Press and hold SET until the current stride length begins flashing.
Press MODE repeatedly to increase the stride length to the desired value
(increases by 1 cm per press, or 0,1 ft if MIL is selected).
Press and hold MODE and the stride length value will increase faster.
Once the stride length is set, the pedometer automatically returns to the distance
mode after 5 seconds or by pressing SET.
Setting body weight (30-135 kg)
The default setting is 45kg (100lb).
Press MODE repeatedly until CAL is shown on the display.
Press and hold SET until the current stride length begins flashing.
Press SET repeatedly to increase the body weight to the desired value (increases
by 1 kg per press, or 1 lb if MIL is selected).
Reiniciar o pedómetro
Prima e mantenha simultaneamente o botão MODE e SET para reiniciar o contador.
Regulação personalizada
Definição das unidades de distância e de peso
A definição por omissão do pedómetro é métrica (km para distância e cm para
comprimento da passada e kg para peso corporal). Isto pode ser alterado para o
sistema imperial (milhas, pés e libras).
Prima simultaneamente os botões SET e MODE para reiniciar os dados, e
continue a premir os botões durante 5 segundos para mudar entre o sistema
métrico e imperial.
Calcular o comprimento da passada
A forma mais simples de definir o comprimento da passada é caminhar por
exemplo 10 passos e depois medir a distância caminhada. Divida a distância por
10 para determinar o comprimento da passada.
Definição do comprimento da passada (30 a 240 cm)
A definição por omissão é 75 cm (3 pés).
Prima MODE até aparecer o texto KM no mostrador.
Prima e mantenha SET e o comprimento actual da passada começa a piscar.
Prima repetidamente MODE para aumentar o comprimento da passada para o
valor desejado (aumenta 1 cm por cada pressão, ou 0,1 pés se estiver selecionado
MIL).
Prima e mantenha MODE e o comprimento da passada aumentará mais
rapidamente.
Logo que o comprimento da passada estiver definido, o pedómetro volta
automaticamente ao modo distância ao fim de 5 segundos ou premindo SET.
Definição do peso corporal (30 a 135 kg)
A definição padrão é 45 kg (100 lb).
Prima repetidamente MODE até ser apresentado CAL no mostrador.
Prima e mantenha SET e o peso corporal actual será apresentado.
Prima repetidamente SET para aumentar o peso corporal para o valor de -
sejado (aumenta 1 kg por cada pressão, ou 1 lb se estiver seleccionado ML).
Prima e mantenha SET e o valor do peso corporal aumentará mais rapidamente.
Logo que o peso corporal estiver definido, o pedómetro volta auto maticamente ao
modo caloria ao fim de 5 segundos ou premindo SET.
Especificações
Gama de temperaturas de operação: 0 °C a +50 °C.
Armazenagem -10 °C a +60 °C.
Tipo de bateria LR44/L1154.
Tempo de vida da bateria aprox. 6 meses a 10 000 passos / dia.
Proteja o ambiente
Todas as partes componentes deste produto incluindo as baterias devem ser
recicladas e não devem ser atiradas para o lixo comum. Deite fora estes itens de
acordo com os regulamentos locais aplicáveis.
GARANTIA
A Silva garante que, por um período de dois (2) anos, o seu produto Silva, se usado
normalmente, estará substancialmente livre de defeitos de material e de fabrico. A
responsabilidade da Silva sob esta garantia está limitada a reparar ou substituir o
produto. Esta garantia limitada estende-se apenas ao comprador original. Se o
produto se apresentar como defeituoso durante o período de garantia contacte o
local original de compra. Certifique-se de que possui a prova de compra quando
devolver o produto. As devoluções não podem ser processadas sem o original da
prova de compra. Esta garantia não se aplica se o produto tiver sido alterado,
instalado, operado, reparado ou mantido em desa cordo com as instruções
fornecidas pela Silva, ou se tiver sido sujeito a stress físico ou elétrico, má
utilização, negligência ou acidente. A garantia também não cobre o desgaste
normal. A Silva não se responsa biliza por qualquer consequência, directa ou
indirecta, ou danos resul tantes da utilização deste produto. Em nenhuma
circunstância a responsa bilidade da Silva excederá o valor que pagou pelo produto.
Algumas jurisdições não permitem a exclusão ou limitação dos danos incidentais ou
conse quentes, e portanto a limitação ou exclusão acima podem não lhe ser
aplicáveis. Esta garantia só é válida e pode ser processada no país de compra.
Para mais informações visite www.silva.se
User guide ex
10
pedometers
Package contents
Pedometer
Neck lanyard
Belt clip
Batteries LR44/L1154
User guide
General information
The ex
10
pedometer uses a built-in sensor that senses the acceleration. The unit’s
location/direction is important, as the maximum tilt angle is 45º measured from a
vertical line, see image 1
.
1
In order to count steps accurately, it is important that the pedometer does not
swing.
The pedometer is not waterproof, therefore keep it dry and treat it carefully.
The pedometer does not have an ON/OFF button, as the power consumption
when not in use is extremely low
Wearing the Pedometer
The ex
10
pedometer is designed to be worn around the neck using the included
neck lanyard or attached to a garment in upright position, using the belt clip. The
lanyard features a quick release that prevents strangling when the pedometer is
worn around the neck.
Changing the battery
Change batteries when the display dims. Twist the upper part of the pedometer
and pull out the battery holder to access the batteries. See image 2. Change
batteries (type LR44/L1154).
Press and hold SET and the body weight value will increase faster.
Once the body weight is set, the pedometer automatically returns to calorie mode
after 5 seconds or by pressing SET.
Specifications
Temperature range Operation: -0 °C to +50 °C
Storage: -10 °C to +60 °C
Battery type: LR44/L1154
Battery lifetime approx. 6 months at 10 000 steps/day.
Protect the environment
All parts included in this product including batteries should be recycled and must
not be thrown away in the regular trash. Dispose of these items in accordance
with applicable local regulations.
WARRANTY
Silva warrants that, for a period of two (2) years, your Silva product will be
substantially free of defects in materials and workmanship under normal use.
Silva’s liability under this warranty is limited to repairing or replacing the product.
This limited warranty extends only to the original purchaser. If the product proves
defective during the warranty period please contact the original place of
purchase. Make sure to have your proof of purchase on hand when returning the
product. Returns cannot be processed without the original proof of purchase. This
warranty does not apply if the product has been altered, not been installed,
operated, repaired, or maintained in accordance with instructions supplied by
Silva, or has been subjected to abnormal physical or electrical stress, misuse,
negligence or accident. Neither does the warranty cover normal wear and tear.
Silva is not responsible for any consequences, direct or indirect, or damage
resultant from use of this product. In no event will Silva’s liability exceed the
amount paid by you for the product. Some jurisdictions do not allow the exclusion
or limitation of incidental or consequential damages, so the above limitation or
exclusion may not apply to you. This Warranty is valid and may be processed only
in the country of purchase.
For more information please visit www.silva.se
Bruksanvisning för ex
10
-pedometrar
Förpackningen innehåller
Pedometer
Halssnodd
Bältesklämma
Batterier LR44/L1154
Bruksanvisning
Allmän information
ex
10
-pedometern använder en inbyggd sensor som känner av accelera tionen.
Maximal lutningsvinkel är 45° i förhållande till en vertikal linje - se bild 1. Därför
är enhetens placering/riktning viktig.
.
1
För att pedometern ska kunna räkna steg är det viktigt att den inte gungar.
Pedometern är inte vattentät – behandla den därför varsamt.
Pedometern är inte försedd med en ON/OFF-knapp eftersom
energiförbrukningen är extremt låg när den inte är i bruk.
Bära pedometern
Pedometern ex
10
är designad för att bäras runt halsen med den medföljande
halssnodden eller fästas på ett klädesplagg i upprätt position, med bältesklämman.
Halssnodden är försedd med en snabburkoppling som förhindrar strypning när
pedometern bärs runt halsen.
Batteribyte
Byt batterierna när tecknen på displayen börjar bli svaga. Vrid den översta delen av
pedometern och dra ut batterihållaren för att komma åt batterierna. Se bild 2. Byt
batterierna (typ LR44/L1154).
2
Energibesparing
Pedometerns LCD-display går i standby-läge efter att den har varit inaktiv i 80
sekunder - detta för att spara energi. LCD-displayen aktiveras på nytt när någon
av knapparna trycks eller när rörelse registreras.
Stegfilterfunktion
Pedometern har en filterfunktion som förhindrar att steg registreras av misstag
när man står stilla eller gör korta, oavsiktliga rörelser som inte är en del av
promenaden/löpningen. Pedometern använder ett 10-sekunders filter för korrekt
stegräkning. Detta betyder att du måste gå i tio sekunder innan antalet steg
uppdateras på displayen.
Anvisningar för pedometern ex
10
step
Art.nr. 56085
Den här modellen är avsedd att räkna antalet steg som tas.
Återställning av pedometern
Tryck och håll knapparna SET och MODE samtidigt för att återställa pedometern.
Anvisningar för pedometern ex
10
distance
Art.nr. 56086, 56088
Den här modellen är avsedd att räkna antalet steg som tas och även visa
tillryggalagd distans. För att pedometern ska kunna visa distansen måste
steglängden anges.
Huvudfunktioner
Tryck på knappen MODE för att bläddra igenom följande funktioner
• Stegräkning - STEP visas på displayen.
• Distansmätning - KM eller MIL visas på displayen.
Återställning av pedometern
Tryck och håll knapparna MODE och SET samtidigt för att återställa pedometern.