Sloan Tank and Valve Installation User Manual
Page 2
10500 Seymour Avenue
Franklin Park, IL 60131
Ph: 1-800-982-5839 or
1-847-671-4300
Fax: 1-800-447-8329 or
1-847-671-4380
www.sloanvalve.com
Code No: 0816427 – Rev. 3 (02/11)
LIMITED WARRANTY
Sloan Valve Company warrants its Sloan toilet tank systems to be made of first class materials, free from defects of material or
workmanship under normal use and to perform the service for which they are intended in a thoroughly reliable and efficient
manner when properly installed and serviced, for a period of three years from date of purchase. During this period, Sloan Valve
Company will, at its option, repair or replace any part or parts which prove to be thus defective if returned to Sloan Valve Company,
at customer's cost, and this shall be the sole remedy available under this warranty. No claims will be allowed for labor,
transportation or other incidental costs. This warranty extends only to persons or organizations who purchase Sloan Valve
Company's products directly from Sloan Valve Company for purpose of resale.
THERE ARE NO WARRANTIES WHICH EXTEND BEYOND THE DESCRIPTION ON THE FACE HEREOF. IN NO EVENT IS SLOAN VALVE
COMPANY RESPONSIBLE FOR ANY CONSEQUENTIAL DAMAGES OF ANY MEASURE WHATSOEVER.
6. ADJUSTMENTS AND OPERATIONS
OF SINGLE FLUSH TOILETS
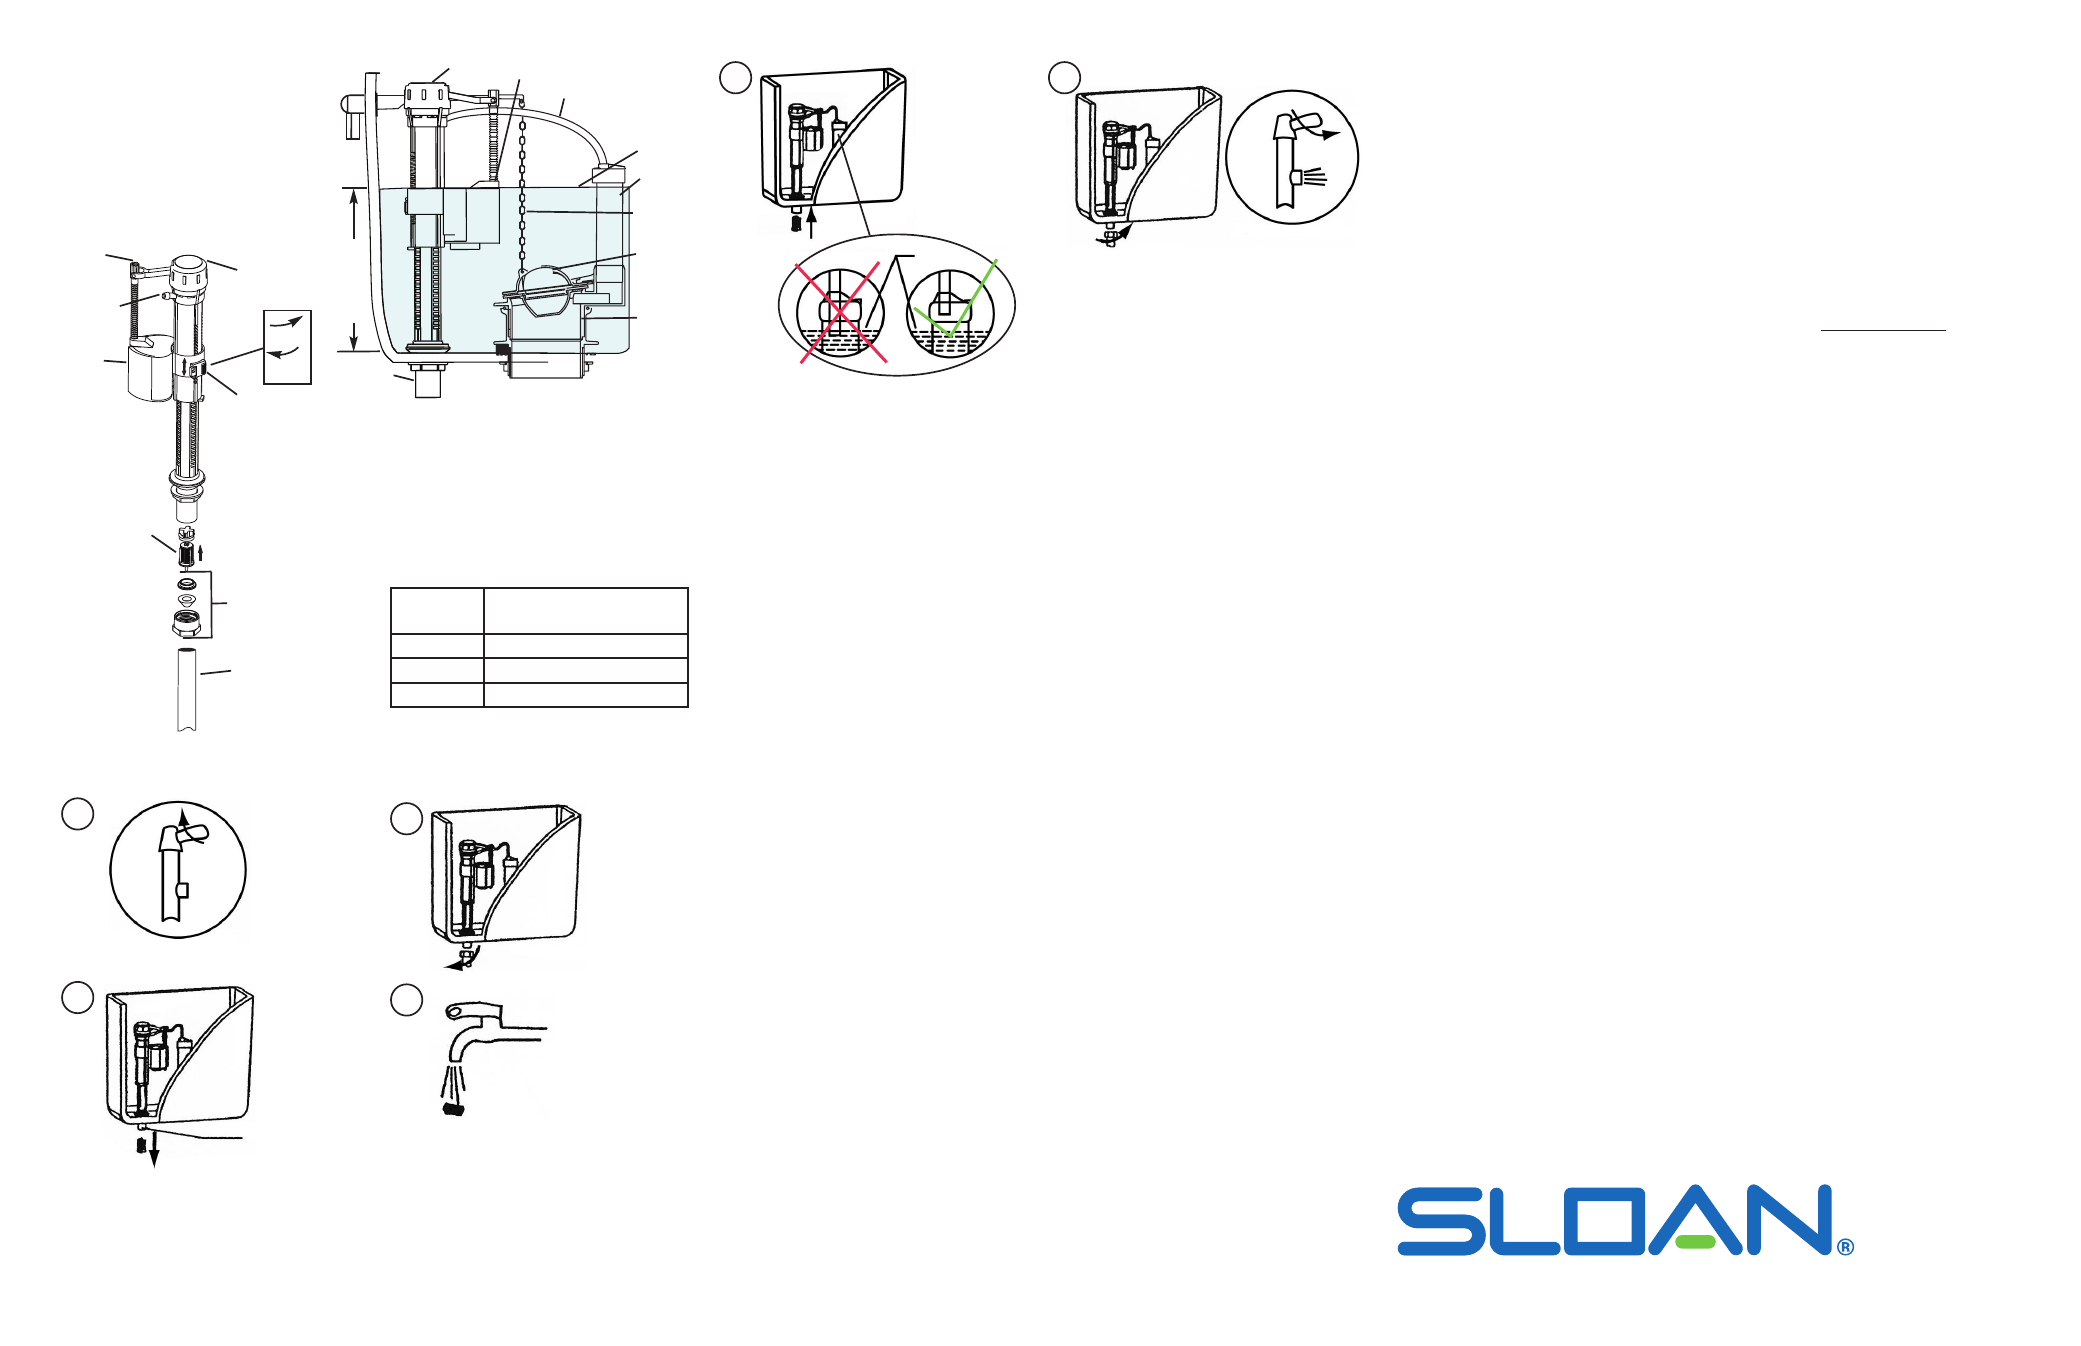
The fill valve is preset at the factory. When
replacing the fill valve check for correct float
cup height (see figure 4) per volume as listed
in the table. It is important that the water
level is adjusted to the waterline indicated on
the overflow tube (Fig. 4).
WATER LINE
Fill Valve
Refill tube
Waterline
Overflow
Tube
Flapper
Chain
Flapper
Flapper
Valve
Water
Supply
FIG. 4
Fill Valve
Float
Float Cup
Adjustment Clip
Unlock to
slide/down
Lock to set
water height
In-line filter and
flow restriction
¼” Compression
Supply Line
Connection
To
Waterline
Refill Hose
Float Adjustment
Screw
Lock
Unlock
FIG. 5
Water Supply Line
Shut off water supply.
Install clean
filter screen
into inlet pipe.
A
E
Take out filter
screen from
inlet pipe.
C
Detach Water Supply.
B
Connect water supply to inlet valve and turn
on water supply.
F
Flush and clean
filter screen.
D
Water Level
Inlet Pipe
Turn on water supply
TROUBLESHOOTING
1. Poor Flush.
A. Adjust the tank water level to the marked water line on overflow tube.
B. Make sure water supply valve is fully open.
C. For dual flush, make sure the push button rods are in place and are activating the dual flush
assembly. Adjust as needed.
2. Tank takes a long time to fill.
A. Make sure water supply valve is fully open.
B. Clean any residue from the inlet valve, in-line filter, dual flush cartridge assembly or supply line. Flush
the lines to clear any debris.
C. Check water pressure supply, operating range is 20-80 PSI.
3. Water level too high or too low.
A. Adjust the float adjustment screw or float cup.
4. Fill valve fails to shut off or fails to fill tank.
A. Verify water supply is on.
B. Filter screen is clogged. Clean filter screen.
C. Verify refill hose is not obstructed or kinked.
5. Noisy tank water refill.
A. Adjust the water supply line if water pressure is to high.
B. Clean any residue from the inlet valve or supply line. Flush the lines to clear any debris.
6. Bowl water continues to flow or tank refill water won’t shut off.
A. Flapper is not seating properly. Adjust chain slack between flapper and flapper valve.
B. Flush handle extension is being restricted. Repair or replace flush handle assembly.
C. Clean area of debris and check for any wearing around the flapper or dual flush valve seat on opening
to allow seal.
D. For dual flush, adjust the push button rods for proper slack, so the fill valve seal is not held off the
flush valve.
7. Handle/dual flush button does not activate plunger.
A. Adjust chain linkage.
B. Check arm for breakage. Replace if necessary.
C. Check push button rods for breakage or adjustment.
8. If the water rises in bowl during the flush and stays there, or drains slowly.
A. Ensure that the chain connected to flapper is adjusted properly. Too much slack will result in the
flapper closing too soon, not enough slack will result in not seating properly and leaking. There should
be enough slack to allow the flapper to seat properly.
B. Check the plumbing system venting. Fill a basin near the location of the toilet and open the drain.
If the water drains quickly with no visible problem, there is no venting problem. If there is a venting
problem the sluggish/poor performance is not a fixture problem.
9. Leaking tanks.
A. Check flapper and flapper seat in tank for warping or degradation. Many cleaning chemicals
commonly used in tanks contain chlorine that attacks these parts causing warping and
degradation.
B. Check tank for cracks. If cracked the tank must be replaced.
C. Check tank bolts. Rubber washers may be corroded or bolts may be loose. Replace or tighten
as necessary.
NOTE: be careful not to overtighten nuts on tank as this may result in cracking the tank.
D. Check for condensation. Very cold water can generate condensation in high temperature and
humid areas in unlined tanks.
CAUTION: Do not use in-tank cleaners. Products containing chlorine (calcium hypochlorite) can seriously
damage the fittings in your tank. This damage can cause leakage and property damage.
For more complete up-to date information please visit us at www.sloanvalve.com.
If further assistance is required, please contact the Sloan Valve Company
Installation Engineering Department at: 1-888-SLOAN-14 (1-888-756-2614)
PARTS LIST
Code #
Part #
Description
2109012
ST-9012-A Gravity Tank Assembly 1.6/1.1 gpf (6.0/4.2 Lpf)
2109013
ST-9013-A
Gravity Tank Assembly 1.6 gpf (6.0 Lpf) Left Hand
2109010
ST-9010-A
Gravity Tank Assembly 1.28 gpf (4.8 Lpf) Left Hand
2109113
ST-9113-A
Gravity Tank Assembly 1.6 gpf (6.0 Lpf) Right Hand
2109110
ST-9110-A
Gravity Tank Assembly 1.28 gpf (4.8 Lpf) Right Hand
2109000
ST-9000-A
Gravity Closet Bowl 1.28 gpf (4.8 Lpf)
2109002
ST-9002-A
Gravity Closet Bowl 1.6/1.1 gpf (6.0/4.2 Lpf)
2109003
ST-9003-A
Gravity Closet Bowl 1.6 gpf (6.0 Lpf)
2109020
ST-9020-A
Gravity Closet Bowl ADA 1.28 gpf (4.8 Lpf)
2109023
ST-9023-A
Gravity Closet Bowl ADA 1.6 gpf (6.0 Lpf)
Repair Parts Kits
Code #
Part #
Description
0319140
ST-15-A-1.28 Fill Valve-1.28 gpf (4.8 Lpf)
0319142
ST-15-A-1.6 Fill Valve- 1.6 gpf (6.0 Lpf)
0319131
ST-19-A-1.28 Single Flush Valve Assembly – 1.28 gpf (4.8 Lpf)
0319154
ST-19-A-1.6
Single Flush Valve Assembly – 1.6 gpf (6.0 Lpf)
0319132
ST-23-A
Dual Flush Valve Assembly – 1.6/1.1 gpf (6.0/4.2 Lpf)
0319145
ST-36-A
Handle Repair Kit (Single Flush)
0319148
ST-37-A
Button Repair Kit for (Dual Flush)
0319172
ST-48
Flapper and Chain
0319181
ST-60-A
Gravity Closet Mounting Kit
(tank & johnny bolt assemblies, tank gasket, spacers)
7. FILTER CLEANING
For small adjustments, turn the adjustment screw
located on float adjustment (Fig 5).
Test flush the toilet several times to ensure
proper operation. If flapper ball doesn’t seat or
lift properly when flushed, adjust the flapper
chain length by repositioning the chain hook on
the chain.
Float Cup
Height
Flush Volume
8”
1.28 gpf (4.8 Lpf)
8½”
1.6/1.1 gpf (6.0/4.2 Lpf)
9”
1.6 gpf (6.0 Lpf)
Fl
oa
t
C
up
H
ei
gh
t
(s
ee
t
ab
le
)
Float Cup