Operation, Replacing the battery, Demonstration mode – SOMFY THERMO SUNIS INDOOR WIREFREE RTS SUN SENSOR User Manual
Page 4
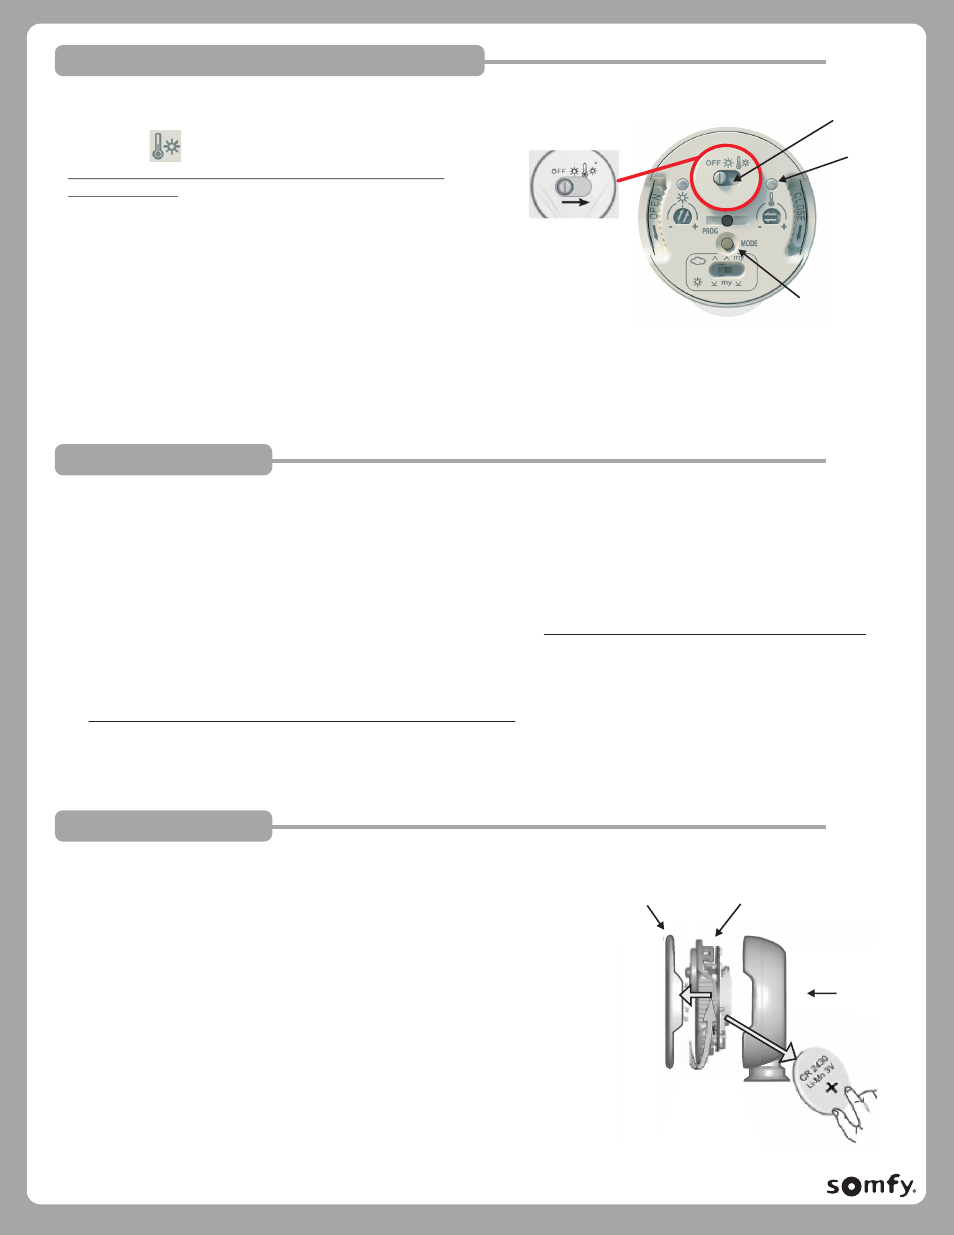
FIGURE 6
ON/OFF
Sun/Temp
Selector Switch
Mode Button
Temperature
LED
Indicator
© Copyright Somfy Systems, Inc. 1/2010
PAGE 4 REV 5
OPERATION:
STANDARD OPERATING MODE (DEFAULT MODE)
Activation of Window Covering via Temperature & Sunlight
NOTE: When (Sun & Temperature) control is selected, the
Temperature threshold setting will TAKE PRIORITY over the Sun
Threshold Setting.
Sun Activation (Control via Sunlight) is not possible unless Temperature is
within the preset threshold.
Momentarily press the Mode Button, Sun & Temperature LED Indicator light
will illuminate (for approximately 15 seconds) to indicate preset sensor status.
GREEN LED: INDICATES SENSOR WITHIN THRESHOLD SETTING
RED LED: INDICATES SENSOR BELOW THRESHOLD SETTING
NOTE: The Thermosunis RTS Sensor is capable of providing control in accordance to Sunlight an Temperature conditions only.
Once a command is sent, the Thermosunis will not send another command until there is a change in sunlight or temperature conditions.
REPLACING THE BATTERY
The Thermosunis WireFree™ RTS Light and Temperature Sensor uses a lithium battery
(Type: CR2430)
Sun and Temperature LED will illuminate orange when battery needs replacing.
1. Carefully remove rear cover of the Thermosunis sensor exposing the control
setting panel (See Figure 7).
2. Firmly grip the molded indentations and rotate the control setting panel
counterclockwise to open.
3. Carefully separate the control setting panel from the sensor case exposing
the battery holder.
4. Replace battery with correct rated/type. Be certain of battery polarity (+) and
(-) when installing new battery.
NOTE: Do not use any tools when replacing the battery as there is a risk of
damaging the sensor circuitry.
1. Press and hold the Mode Button until LED Indicator blinks. LED Indicator(s) will continue to blink for 30 seconds the extinguish.
DEMONSTRATION MODE
2. If necessary, adjust Sunlight and Temperature Sensitivity (Threshold) according to (STEP THREE: SETTING THE SENSOR SENSITIVITY (THRESHOLD).
LED(s) will blink during this mode. Should LED Indicator(s) extinguish prior to final setting, simply press the Mode Button momentarily to
reactivate LED Indicator(s)
3. Thermosunis sensor will provide the necessary RTS command as selected with the Function Selector Switch. (SEE STEP FOUR: OPERATION #3)
after 5 seconds of sensing Sunlight or Temperature within the set threshold.
Demonstration mode reduces the standard operating time delays, permitting almost an immediate operating/output response from the
Thermosunis sensor. This mode facilitates initial SUNLIGHT & TEMPERATURE sensitivity (threshold) settings and quickly demonstrates the
operation of the motorized window covering.
FIGURE 7
NOTE: 1. Thermosunis will automatically default to STANDARD OPERATING MODE after 3 minutes.
2. Rotating the Sun Sensitivity (threshold) selector to a FULL COUNTERCLOCKWISE (-) position will simulate
sun if no sunlight is present. It is recommended to leave the selector (threshold setting) in this position.
Sensor Case
Control Setting Panel
Rear Cover
P-0004
1. Press and hold the Mode Button until LED Indicator blinks. LED Indicator(s) will continue to blink for 30 seconds the extinguish.