Sm890i – Soundtube SM890i User Manual
Page 2
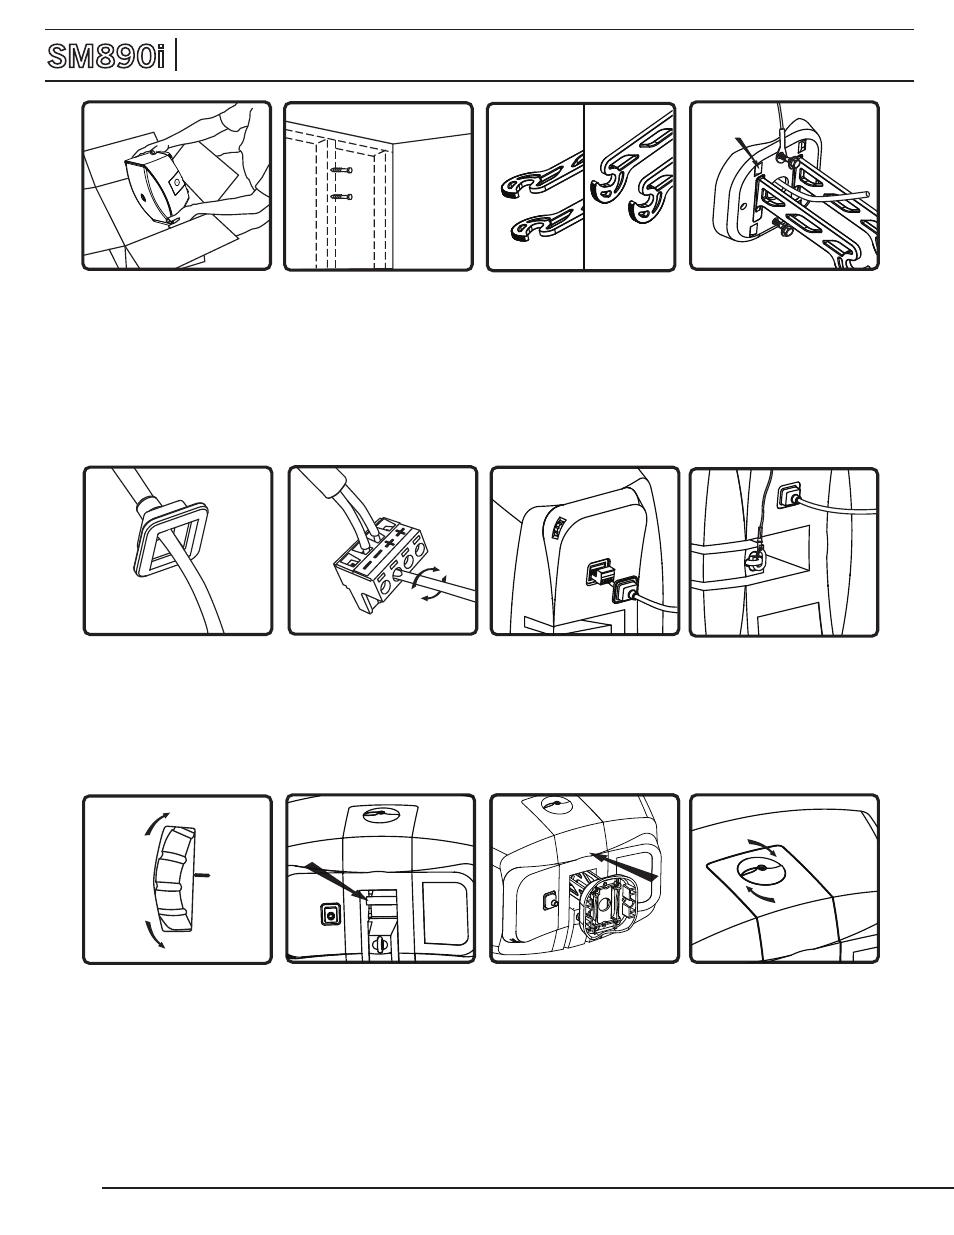
1.
Unpack speaker and
mounting hardware.
5.
Slip terminal weather boot
over signal wire. For environ-
mental applications, put
sealant around nipple and base
when installation is complete.
2.
Choose a secure mounting
surface with sufficient strength
to reliably hold the speaker.
Mounting bracket accom-
modates screwing, through-
bolting and strapping
installation options.
4.
Thread safety cable
(included) through mounting
screw and securely fasten
mounting plate to surface
(user must supply fasteners).
Mounting bracket may also
be strap-mounted to pole or
appropriate anchor point.
The max. strap width is
0.5 in / 12.7 mm.
7.
Insert four-pin Euroblock
connector into jack on rear of
speaker. Connectors are keyed
for polarity.
9.
Select the desired setting
on the rear-mounted tap switch.
Use table on page 1 to choose
appropriate tap number based on
system voltage, and desired power
draw.
6.
Connect signal wire to
four-pin Euroblock plug. Use
inside positive and negative
inputs for signal wire input.
For daisy chaining, use outside
positive and negative terminals
to connect additional speakers.
Tighten unused terminal screws.
10a.
When mounting the
speaker, ensure that the
mounting rod in the speaker
securely engages with the
mounting prongs on the bracket
arm.
8.
Clip snap-link safety cable to
eyebolt on back of cabinet.
Install Instructions For:
SM890i
1.435.647.9555
|
800.647.TUBE
|
www.soundtube.com
11.
Position speaker at the
desired angle and secure with
the clamp knob. As a security
feature, an included 5 mm
Allen hex key is required for
loosening the clamp knob and
readjusting the speaker position
angle.
12.
Done!
3.
For proper bracket and
plate orientation, pay special
attention to the prongs on the
bracket arm and ensure that
they point toward the direction
of the desired speaker position.
Vertical
Speaker
Horizontal
Speaker
10b.
When properly inserted,
bracket arm prongs will be fully
engaged with the mounting rod
in the speaker cabinet.
Strap mount
location x4
SM890i
2
1
3
4