6535 jd7138 v2 10-18.pdf, Step8, Step9 – Thunder Tiger SPARROWHAWK VX Malntenance Manual User Manual
Page 11: Step13, Step17 step18, Step19, Step10, Step11, Step20, Step12
Pay close attention here
注意組裝步驟
Ensure smooth, non-binding movement when assembling
確認組件靈活度
Pay close attention here
注意組裝步驟
Apply C.A Glue
使用快乾膠黏合
Assemble as many times as specified
依指示組裝所需數量
Drill holes with the specified diameter
依標示尺寸鑽孔
Pay close attention here
注意組裝步驟
Pay close attention here
注意組裝步驟
Pay close attention here
注意組裝步驟
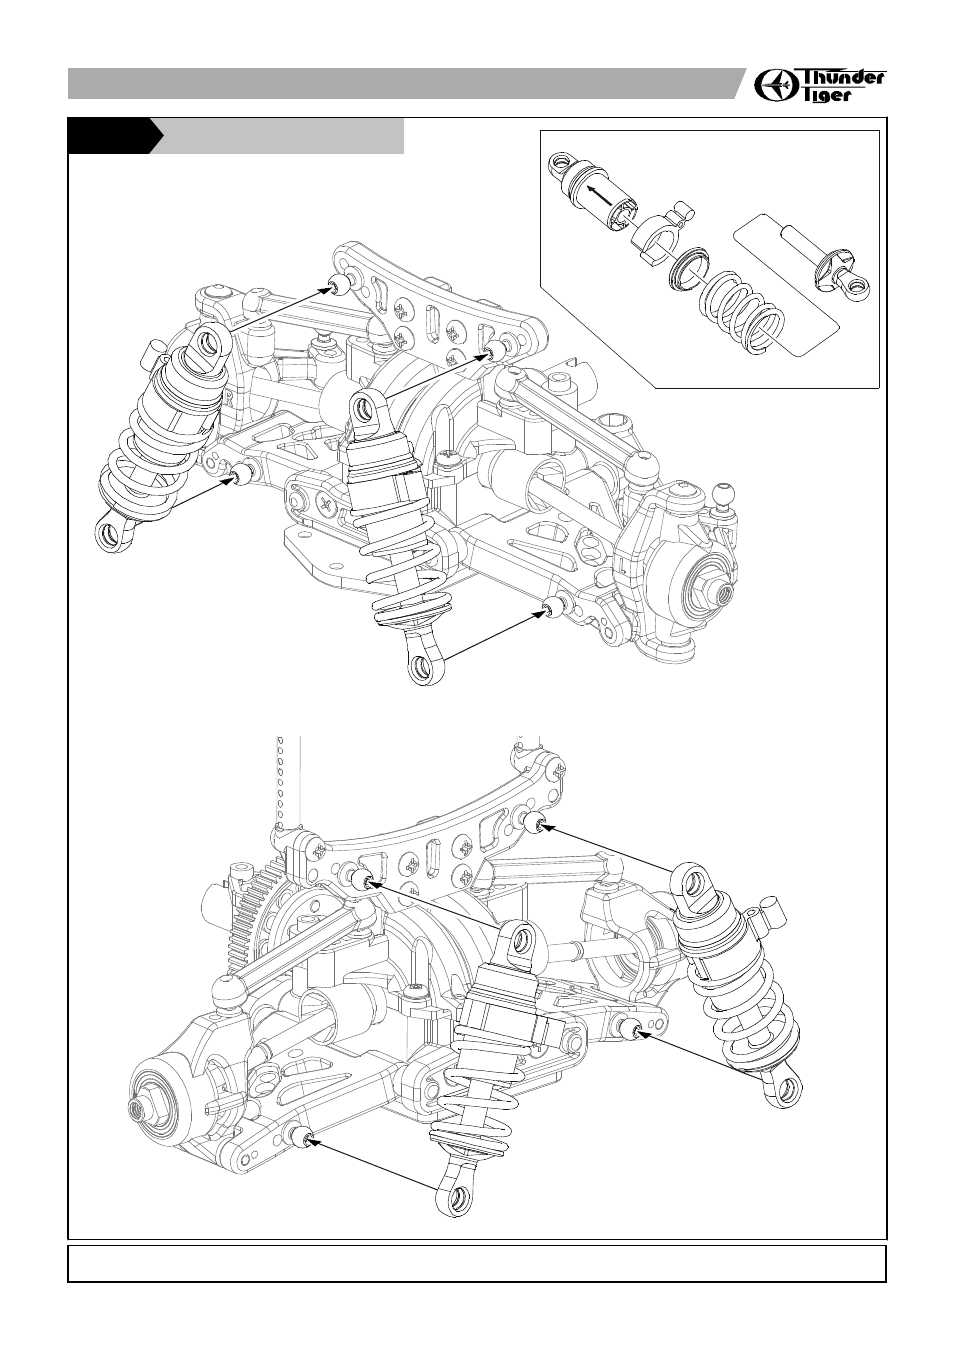
〈Front Shock Absorbers〉
〈將前避震器與前擺臂懸吊結合〉
〈Rear Shock Absorbers〉
〈將後避震器與後擺臂懸吊結合〉
11
Apply grease
使用潤滑油膏(黃油)
Swing Post Screw
轉向曲柄固定螺絲
5x8x2.5mm
Bushing
襯套
6mm(L)
Ball Stud
球頭座
3
2
4
Note direction
注意組裝方向
Rear
此面朝後
Top View
上視圖
Side View
側視圖
Rear
此面朝後
Marked "ES-ST"
標示 "ES-ST"
Marked "ES-ST"
標示 "ES-ST"
12
13
〈Front Suspension〉
〈將前擺臂懸吊組結合於底板上〉
3x10mm
F/H Philip Machine Screw
平頭十字螺絲
2
3x10mm
F/H Philip Machine Screw
平頭十字螺絲
3
14
15
3x8mm
BT Philip Machine Screw
圓頭十字螺絲
5
3x18mm
BT Philip Machine Screw
圓頭十字螺絲
4
3x12mm
Socket Hex Machine Screw
內六角固定螺絲
2
2
Body Clip
車殼R型插銷
3x8mm
F/H Philip Machine Screw
平頭十字螺絲
3
2
5
Body Clip
車殼R型插銷
3x10mm
F/H Philip Machine Screw
平頭十字螺絲
Adjust height to suit body.
調整車殼R型插銷來安裝車殼
16
Install the tire onto the wheel. Glue the tire to the wheel with instant glue in four spots around the tire on both sides.
將輪胎(含內襯)與輪轂結合並在胎緣內側點上快乾膠黏合。
Warning: Follow the adhesive instructions for proper use and safety. Wear eye and hand protection.
注意!!!
使用快乾膠時請注意安全,最好戴上手套及護目鏡以避免危險。
Hint
組裝提示
4x12mm
Socket Hex Machins Screw
內六角固定螺絲
4
4
3x5mm
Washer
墊圈
Tire insert foam
輪胎海綿內襯
17
Shock Absorber 避震器組
STEP8
Steering Bellcrank 轉向曲柄組
STEP9
Steering Bellcrank 轉向曲柄組
STEP9
Steering Servo 轉向伺服機
STEP13
Installation of Motor Mount 結合馬達組
STEP14
STEP15
STEP16
Installation of Battery Pack 安裝電池
STEP17
STEP18
Front Bumper 前防撞板 / FrontBody Mounts 前車殼支柱
STEP19
Tire/Wheels 輪胎及輪轂
STEP19
Tire/Wheels 輪胎及輪轂
3x10mm
F/H Philip Machine Screw
平頭十字螺絲
M3 Lock Nut
止鬆螺帽
〈Rear Suspension〉
〈將後擺臂懸吊組結合於底板上〉
1
1
M3 Lock Nut
止鬆螺帽
2
3x14mm
F/H Philip Machine Screw
平頭十字螺絲
3x10mm
F/H Philip Machine Screw
平頭十字螺絲
1
2
Installation of Rear End 結合後擺臂懸吊組
STEP10
Installation of Front End 結合前擺臂懸吊組
STEP11
10
Installation of Top Plate 結合二樓板
Receiver & E.S.C 接收機與速控器
18
STEP20
Body Shell 車殼
The
tires
and
wheels
in
your
kit
may
vary
from
those
shown
in
the
pictures.
Thunder
Tiger
is
constantly
working
to
upgrade
our
kits
and
we
reserve
the
right
to
change
specificatioins
without
prior
notice.
本套件所附之輪胎與輪轂可能跟圖示有所差異。
因產品後續之設計研發或功能不斷改善之原因,
我們將保留產品規格變更權利,不再另行通知使
用者。
3x8mm
BT Self-Tapping Screw W/washer
圓頭十字墊圈螺絲
4
2.6x10mm
F/H Self-Tapping Screw
平頭十字螺絲
2.6x6mm
F/H Self-Tapping Screw
平頭十字螺絲
6mm(S)
Ball Stud
球頭座
Marked "T" for Thunder Tiger stock servo. Find the
appropriate servo horn mount for your servo from the
chart below. Install the servo horn arm with the stock
mounting screw.See the graphic for the correct neutral
angle.
標示"T"搭配原廠伺服幾使用。請參考列表找尋適合各家
廠牌伺服機所使用之拉桿座,然後配合拉桿鎖附於伺
服機上。
拉桿角度請依圖示調整於中立位置
(約90度)。
1
1
2
Marked "T"
標示 "T"
Back
背面
Steering Servo Type
轉向伺服機
ACE R/C S1903/ S2008MG
ACE R/C DS1015/DS1313
Airtronics / Sanwa / JR / KO
Futaba
Hitec
Servo Horn Mount
拉桿座
T
T
A
T
H
Neutral
中立點
4x10mm
Socket Hex Machins Screw
內六角固定螺絲
1
90°
Steering Servo 轉向伺服機
STEP12
Spur Gear 大齒盤齒數
Pinion Gear 馬達驅動齒數
Final Gear Ratio 最終傳動齒比
Max. Speed 極速
Acceleration 加速
Running Tine 行駛時間
Fits Chassis
適用底板
Fits Upper Deck 適用二樓板
Fits Motor MNT.
適用馬達固定座
Adjust the gear ratio by changing pinion gears according to the size of the track and other conditions.
藉由更換不同大齒盤齒數與馬達驅動齒數之搭配組合來調整車輛最終傳動齒比以適應不同賽道及實際使用環境之需求。
1. Sparrowhawk VX at present comes with 72T spur gear and 26T pinion gear.
Thunder Tiger also provides 19T/20T/21T/22T/23T/25T racing pinion gears as optional parts.
For other gear ratios, please find optional gears with standard 48pitch from the aftermarket parts.
1. 本車標準齒數比為 72T/26T,
雷虎科技亦另外提供19T/20T/21T/22T/23T/25T 之改裝馬達齒供玩家改裝需求。請注意!
如需要更多競速齒比搭
配,在選購市售改裝馬達齒及大齒盤時需選購標準48P齒距之改裝件方能安裝於本車款上。
2. Replace standard parts with optional chassis, upper deck and motor mount when using 30T/32T/35T pinion gears.
2. 換裝30T/32T/35T馬達驅動齒時需更換改裝套件之底板、二樓版及馬達固定座。
Slow 慢
Good 佳
Long 長
Fast 快
Bad 差
Short 短
72(48 Pitch齒距)
69(48 Pitch齒距)
STD. 標準件
OPT. 改裝件
Gear Ratio Formula
齒輪比計算公式
Spur Gear Teeth
Pinion Gear Teeth
( )
X2.6154 :1
7.2V Stick Pack Battery
7.2V條狀電池
Body Clip
車殼R型插銷
4
2
Round Tap Screw
圓頭十字螺絲
OPT. 改裝件
OPT. 改裝件
STD. 標準件
STD. 標準件
★
※
Electronic speed
control
速控器
Receiver
接收機
5.6X3mm
Arm Washer
墊圈
3X4mm
BT Philip Machine Screw
圓頭 字螺絲
Steering Servo Type
轉向伺服機
ACE R/C S1903/ S2008MG
ACE R/C DS1015/DS1313
Airtronics / Sanwa
Futaba
Hitec
Servo Horn Mount
拉桿座
T
T
A
T
H
2
1
Motor Pinion Gear 馬達驅動齒
STEP12
Hint
組裝提示
★
★
※
Note to insert a washer into the gap to avoid breakage of
motor mount caused by overtighten screw.
注意確實裝入墊圈,以保護馬達固定座因固定螺絲鎖附過緊
而造成斷裂
Finally tighten the motor mount
screw.
調整完成後再鎖附螺絲
Note the washer is installed before re-tightening
the screw.
鎖附馬達固定座螺絲前,再次確認墊圈確實安裝
3x6mm
BT Philip Machine Screw
圓頭十字螺絲
1
Note the size of screw. Too long screw
will touch the driveshaft cup.
注意螺絲尺寸,過長會頂到傳動軸接杯
Turn the motor to find proper gear mesh, the
spur gear should spin smoothly after adjusting.
轉動馬達調整最佳齒隙
3x14mm
F/H Philip Machine Screw
平頭十字螺絲
1
3x12mm
F/H Philip Machine Screw
平頭十字螺絲
2