Netw ork configuration, Ser ver configuration – Visara iCON-1T Quick Start User Manual
Page 2
After po
w
e
ring on the ICON-1T
, a Message
windo
w will appear indicating that the ICON
Ser
v
er is star
ting.
Clic
k
OK
.
The
Visar
a ICON Session Manager windo
w
will open.
If y
ou are po
w
e
ring on y
our ter
minal f
or the first
time
, y
ou will need to configure the ICON-1T
with netw
or
k, ser
ve
r, and user inf
or
mation bef
ore
connecting to a ser
ve
r session.
Netw
ork Configuration
The ICON-1T configur
ation prog
ram can be
star
ted b
y
choosing
Settings
and then
General
from the Star
t Men
u.
On the Netw
or
k panel, enter
Local Host
Name
and
Domain Name
f
or Ether
net.
The
IP Address
, Subnet Mask and Def
ault
Gate
w
a
y m
ust be entered unless pro
vided
b
y
DHCP
. Select
Rene
w une
xpired DHCP
lease
to allo
w an IP address to be rene
w
e
d
if the DHCP lease has not e
xpired.
Clic
k
Appl
y
to accept the settings
, or
Exit
to ignore the changes and e
xit the
configur
ation prog
ram.
The ICON-1T m
ust
be shut do
wn and restar
ted f
or the IP
address to become eff
ectiv
e
.
Ser
ver Configuration
Use the
Netscape
w
e
b
b
ro
wser to complete
the ICON-1T ser
v
er configur
ation.
L
og in
to the ser
v
er configur
ation utility
b
y
selecting
Pr
ograms
and then
Netscape
from the Star
t
Men
u.
The bro
wser has been pre-configured
with the address required to open the main
page of the ICON-1T Configur
ation Utility
(http://127.0.0.1).
Clic
k
Administrative Functions
. Y
ou will be
prompted f
or the administr
ator pass
w
ord.
(Cer
tificate related windo
ws ma
y be
displa
y
ed bef
ore y
ou are ask
ed f
or a
pass
w
ord.)
The def
ault pass
w
ord is
admin
,
and is case sensitiv
e
. Enter pass
w
ord and
clic
k
Submit
.
Configure Sessions:
Clic
k
Configure Sessions
on the ICON-1T
Configur
ation Utility men
u.
1.
Session Name
- Enter a unique name f
o
r
the ne
w session.
2.
T
winax Ad
dress
- Select the twinax
address to use f
or this session, 0 - 6.
This
address m
u
st not be used f
or more than
one session on the same twinax connection.
3.
Displa
y T
ype
-
Select the displa
y y
ou wish
to em
ulate
.
4.
Sharing -
Select from the f
ollo
wing:
- No Sharing:
Once the session is activ
e
,
it ma
y not be accessed b
y
another user
.
- Sharing,
no arbitration:
The
session
ma
y be shared b
y
m
ultiple users
. With
no
arbitration
more than one user ma
y use
the k
e
yboard at the same time
.
- Sharing,
with arbitration:
The
session
ma
y be shared b
y
m
ultiple users
.
With
arbitration
only one user has control of the
k
e
yboard.
The arbitration timeout
deter
mines ho
w man
y
seconds will lapse
betw
een the last k
e
ystrok
e of one user and
the time that control of the k
e
yboard is
released to others
.
- Sharing,
with arbitration and o
verride:
In addition to the abo
v
e
,
S
haring with
arbitration
, one user is ab
le to tak
e
control
of the k
e
yboard b
y
selecting
Override
Loc
k
out
from the
K
e
yboar
d
men
u on the
em
ulation screen.
- 5 -
- 4 -
- 3 -
- 2 -
The configur
ation instr
uctions that f
ollo
w are
for an initial quic
k setup only
. The
ICON-1T
Single S
tation Console T
e
rminal User
’s
Manual
should be consulted f
or fur
ther
configuration instr
uctions
.
This manual is
a
v
ailab
le b
y
clic
king Help from the ICON-1T
Star
t men
u
.
F
or the most current v
ersion of the User’
s
Manual, visit the Suppor
t center at
http://www
.visar
a.com.
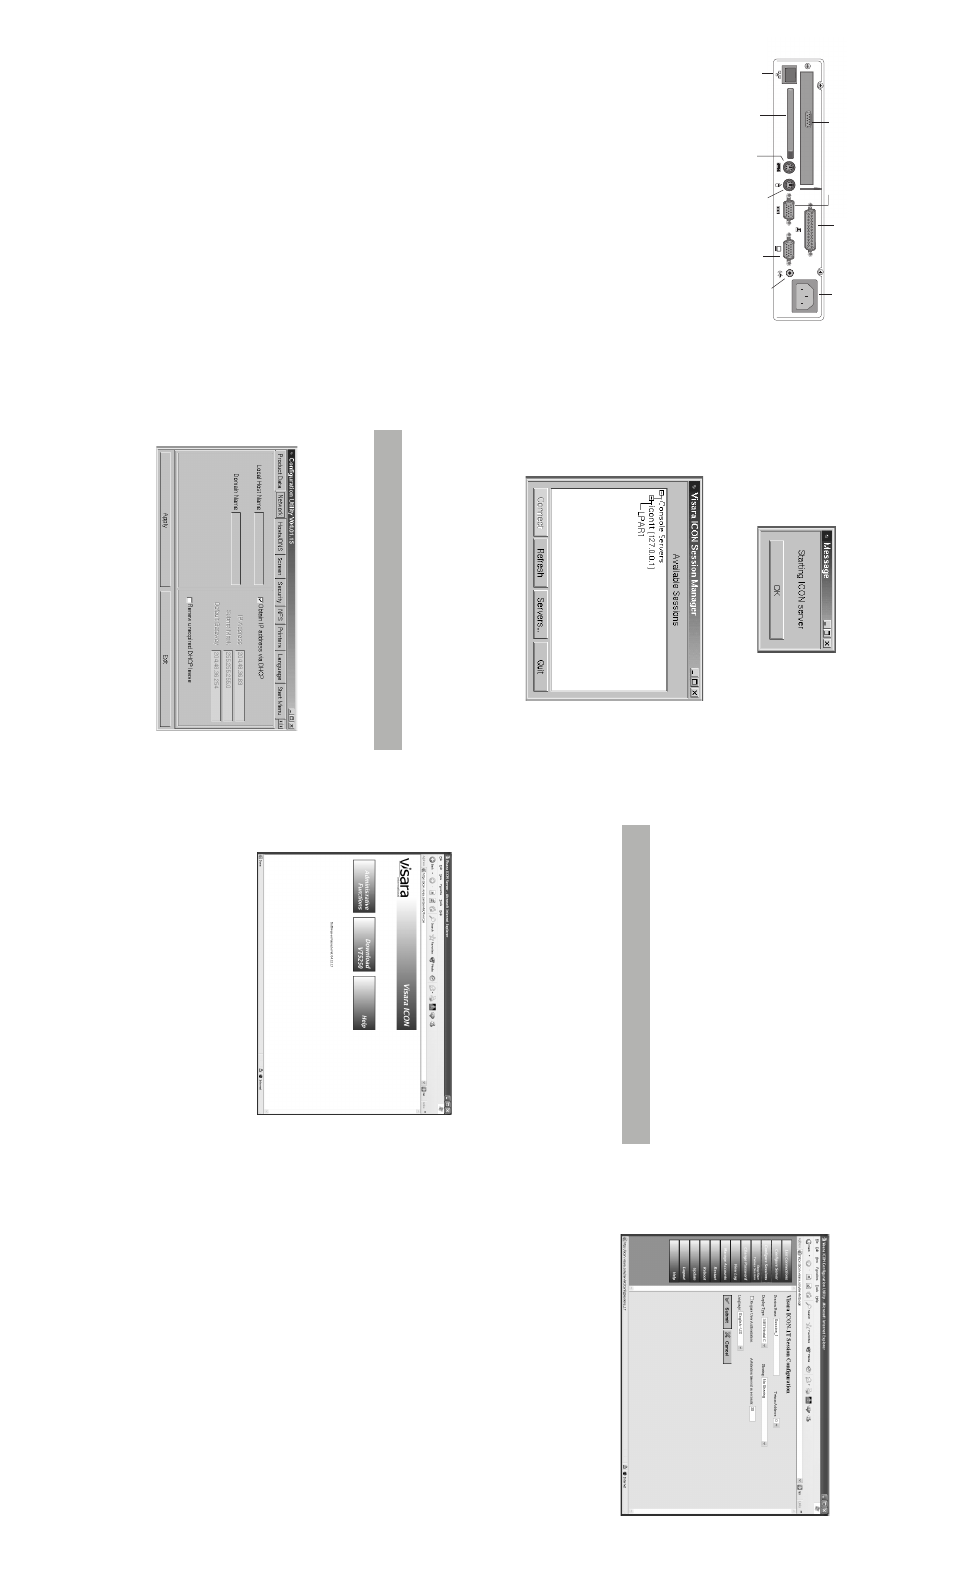
•Speaker Out
Connection f
or headphones or speak
ers
.
•Ethernet Connector
This connector can be used to connect the b
uilt-in 32-
bit 10/100 Ether
net netw
or
k LAN Controller to a host or
Hub
.
•T
winax Connector
Connect the 9-pin end of
T
winax
T
-connector cab
le
.
•PCMCIA Slot
Accommodates
T
ype I or
T
ype II PCMCIA cards
.
•PS/2 K
e
yboar
d Connector
This connector is f
or a standard k
e
yboard using a PS/2
plug (mini DIN).
•PS/2 Mouse Connector
This connector is f
or a mouse using a PS/2 plug
(mini DIN).
•V
GA Connector
This connector is f
or displa
ying on a standard
V
G
A
compatib
le de
vice
.
•Serial P
o
rt
Connector
16550U
AR
T connection f
or one ser
ial de
vice
•P
arallel P
o
rt
Connector
This connector can be used f
or pr
inter attachment.
Rear V
iew
Po
wer
VG
A
Connector
Speak
er
Out
PS/2 Mouse
PS/2 K
eyboard
PCMCIA
Slot
P
arallel Port
Serial Port
T
w
inax Connector
Ethernet